
- Joined
- May 13, 2014
- Messages
- 3
- Reaction score
- 0
- Points
- 0
Hi everyone i am new to this forum and thank everyone who have helped me in the past with projects!
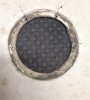
I have a 1989 Seafarer 226 and I am in the middle of what seems to be a very common problem a "soft floor". Below are some images of before and mid way through the current project to put a new plywood core in the floor panel.
Currently i have it all removed and almost completely stripped down (below)
Any further advice about the next steps i would absolutely appreciate it!
BUT the reason i am seeking help is about the damage the soft floor flexing has done to the area around access hatch screws (image below) and how i should deal with repairing this and if possible a step by step DIY tutorial of some sort.
As you can see there are three small through cracks and stress cracks surrounding them.
I want to fix this correctly or obviously it will just leak directly back through and occur again - BUT I DO NOT have much of experiencing repairing nonskid stress/through cracks in gel-coat surfaces like this. This floor panel is located in the stern of the boat and is directly over the Main Gas Tank panel.
Thank you very much to everyone in advance...
Attachments
-
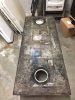 photo 1(9).JPG1.2 MB · Views: 2,569
 -
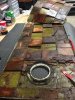 photo 2(9).JPG1.4 MB · Views: 2,574
 -
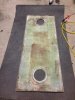 photo 3(5).JPG1.4 MB · Views: 2,571
 -
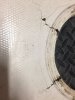 photo 2(10).JPG309.6 KB · Views: 2,566
 -
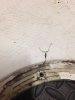 photo 3(6).JPG247.5 KB · Views: 2,565
 -
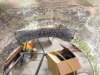 photo 4(3).JPG441.1 KB · Views: 2,567
 -
 photo(15).JPG471.9 KB · Views: 2,565