Replacing Cockpit Floor 241/240 Weekender/Offshore

lime4x4

Well-Known Member
Joined
Mar 24, 2011
Messages
339
Reaction score
2
Points
16
Location
Palmerton, Pa
My live well and bait tank are on the port side. The drains are almost next to the walk way in the middle of the boat.
 

lime4x4

Well-Known Member
Joined
Mar 24, 2011
Messages
339
Reaction score
2
Points
16
Location
Palmerton, Pa
Where i have the black circles is where i have 2 drains that i would like to replace
 

Attachments

  • drains.png
    drains.png
    232 KB · Views: 4,049

DennisG01

GreatGrady Captain
Joined
Sep 1, 2013
Messages
6,860
Reaction score
1,218
Points
113
Location
Allentown, PA & Friendship, ME
Model
Offshore
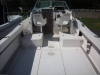
Got it. Yup - same boat here so same configuration. The left circle is the T and the right one, I assume (haven't seen it personally, yet) is a 90*. I'll take a closer look - but it might mean another access plate either in the middle of the two drains (might be too tight for that, though) or possibly from the fuel tank compartment. Although, I'd leave cutting a hole in the main stringer as a last resort. Maybe a plate in the floor, instead.
 

lime4x4

Well-Known Member
Joined
Mar 24, 2011
Messages
339
Reaction score
2
Points
16
Location
Palmerton, Pa
Well i'm not gonna remove the fuel tank and cut a hole in the stringer. I'm thinking of installing a rectangular access panel on the floor in front of the tanks to gain access
 

DennisG01

GreatGrady Captain
Joined
Sep 1, 2013
Messages
6,860
Reaction score
1,218
Points
113
Location
Allentown, PA & Friendship, ME
Model
Offshore
Sorry for the delay in posting more pictures. It's all done and feels like I'm walking on concrete - VERY solid. ALL wood (marine ply) was given a few coats of epoxy before installing. Overkill, but I'd rather do it that way for the long run. Here's some more pics:

These are of rebuilding the aft bulkhead - the one directly behind where a aux fuel tank would go (and in front of where a stern drive would've been.

This one is of the main "new" piece (cut it into two to slip it in and then glassed the seam). Looking aft:


This is the same piece, but looking forward (and after I trimmed the extra little bit of original glass that stuck up over the wood). I had left it in place since there was no reason to remove it.

This is what I assembled to give this bulkhead more strength. The second and third pics are looking aft, then forward. All edges where tabbed into the surrounding glass.


DennisG01

GreatGrady Captain
Joined
Sep 1, 2013
Messages
6,860
Reaction score
1,218
Points
113
Location
Allentown, PA & Friendship, ME
Model
Offshore
These are rebuild pictures of the main body of the floor.

This is the first piece of wood that was laid down. How nice it was to be able to step on the floor again! The original "opening" above the aft bilge was wider since this boat was originally a stern drive. There was also NO structure running port-starboard directly aft of this opening (where that thin strip of wood is now). You can also see the extra lateral support I built into this opening - the piece directly under the upper hatch (could, well "should", not have stepped on the hatch without this) and the other one below it.


This is the same section of floor with old non-skid "skin" epoxied back down. The lip that you see running around the epoxied wood is there both for extra support and also the start of the "rain gutter" (using fiberglass angle) that I built around both this area and the middle floor hatch (where an aux fuel tank would be). This was plumbed into the port-side scupper drain.


These are the fairing of the floor to make it level and smooth and using fiberglass angle to start the mockup for making a brand new hatch for that area.


DennisG01

GreatGrady Captain
Joined
Sep 1, 2013
Messages
6,860
Reaction score
1,218
Points
113
Location
Allentown, PA & Friendship, ME
Model
Offshore
These are the building of the new hatch. Starting with the fiberglass angle "mock-up" that was seen in the previous post, then moving that mock-up to a level work surface. I pre-cut the glass and dry-fitted everything on top of a piece of tightly stretched plastic drop cloth that I also applied mold release wax to. The first step (hard to see in pictures since it became translucent) was to lay down and wet out the "top skin" of the hatch. Then lay in the angle, then wood core, then layers of glass for the bottom skin. The last picture shows the use of folding legs to create a table.


I should caution that I got a little too confident and laid the wood core down without first drilling any pressure release holes. It was about 1am at that point and only 2 days before I had to have everything finished to take the boat to Maine. In other words, I got lazy. The next day, when I popped the hatch off the work surface, there were huge air bubbles. I had to cut/grind them out, then reapply more epoxy/glass and then fair it. Not especially hard, but kind of a bummer.
 

DennisG01

GreatGrady Captain
Joined
Sep 1, 2013
Messages
6,860
Reaction score
1,218
Points
113
Location
Allentown, PA & Friendship, ME
Model
Offshore
Here are some final pictures. The first one is what the boat looked like when I got it. Note the large piece of wood just set in place to cover the hole. I still need to either reattach the gunnel trim or maybe make and install some coambing pads.


Sorry - there's some dirty footprints here!


lime4x4

Well-Known Member
Joined
Mar 24, 2011
Messages
339
Reaction score
2
Points
16
Location
Palmerton, Pa
Doesn't look bad at all. Brings back memories of doing the searay. Now i feel like going and buying a boat to restore NOT....Don't miss the itching...lol
 

DennisG01

GreatGrady Captain
Joined
Sep 1, 2013
Messages
6,860
Reaction score
1,218
Points
113
Location
Allentown, PA & Friendship, ME
Model
Offshore
Thanks, John. I had to keep reminding myself that it doesn't have to be "pretty" (since that takes more time - and that was something I didn't have). Maybe I'll come back sometime and paint the non-non-skid areas (perimeter) white sometime. The main focus, though, was making it structurally sound and long-lasting. The center hatch that I re-cored out of rigid foam insulation was a "let's see what happens" kind of thing. But I didn't want to take any chances on the floor. The hatch is easy to fix. But, the hatch has been doing amazingly well.
 

lime4x4

Well-Known Member
Joined
Mar 24, 2011
Messages
339
Reaction score
2
Points
16
Location
Palmerton, Pa
It;s functional. I got bashed on another boating site for having both engine cowlings and outboard bracket line-xed. I bought the grady to fish and crab. after fishing for 12 hours the last thing i want to do is spend another 3 to 5 hours cleaning and making it shine like new. Now it just gets a quick hose off and she's done.