I got all 4 out without cutting the deck. I wound up ordering the exact same ones I took out . I’m so over budget right now I’m just trying to wrap it up and get it in the water.

You are using an out of date browser. It may not display this or other websites correctly.
You should upgrade or use an alternative browser.
You should upgrade or use an alternative browser.
Replacing cockpit floor drains
- Thread starter ocdansar
- Start date
Capt. Bruno
New Member
- Joined
- May 15, 2020
- Messages
- 3
- Reaction score
- 3
- Points
- 3
- Age
- 60
- Model
- Express 330
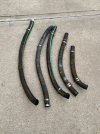
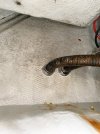
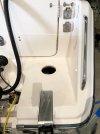
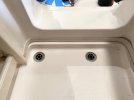
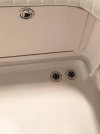
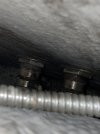
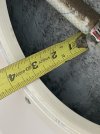
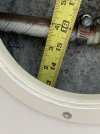
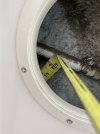
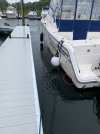
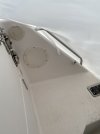
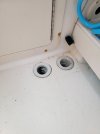
In June 2019, I bought a 2007 Grady 330 Express with 150 hours on the original engines and boat. I had the boat surveyed and I knew that I had issues with the hoses below deck. I addressed the hoses in May 2020 and also took the opportunity to get rid of the plastic deck drains and use the newer stainless drains. Bought them on eBay. There are no check valve/ball in them - not needed as scuppers are much lower and have a check on them (also replaced the rubber check). My main concern was the hoses so I had to get to both ends of the hoses, the drains and the scuppers. I went through a lot of picks on boattrader and spotted a 330 Express that had some deck armor inside and outside and I noticed that they had deck access plates just outside the port transom door and another one on the starboard side. I installed deck access plates, went with the same exact pop-up that Grady uses in the engine well. You can get screw-in or just covers. From these access plates, I could reach the deck drains and the scuppers and replace the deck drains and the hoses at the same time and now I have access to service them if needed. I actually found a snapped hose clamp laying in the hull. Here are pics of new drains, access holes, the rusted and cracking drain hoses and broken clamp. It will take two people, one with an arm in the hull and one on the deck. The stainless through hulls were in very good shape and didn't need to be replaced but if needed, they can be reached from the new deck access plates. All hose clamps were replaced with the ABA style. Hope this helps someone.
Attachments


Thanks Capt Bruno- You might have saved me from cutting open my hull on the port and starboard sides!! (as the local dealer recommended) I was debating on whether or not to cut an access in the deck like you did because I wasn't sure I could reach the through hulls- but you proved it can be done! Did you use a Dremel or a knife and dikes to remove the hose once the clamp was removed? Would you change the location of the access hole one way or another- or was that spot perfect? Any recommendations are appreciated!In June 2019, I bought a 2007 Grady 330 Express with 150 hours on the original engines and boat. I had the boat surveyed and I knew that I had issues with the hoses below deck. I addressed the hoses in May 2020 and also took the opportunity to get rid of the plastic deck drains and use the newer stainless drains. Bought them on eBay. There are no check valve/ball in them - not needed as scuppers are much lower and have a check on them (also replaced the rubber check). My main concern was the hoses so I had to get to both ends of the hoses, the drains and the scuppers. I went through a lot of picks on boattrader and spotted a 330 Express that had some deck armor inside and outside and I noticed that they had deck access plates just outside the port transom door and another one on the starboard side. I installed deck access plates, went with the same exact pop-up that Grady uses in the engine well. You can get screw-in or just covers. From these access plates, I could reach the deck drains and the scuppers and replace the deck drains and the hoses at the same time and now I have access to service them if needed. I actually found a snapped hose clamp laying in the hull. Here are pics of new drains, access holes, the rusted and cracking drain hoses and broken clamp. It will take two people, one with an arm in the hull and one on the deck. The stainless through hulls were in very good shape and didn't need to be replaced but if needed, they can be reached from the new deck access plates. All hose clamps were replaced with the ABA style. Hope this helps someone.
I'm hoping I can reach the generator hose on the starboard side as well since it is a few inches higher and a few inches forward of the scupper drain through hulls...keeping my fingers crossed!!
Best Regards, Dan
Capt. Bruno
New Member
- Joined
- May 15, 2020
- Messages
- 3
- Reaction score
- 3
- Points
- 3
- Age
- 60
- Model
- Express 330
You can reach the generator hose though the deck plate as well. I don’t have particularly long arms but I managed to reach everything where the plates are located. I had someone on deck to screw in the drains while I held the bottom side.. I used a box cutter to cut the hoses and when you cut enough rubber, most of the hoses can then be twisted free. On stubborn ones, after using the box cutter to where I could see the reinforcing wire, I cut the wire with a pair diagonal wire cutters and then twisted the hose free. I bought a hole saw on Amazon to cut the holes for deck plates - be very careful for your safety. In my case saw went through the port side very easily but the starboard deck is going to be about twice as thick as the port and that marine plywood gums up the saw. The hole saw is so big that if it gets stuck, it is going to rip the drill out of your hands - keep body parts clear of the drill in case it gets away. I was using a drill will a handle on the side but it is lot of torque if the hole saw hangs. Patience and frequently clean the hole saw. There is tall young guy in my marina and if I ever cannot reach something (like hose on the bottom of the livewell) I get him to assist for a few minutes and me makes it look so easy. For these decks plates, I didn’t have any issues reaching anything. You want the holes to be where you can reach the drains and the ports on the sides of the boat. Good luck.
Flot
Well-Known Member
- Joined
- Dec 1, 2018
- Messages
- 171
- Reaction score
- 46
- Points
- 28
- Age
- 49
- Model
- Express 330
I was able to do my port side on my 330 without any cutting, remove the batteries and the battery/fuel panel (you can just fold it down onto the deck, don't need to disconnect anything, the fuel lines should have enough slack.) You can then lay through that square opening and access everything - uncomfortable but it is definitely possible to do both hoses and deck drains this way.Thanks Capt Bruno- You might have saved me from cutting open my hull on the port and starboard sides!! (as the local dealer recommended) I was debating on whether or not to cut an access in the deck like you did because I wasn't sure I could reach the through hulls- but you proved it can be done! Did you use a Dremel or a knife and dikes to remove the hose once the clamp was removed? Would you change the location of the access hole one way or another- or was that spot perfect? Any recommendations are appreciated!
Starboard side, I couldn't figure out how to do it without cutting something. I am trying very hard not to put that pie plate into the transom step. I'd be willing to put one on the SIDE of the transom wing if possible, but as a diver I'd prefer to keep the floor clean if I can help it. Might end up throwing in the towel and doing it, people say it is possible without.
Flot- I was very hesitant in cutting anything into the deck either so I emailed Grady and their response was to cut an access hole in the transom wing (starboard side) as you had said but my 2007 already has an access hole that I can barely get my wrist into because its so shallow. She may have been referring to a different model year that has more depth behind the access plate. (Picture attached)I was able to do my port side on my 330 without any cutting, remove the batteries and the battery/fuel panel (you can just fold it down onto the deck, don't need to disconnect anything, the fuel lines should have enough slack.) You can then lay through that square opening and access everything - uncomfortable but it is definitely possible to do both hoses and deck drains this way.
Starboard side, I couldn't figure out how to do it without cutting something. I am trying very hard not to put that pie plate into the transom step. I'd be willing to put one on the SIDE of the transom wing if possible, but as a diver I'd prefer to keep the floor clean if I can help it. Might end up throwing in the towel and doing it, people say it is possible without.
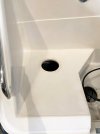
As far as the port side, I did remove the battery/fuel panel and the only thru-hull I can see is the single drain for the aft bilge. The scupper drains are near the water line and unless the batteries are sitting on a removable shelf, I'm not sure I can reach the thru-hull fittings... (pic attached)
Attachments
Flot
Well-Known Member
- Joined
- Dec 1, 2018
- Messages
- 171
- Reaction score
- 46
- Points
- 28
- Age
- 49
- Model
- Express 330
Yikes, I agree that 3" is not much to work with. I'll have to measure twice on that side. I do wonder if that hatch on your boat were lower, if there's a significant widening of the space. (although probably not)
The battery shelf is not removable, but the batteries are. Once removed, I found it easy enough to lay down on the deck, shimmy into that square hole, and I could reach both deck drain through hulls to replace the hoses.
The battery shelf is not removable, but the batteries are. Once removed, I found it easy enough to lay down on the deck, shimmy into that square hole, and I could reach both deck drain through hulls to replace the hoses.
Then I shall give it a shot- anything to avoid drilling holes! Here's a pic of the starboard access hole-it's pretty low so even if I could reach the closer thru-hulls, I'd never reach the forward ones...Yikes, I agree that 3" is not much to work with. I'll have to measure twice on that side. I do wonder if that hatch on your boat were lower, if there's a significant widening of the space. (although probably not)
The battery shelf is not removable, but the batteries are. Once removed, I found it easy enough to lay down on the deck, shimmy into that square hole, and I could reach both deck drain through hulls to replace the hoses.
This is my first Grady and love her to death but lack of access is (hopefully) the only thorn...
Attachments
Flot
Well-Known Member
- Joined
- Dec 1, 2018
- Messages
- 171
- Reaction score
- 46
- Points
- 28
- Age
- 49
- Model
- Express 330
From your photo, I feel like I could put that same access plate about 5-6" lower and see what happens. Still not ideal but might save me cutting the floor. Of course, if I'm wrong, then I have two pie plates.Then I shall give it a shot- anything to avoid drilling holes! Here's a pic of the starboard access hole-it's pretty low so even if I could reach the closer thru-hulls, I'd never reach the forward ones...
I've torn open most of my 330 in the last 2 years since I bought it, and can honestly say that while it's not perfect, this is the only major inconvenience I've run into. All the other systems have generally had good access. OTOH I've ripped out hundreds of feet of badly run wires, seems even the easy access that was available was too much hassle for various installers over the years, which blows my mind. If there is a panel, hatch, drawer, or appliance - remove it and there is access to something behind it.
BTW someone above talked about screw in vs push in pie plates - you should always be using the screw in variety with a gasket for watertightness. Plus if the transom should ever get submerged, a push-in plate could pop out from air pressure and create an 8" opening - a screw in would not.
ROBERTH
GreatGrady Captain
- Joined
- Jun 10, 2006
- Messages
- 1,367
- Reaction score
- 136
- Points
- 63
- Location
- Greenville, NC
- Model
- Sailfish
Regarding the pie plates screw in vs snap in...on my bracket model, it had 3 plates that were snap in. They all leaked and always had water in the bracket I had to drain. I installed the screw in types and have yet to drain any water out since. They do seal as they should since you can get them tight enough.
mleads310
GreatGrady Captain
I know this may be slightly different as I have a 282, but I just cut an 8" hole over the weekend on the starboard side wing. I went as close to the deck as I could and as close to the transom door as I could. It definitely widens up a lot. I have about 10 inches depth to work with. I actually stuck my whole head inside to look around.
Flot
Well-Known Member
- Joined
- Dec 1, 2018
- Messages
- 171
- Reaction score
- 46
- Points
- 28
- Age
- 49
- Model
- Express 330
I did the same - but unfortunately I could barely fit my hand inside. There was no way I was replacing hoses through that hole.I know this may be slightly different as I have a 282, but I just cut an 8" hole over the weekend on the starboard side wing. I went as close to the deck as I could and as close to the transom door as I could. It definitely widens up a lot. I have about 10 inches depth to work with. I actually stuck my whole head inside to look around.
I finally decided I only had two choices, either remove the swim platform or cut the side of the boat. I went through the side, replaced all 3 thru hulls (two drains plus generator) and hoses. This worked out since the boat is going in for paint next week - otherwise I would have done the swim step.
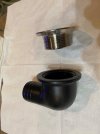
Were you able to pick that drain up from a local store? I'm having a hard time finding one for my Advance. I'm guessing they're all about same diameter 1 1/2". That looks much nicer than the plastic one. Any links to sites would be fantastic. I'll try to upload a picture of mine.This is the one from factory tour that got my attention. Ordered from dealer as soon as I got done with tour.
View attachment 17576
Attachments
- Joined
- Mar 1, 2006
- Messages
- 3,109
- Reaction score
- 1,390
- Points
- 113
- Location
- Richmond, KY/Beaufort, SC
- Model
- Seafarer
Picked mine up from dealer. 11-547 is part number.Were you able to pick that drain up from a local store? I'm having a hard time finding one for my Advance. I'm guessing they're all about same diameter 1 1/2". That looks much nicer than the plastic one. Any links to sites would be fantastic. I'll try to upload a picture of mine.