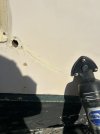
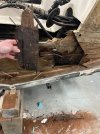
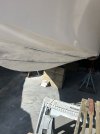
98 208 for last five years small split in the gel coat during the winter freeze mostly on the starboard side then the port , repaired each year not understanding what was going on . Last season had a professional look at it he recommended installing two SS 4 x20 inch brackets across the transom via the engine bolts to get through the year . Scheduled repair for this winter. After removing the back skin he was hopeful maybe let it dry for a month he could then re glass . Not so !

You are using an out of date browser. It may not display this or other websites correctly.
You should upgrade or use an alternative browser.
You should upgrade or use an alternative browser.
Small cracks lead to transom replacement
- Thread starter steveditt
- Start date

Mustang65fbk
GreatGrady Captain
- Joined
- Jun 4, 2020
- Messages
- 3,114
- Reaction score
- 804
- Points
- 113
- Age
- 40
- Location
- Seattle
- Model
- Seafarer
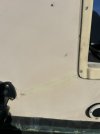
It's hard to tell from the pictures but those transom caps are pretty notorious for leaking. In the second picture it almost looks like there's a gap on the bottom of it, which if water were to continually get in there for multiple seasons, then it can rot out the transom like yours did. The cracks on either side don't help either and this was actually one of the biggest reasons why I went with a 228 Seafarer in that it doesn't have the transom cap on it and is fully enclosed. Sorry to hear of the troubles, hope she's back on the water shortly. Good luck!
Last edited:
SeanC
GreatGrady Captain
- Joined
- Jun 16, 2015
- Messages
- 417
- Reaction score
- 239
- Points
- 43
- Location
- Brisbane, Australia
- Model
- Seafarer
I don't think the cracks were the cause but are due to an already wet core expanding as it froze.

I agreeI don't think the cracks were the cause but are due to an already wet core expanding as it froze.
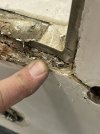
No the cracks were definitely the results of the wet core repaired in the spring reappearing after the winter freeze . The aluminum cap was part of the cause interesting the upper starboard side was also wet , as the boats are built they use a sealant on the lower half then lowing the top half after time that sealant breaks down or mine wasn't done correctly .
loubeer
GreatGrady Captain
- Joined
- Sep 6, 2017
- Messages
- 252
- Reaction score
- 88
- Points
- 28
- Location
- Newport Beach, CA
- Model
- Express 330
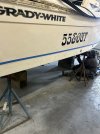
Not sure the reason for your transom rot, but I would recommend that any owner of a Grady with an aluminum transom cap, replace it with vinyl. Also, don't ignore maintenance on the transom drain tubes - the brass tubes must be replaced before they corrode or crack or you will have water seep into your transom. (From the looks of the pictures, it looks like this is what happened to the subject transom.) In my opinion, and what I have done on my 330, is use 1 1/4 fiberglass tubing (1/8 inch walls) in the transom holes instead of the brass tubes, seal with 5200 and you'll never have to worry about the transom drains again.
loubeer
GreatGrady Captain
- Joined
- Sep 6, 2017
- Messages
- 252
- Reaction score
- 88
- Points
- 28
- Location
- Newport Beach, CA
- Model
- Express 330


Fishtales
Well-Known Member
- Joined
- Jan 31, 2005
- Messages
- 8,492
- Reaction score
- 1,398
- Points
- 113
Classic results of the poor transom design. To be fair, it is a 98 hull. That being said the process of using metal and plastic strips, screwed on and caulked versus building it right should be over for this builder. I can't believe they have not addressed this at least on their most expensive models.

Greatty
Well-Known Member
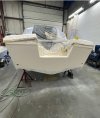
Sorry to see you go through this. Went through this myself last year with my '99 180. Roughly how much was the estimate?Very slow process almost ready for gel coat. Decided to have the bottom redone while its in the shop .
Fishtales
Well-Known Member
- Joined
- Jan 31, 2005
- Messages
- 8,492
- Reaction score
- 1,398
- Points
- 113
Silly , dumb questions. Is there a standard size for those scuppers? Are there ones that are better than others (brand)? . I’m looking to replace mine on my 22 seafarer.
That thing is gonna be a tank when completed!
Sorry to see you go through this. Went through this myself last year with my '99 180. Roughly how much was the estimate?
I thought when we discussed it last summer in the six range it certanly takening a lot longer then I thought i'ii let you know when the time comes .Bottom is being done separately sanding two layers epoxy then barrier and two bottom paint about $4
Greatty
Well-Known Member
Barbender
Well-Known Member
There is a part of me that would love to attempt this on a 05 Grady 282 but the amount of work and skill required makes me nervous. This is a really impressive repair job, you will certainly be able to enjoy the boat worry free.