Special approach to cutting through the silicone holding the floor panels in place

mdscole

Well-Known Member
Joined
Sep 14, 2014
Messages
48
Reaction score
3
Points
8
What I have:
1998 Voyager 248

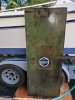
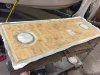
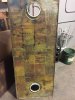
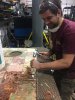
issue: both the livewell and the washdown pumps have failed. the deck plate is a bit small to address the issue. I was looking for input from those who have pulled these panels to access the areas. Best tool? Best recaulk?... do we need to recaulk?

Mitch
 
Cut the silicone caulk with a razor knife around the perimeter, take deck plate off to help lift it out. Do what you need to do under there, and use the GE silicon clear all around after your done screwing it down. I took someone's idea of using masking tape on both sides of the seam before siliconing shut so it leaves you with a neat silicone hatch. Good Luck
 
pulled mine earlier this year. Was not an issue. I used a simple utility knife. So long as you cut it, its just the friction of the caulking holding it in.

I was worried and it turned out to be a non issue.

As for recaulk, after I redid the one wet panel, I put it back down with regular silicone because I am yanking them back up this winter. I will use something better when it goes back down for good. When recaulking, put down some masking tape to keep things neat.
 
Haha posted at the same time, with the same advice.
 
Well, the "best" way is to install a perimeter string before recaulking - then just pull the string to cut through the caulk.

Short of that, I'm not sure there is really any one best way. A new razor blade works just fine - use plastic if you're concerned about scratching. A little soapy water or Windex will help it glide through easier.

Only use caulk again if you don't want lot's of water entering that area.

Replacement caulk... lot's of this is personal preference. I like the BoatLife Lifeseal product.
 
Hmmm, tape. Work's like a charm. Just pulled my rear panel last night for fuel tank replacement. Razor knife works great with a fresh blade. GE Silicone II in Almond is a nice match when you re-caulk20170809_180805.jpg20190829_195354.jpg
 
Ya, the screws go through the wood they used to core the panels. The wood pieces they used are square pieces about 6"x6". The screws to hold down the panels are never sealed, and the water goes right into the core.

I cut out the fiberglass underside layer, chiseled out the wood pieces and ground everything out out, replaced with 5/8" ply glassed over with biaxial cloth, plus redid the little braces with chop strand mat over it. Using solid wood, 3/4" would have been overkill, and with the braces 1/2" would likely do just fine. You could barn dance on mine now and zero flex.

When I reglassed it, I left the wood back a bit where the screws go so the wood is totally sealed in. Can never get wet now.
 
it looks like the screw band clamps for the fill and vent both face the same direction. They should be installed in opposite directions and about 180 degrees in rotation just like your fuel pickup hose clamps are.
The fill hose is actually more likely to leak since when filling it is under positive pressure whereas the fuel pickup hose is under negative pressure when the fuel pump is working
 
the GE almond color100% silicone is a perfect match , most likely what grady used. you can use kitchen/bath or door/ windows. same stuff ( marked differently for marketing)
 
I also agree on the GE Silicone Almond, it’s a perfect match. The tape trick is worth the time to make it look perfect too. Here’s pics of my tank lid, was a little punky but wet inside all the wood, I redid it all with expoxy, cloth and wood squares. Most of the water intrusion was at the screw holes, so I tapered the wood back so screws couldn’t repeat the problem.
 

Attachments

  • 4E275E54-6B2E-4203-A7B2-9FEFEEF1D4F4.jpeg
    4E275E54-6B2E-4203-A7B2-9FEFEEF1D4F4.jpeg
    1.4 MB · Views: 29
  • 479F8366-7767-4CB2-9999-4FFD52AA46EE.jpeg
    479F8366-7767-4CB2-9999-4FFD52AA46EE.jpeg
    813 KB · Views: 33
  • 12F5F4E5-5C4A-411E-8F81-E33E2F00746C.jpeg
    12F5F4E5-5C4A-411E-8F81-E33E2F00746C.jpeg
    855.8 KB · Views: 33
X3 on the GE almond. A couple of tips. No need to fill the entire depth of the gap on panels you are in/out of each season.. It will make it harder to get out in the future. You want to ensure some rubber strips are installed between the hatch and liner to avoid any noise and that the caulk seam seals at the top. Some have installed mono line in the gap prior to sealing. Leave a bit exposed in a spot that you can grab with pliers. Pull the line straight up and cut the caulk when you want to access. Makes it easy.