Tilt and trim seals

ScottyCee

Well-Known Member
Joined
Feb 11, 2020
Messages
456
Reaction score
86
Points
28
Location
Samish Island, WA
Model
Sailfish
I sent them some more pictures and additional explanation, and this time they say they will send the correct ones today. I'm pretty sure they'll nail at this time. It's hard not to be a little frustrated though.
 

seasick

Well-Known Member
Joined
Aug 19, 2008
Messages
9,117
Reaction score
1,305
Points
113
Location
NYC
I wonder if they sent the wrong wrench. It's hard to understand how they could send the wrong replacement pins twice.
 

ScottyCee

Well-Known Member
Joined
Feb 11, 2020
Messages
456
Reaction score
86
Points
28
Location
Samish Island, WA
Model
Sailfish
Well, they have a photo of it, so this time they'll get it right. They were most apologetic. I think there are two pin thread sizes, so I guess it could happen. The pic I drew might have been enough in a perfect world. 8^)
 

Andrew93

GreatGrady Captain
Joined
Sep 30, 2012
Messages
329
Reaction score
48
Points
28
Location
Massachusetts
Model
Express 305
When I did mine I had a generic spanner where the pins lined up to the caps but were slightly too large for the holes in the cap. I drilled the holes out a little bigger to accept the spanner and it was fairly smooth sailing from there. I replaced them a few seasons ago and they have held up well since.
 

LongIslandGulfstream

Well-Known Member
Joined
Oct 14, 2018
Messages
51
Reaction score
17
Points
8
Age
34
Model
Gulfstream
Forget all of those fancy spanning tools and homemade concoctions. Been there done that. Just use an AIR CHISEL. Buy new caps. You are done. Let the tool do the work and stay away from the rams. It’s so simple and will work no matter what. I wish I started out using that before failing with the spanning tool and then damaging my ram with a hand punch and hammer. That spanning tool does not bite well on those pesky caps.
 
  • Like
Reactions: Sparkdog118

seasick

Well-Known Member
Joined
Aug 19, 2008
Messages
9,117
Reaction score
1,305
Points
113
Location
NYC
Forget all of those fancy spanning tools and homemade concoctions. Been there done that. Just use an AIR CHISEL. Buy new caps. You are done. Let the tool do the work and stay away from the rams. It’s so simple and will work no matter what. I wish I started out using that before failing with the spanning tool and then damaging my ram with a hand punch and hammer. That spanning tool does not bite well on those pesky caps.
The generic spanners don't work well. The specific tools like the Marine Tech work very well. Three caps would cost 120 bucks. Yes the wrenches are about $70 each. Some motors need 2 of them, some one but you can use them over and over if needed and can lend them to others.
 

ScottyCee

Well-Known Member
Joined
Feb 11, 2020
Messages
456
Reaction score
86
Points
28
Location
Samish Island, WA
Model
Sailfish
Pins are coming in the mail today. Any guesses on whether they’re the right size? LOL
 

seasick

Well-Known Member
Joined
Aug 19, 2008
Messages
9,117
Reaction score
1,305
Points
113
Location
NYC
Let's hope they are correct but I am not going to hold my breath:)
 
  • Like
Reactions: ScottyCee

ScottyCee

Well-Known Member
Joined
Feb 11, 2020
Messages
456
Reaction score
86
Points
28
Location
Samish Island, WA
Model
Sailfish
Got the mail, and correct pins. Cracked the two tilt caps very easily. It took a little muscle but that wrench is sweet. Thanks for the recommendation guys. It’s game on this weekend.
 
  • Like
Reactions: SkunkBoat

seasick

Well-Known Member
Joined
Aug 19, 2008
Messages
9,117
Reaction score
1,305
Points
113
Location
NYC
Great news. Make sure that you note the orientation of the cap seals before pulling them out
 

Ridge Runner

Well-Known Member
Joined
Apr 30, 2015
Messages
157
Reaction score
30
Points
28
Guess what I'm doing tomorrow?
 

Attachments

  • 15859631775418342453991927261253.jpg
    15859631775418342453991927261253.jpg
    803.9 KB · Views: 8

ScottyCee

Well-Known Member
Joined
Feb 11, 2020
Messages
456
Reaction score
86
Points
28
Location
Samish Island, WA
Model
Sailfish
Went well. Caps were surprisingly easy - I used a 30" pipe on two of them but they all broke free easily. The starboard had never been serviced - looks like someone tried to pull the cap and failed - galling of the holes was from some previous operation. Port had been half-ass serviced at some point but nothing appeared to have been replaced. Something like JB Weld was used as a sealant. Existing condition was poor - creme colored fluid and nasty seals. Some of the little hydraulic channels were really full of crud - almost plugged up. Cleaning the Rams and inside the cylinders took about half the overall job time.

It went back together smoothly. Sounds great and moves a lot faster. Not a fluid weep to be found. I'm really glad I had someone with experience to guide me, but I can probably do it next time. Famous last word? 8^)
 

Attachments

  • bad shape.jpg
    bad shape.jpg
    807.8 KB · Views: 12
  • after.jpg
    after.jpg
    1.4 MB · Views: 12
  • before.jpg
    before.jpg
    759.4 KB · Views: 12
Last edited:
  • Like
Reactions: SkunkBoat

Ridge Runner

Well-Known Member
Joined
Apr 30, 2015
Messages
157
Reaction score
30
Points
28
I finally got around to tackling mine. Hardest part was removing the seals from the caps. Pretty sure they were the factory originals! One side was low on fluid and it was completely contaminated, would not trim up without help. The other side took forever to bleed. I used a piece of PVC clamped to the shaft to holt th20200411_171228.jpg
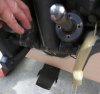
e spanner down on the tilt tube, but I used another method on the trim tubes...