I have a 2000 Grady 247 Advance with twin 150 HPDIs. The port tilt/trim motor runs but will not raise the engine, so I suspect the hydraulic fluid is low. I turned the hydraulic relief screw counter clockwise and the engine settled down a few more inches, so hydraulic pressure should be relieved. I attached a 1500 lb ratcheting strap around the lower unit at one end and around a doubled 2x8 header at the other end. The header is 8-9 feet off the ground and far enough from the boat that the strap is about 20 deg above horizontal. My intent was to get the outboard up far enough that I could continue with a floor jack. The strap appears to have moved the outboard an inch or two, but is now so tight that I'm a little worried that either the outboard or the header is going to break. I just want to double check first that there isn't some additional latch that has to be released to allow me to manually raise the outboard. The handle on the ratchet strap is about 5-6 inches long, so the other possibility is that I'm drastically overestimating the force that the strap is putting on the engine. Plan B would be to get a come-along with a longer handle for more leverage. But I'm told that two strong guys should be able to raise the outboard by hand. I am nowhere near that. Any information or suggestions would be appreciated.

You are using an out of date browser. It may not display this or other websites correctly.
You should upgrade or use an alternative browser.
You should upgrade or use an alternative browser.
Tips/tricks to manually raise outboard?
- Thread starter murphy300
- Start date
Doc Stressor
Well-Known Member
- Joined
- Nov 13, 2009
- Messages
- 1,194
- Reaction score
- 299
- Points
- 83
- Location
- Homosassa, FL
- Model
- Seafarer
Remove the screw on the filler port and you should be able to lift the engine. Be prepared to catch any fluid that gets blown out.
I will try that right now.Remove the screw on the filler port and you should be able to lift the engine. Be prepared to catch any fluid that gets blown out.
Success!! For anyone else reading this, the screw hits a "stop" after several counter clockwise turns, which is a retaining ring like you'd find on a universal joint on your car's driveshaft. Not hard to remove, we'll see how it is to reinstall. The screw has o rings on it so once it was unthreaded I needed needle nose pliers to get it completely out. A few ounces of fluid came out during the lift. Still heavy, but much easier and it was obviously moving. After lifting it about 30 degrees I added the floor jack and that helped a lot. There is now room to access the filler port. Many thanks, Doc Stressor!Remove the screw on the filler port and you should be able to lift the engine. Be prepared to catch any fluid that gets blown out.

PointedRose
Well-Known Member
- Joined
- Feb 11, 2021
- Messages
- 710
- Reaction score
- 215
- Points
- 43
- Location
- San Francisco
- Model
- Overnighter
Make sure you block the engine up working under there! Like you said probably was leaking a little fluid over time. If you fill it up again it might start working.
I had a 4x4 handy for blocking, plus the trailering locks once the engine was 100% up. The downside of removing the screw all the way is there is now a lot of air in the system. But the engine was not moving otherwise.Make sure you block the engine up working under there! Like you said probably was leaking a little fluid over time. If you fill it up again it might start working.
Doc Stressor
Well-Known Member
- Joined
- Nov 13, 2009
- Messages
- 1,194
- Reaction score
- 299
- Points
- 83
- Location
- Homosassa, FL
- Model
- Seafarer
To get the air out, get the cylinder as close to perpendicular to the ground as possible using the trailer jack. With the engine tilted up and resting on the trailer lock, close the pressure relief valve and fill the cylinder with fluid. Put the fill screw back in but don't completely tighten it up so that air and foam can purge out. Work the tilt and trim up and down about 4 times, each time refilling the cylinder. Tighten the fill screw and work the engine up and down a few more times to ensure that it moves freely. Check the fluid level one more time and you should be good to go.
Be sure to fix the source of the fluid leak. It is usually either the ram seal or one of the rubber seals between the cylinder and the pump. I once worked on an F150 where the bottom of the cylinder had corroded through and the whole unit needed to be replaced.
Be sure to fix the source of the fluid leak. It is usually either the ram seal or one of the rubber seals between the cylinder and the pump. I once worked on an F150 where the bottom of the cylinder had corroded through and the whole unit needed to be replaced.
Last edited:
What do you do if you cannot get the release screw loose? The fill screw opening does not take pressure off my motor, 250hp OX66. Can I just loosen a trim cylinder cap? Will that do the same thing? I don’t think there is a ton of pressure in the lines as the motor will not tilt up at all but will trim down.
PointedRose
Well-Known Member
- Joined
- Feb 11, 2021
- Messages
- 710
- Reaction score
- 215
- Points
- 43
- Location
- San Francisco
- Model
- Overnighter
I’m not sure about your specific model engine, but these screws can certainly be a pain. Sometimes they are plastic so it doesn’t rust, but then the plastic gets mangled. Make sure you use correctly sized screw driver and be as gentle as possible with it. If it’s not plastic and is stainless, you could try kroil penetrating oil. Also maybe an impact screwdriver like thisWhat do you do if you cannot get the release screw loose? The fill screw opening does not take pressure off my motor, 250hp OX66. Can I just loosen a trim cylinder cap? Will that do the same thing? I don’t think there is a ton of pressure in the lines as the motor will not tilt up at all but will trim down.
ItalianAngler
Well-Known Member
I take the best screw driver bit for the job I have and attach to a socket driver to get a little more torque. If you have a with kit of a bunch of bit's, they can probably plug into one of my small sockets, put some tape on there to hold it in to the socket. I do the same for my lower unit plugs and I have yet to tear one up. I take my time with it, and use PB if I need to, but I service things regularly now so it's hardly an issue anymore unless it's somewhere I've never been. I'm sure there's a more elegant solution out there but this has yet to fail me and it's stuff most have on hand.What do you do if you cannot get the release screw loose? The fill screw opening does not take pressure off my motor, 250hp OX66. Can I just loosen a trim cylinder cap? Will that do the same thing? I don’t think there is a ton of pressure in the lines as the motor will not tilt up at all but will trim down.
If that manual release screw is completely removed, is there a trick to getting it back into the opening?? I have put hydraulic fluid on the o-rings to help them along, but after 3/4 of a turn after the threads start to mesh the screw stops, solidly. The manual release itself tapers down along its length, I thought possibly it was getting hung up because of that, but many tries later, and ensuring that it is seated evenly before turning, I'm still hitting some sort of wall almost immediately. There is no dirt or debris in the way. The snap ring is intact and removed. This is one of those seemingly very simple jobs that has blown all out of proportion!To get the air out, get the cylinder as close to perpendicular to the ground as possible using the trailer jack. With the engine tilted up and resting on the trailer lock, close the pressure relief valve and fill the cylinder with fluid. Put the fill screw back in but don't completely tighten it up so that air and foam can purge out. Work the tilt and trim up and down about 4 times, each time refilling the cylinder. Tighten the fill screw and work the engine up and down a few more times to ensure that it moves freely. Check the fluid level one more time and you should be good to go.
Be sure to fix the source of the fluid leak. It is usually either the ram seal or one of the rubber seals between the cylinder and the pump. I once worked on an F150 where the bottom of the cylinder had corroded through and the whole unit needed to be replaced.
Doc Stressor
Well-Known Member
- Joined
- Nov 13, 2009
- Messages
- 1,194
- Reaction score
- 299
- Points
- 83
- Location
- Homosassa, FL
- Model
- Seafarer
I’ve never removed the relief screw. You just have to turn it a half turn counter clockwise to release the pressure. It fits into an internal joint which I have never seen except in the shop manuals. There must be a trick to moving the joint so the hole can be aligned with the screw, but I don’t know it.
DennisG01
GreatGrady Captain
- Joined
- Sep 1, 2013
- Messages
- 8,142
- Reaction score
- 1,612
- Points
- 113
- Location
- Allentown, PA & Friendship, ME
- Model
- Offshore
FYI, under normal circumstances, an OB can be manually titled up by hand. You shouldn't need a jack or a winch. Just lift it up.
HD sells a strong vinegar solution - 30%. I've use that to help free up a stuck release screw. Other times, I've used a manual impact screwdriver... and other times I've used a Dremel to first cut a better slot.
I've only ever completely removed a screw with the unit on my workbench. I don't recall anything special to removal or installation.
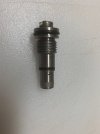
I've attached a picture of the "manual release" as Yamaha calls it. I had to use a very large screw driver and a lot of force to get the screw out in the first place. When trying to reinstall I had to use the same screwdriver and a lot of force just to get the threads to engage at all. Then the after a half turn it stopped, hard. I came very close to surrendering and turning the project over to a Yamaha mechanic. Then for some reason I thought maybe I should check to see whether the screw would go all the way in if I removed that o-ring up at the top. Not permanently, of course, just to see what would happen. Sure enough, it went in with no effort at all. This is a 2000 boat, so likely that o-ring is 20 years old. One new $13 o-ring later, I tried again, with hydraulic oil on the o-ring. Right where it stopped hard before, there was a little resistance, but no stopping. A little force later the screw went 100% in, to the stops. So six or so days of agony over a crusty, hard o-ring after starting a job I thought was going to take 20 minutes. Lesson learned, and since the whole system is open I bought all the other new o-rings and rubber seals for the hydraulic rams. Oh, and in opening up one of the caps on the trim cylinder I found it had been finger tightened, but whoever did that forgot to wrench it tight. I assume that's where my fluid went. I appreciate all the help and advice I received from contributors here, even if you don't have an answer your comments or questions do help me think through these situations and (eventually) get to a solution.I’ve never removed the relief screw. You just have to turn it a half turn counter clockwise to release the pressure. It fits into an internal joint which I have never seen except in the shop manuals. There must be a trick to moving the joint so the hole can be aligned with the screw, but I don’t know it.
Attachments
GOOD to know, I am dealing with a stuck screw that I am going to get out somehow this week hopefully. Did you order a new screw? I am replacing mine and the oil fill and vent screws for lower unit. Cheap insurance.
PointedRose
Well-Known Member
- Joined
- Feb 11, 2021
- Messages
- 710
- Reaction score
- 215
- Points
- 43
- Location
- San Francisco
- Model
- Overnighter
I did get some replacement screws, although dumb as I was, bought on Amazon and got the wrong sized screw so I had to put the old back in a little mangledGOOD to know, I am dealing with a stuck screw that I am going to get out somehow this week hopefully. Did you order a new screw? I am replacing mine and the oil fill and vent screws for lower unit. Cheap insurance.