TOURNY 19' GAS TANK REPLACEMENT HELP

fatire

Member
Joined
Sep 13, 2010
Messages
11
Reaction score
0
Points
0
Hi GW enthusiasts,
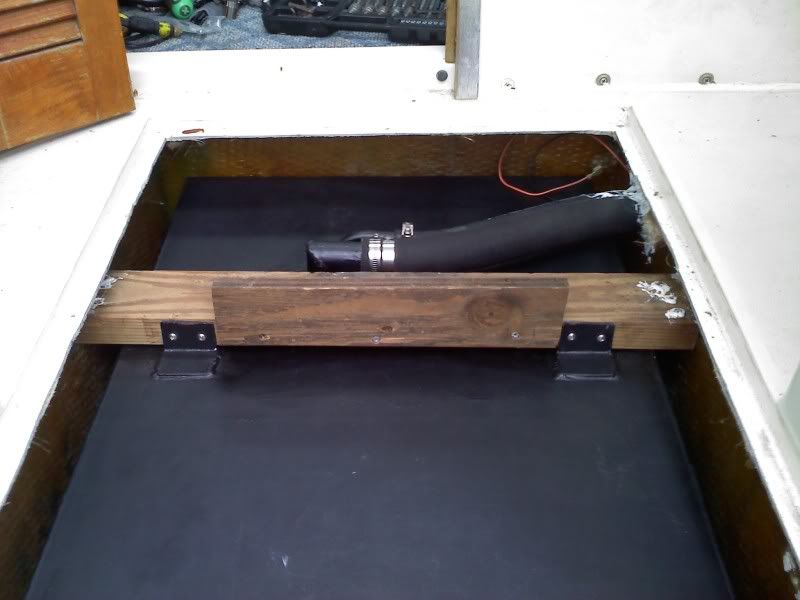
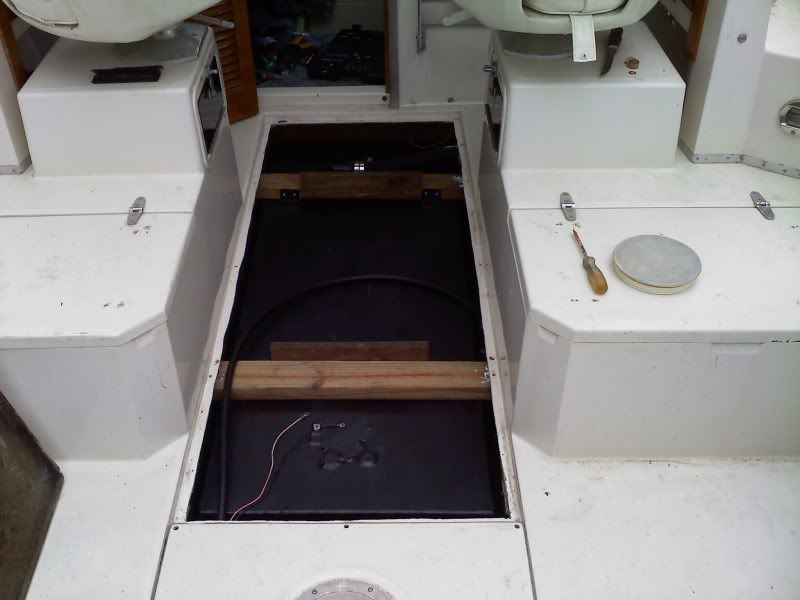
So I've read several posts and related links on replacing my 20 y.o. tank in my Tournament 19.
And good thing I decided to replace it because I found 2-3 perforations under the straps that support the deck cover.
I have a replacement tank being fabricated by speedytanks.com which includes an epoxy coating that should help the tank last for the rest of the boats lifetime.
I plan to glue or epoxy fiber strips on the bottom, and foam in the corners
Then I'll glue/epoxy on the wooden deck support straps on top of the tank so they don't rub the tank and/or trap water.
Here's the problem I've run into:
The tank measures 69" long and the hole in the deck measures 68.5" long.
THANKS GW, nice work! :bang
I've looked and there's no possibility of tilting the tank in a manner that will clear the opening.
:hmm So it looks like I can take about 3/8" of both ends of the cover flanges but I'm not sure what the best way to do that job as I've never really cut fiberglass before.
I have a battery powered Ryobi 5.5" skill saw and was going to use that with a fine tooth carbide blade to do the job but figured I'd ask here?

Also there are several densities of expanding marine foam, 2lB, 4lb, 8lb etc.
I'm thinking denser is better as I want a tight fit that won't rub the epoxy off the tank and then hold/trap water.
(I was going to use plastic bags at the corners to contain the foam, will this work?.)
Any suggestion there would be appreciated as well.

If you have any strong feelings about what I'm proposing I'd welcome your ideas/critiques/opinions!

Thanks in advance
Steve from NH
 

Parthery

GreatGrady Captain
Joined
Jan 31, 2005
Messages
2,588
Reaction score
220
Points
63
Location
Atlanta, GA
Is the tank done yet? Can it be shortened a bit?

When the tank on my '86 190 Tournament was replaced, I had the replacement manufactured by RDS out of Perry, FL. They had the plans for the original tank, and it literally fit like a glove.

If you cut the opening, you will have to try and match the non-skid.....
 

fatire

Member
Joined
Sep 13, 2010
Messages
11
Reaction score
0
Points
0
Thanks for replying Parthery,
Actually I had the foresight to modify the tank and shorten it a full inch but that won't help getting the original tank out!
And cutting won't affect the diamond pattern at all.
There's a 1+ inch lip that the deck panel rests on.
This is what I'd be cutting 3/8 off at either end.
That will leave me with 5/8-3/4" of "lip fore and aft and the ful 1+inch lip on each side, plus the support slats that will go across the tank to support the deck plate.

I don't like the idea of powertool use near the tank but I figure if the tank is totally sealed (I've removed the hoses and sealed the fill, vent and pickup tubes) and there's no fuel order, and I insure no fumes are lying down low in the cavity, there should be no risk of sparking any fumes.
 

richie rich

Well-Known Member
Joined
May 20, 2009
Messages
1,183
Reaction score
1
Points
0
Location
south windsor, CT
I'd have no problem cutting the lip at all....mine was not cut evenly from the factory to begin with...some areas were bigger and some smaller....and even a few missing, possibly from the previous owner...once you put the tank in, you could always glass in a little material as you should have room, but I don't think its necessary. A multi-tool like Fein works great for controlled cuts.

What do you mean by glassing fiber strips on the bottom and foam on the corners? The tank should be sitting on glass covered wooden sleepers correct? And there's a 1 inch or so gap all the way around for air circulation. Most folks 5200 neoprene strips to the bottom of the tank and set that on the sleepers. The 5200 should completely fill the bond area between the strip and the tank to keep any moisture out. Once in, you screw back in the wedges on all sides or use angle brackets screwed to the stringers and bulkheads if you made your new tanks that way. The wood across the top of the tanks should really sit on little blocks epoxied to the stringers instead of the top of the actual tank...I know this is how Grady did it, but the tank welder would probably tell you NOT to do it.

You only need 2lb by regulation...but a 4lb would be better for long term compression and is more dense ....the foam works best if its actually stuck to the tank to keep any moisture out of the area...trapped moisture is what will cause corrosion.....the plastic bag would actually make it worse. Here's a link to a rebuild that shows a tank installation with brackets and foam...just for reference.

http://forums.bateau2.com/viewtopic.php ... 7&start=60

But realistically, leaving good air exposure and a nice sturdy install with last 20+ years as many do.....both methods work if done right.
 
Joined
Jul 6, 2010
Messages
7
Reaction score
0
Points
0
I just did the tank in my 1985 Tournament 190 and it was tight but did come out and go back in. Here's what I did. After removing all the supports, wedges, and hoses, etc., to get the tank out, I put a rope under two ends of the tank and pulled up slightly at the same time and tilted, I believe the bow end first, just a little bit, while continuing to raise both ends. In my case, it was tight, but came out after a little patience, and maneuvering, without any cutting. I just put the new one in this past weekend, basically in reverse order. If it doesn't work tilting the bow up, try tilting the stern end because the inside clearances may be different at the ends.
 

fatire

Member
Joined
Sep 13, 2010
Messages
11
Reaction score
0
Points
0
Thanks 85 Tourn,
I'll give it one more try but not sure how a 59" x 9"(deep) is coming out of a 58.5" opening?
I assume GW drops the tank in the hull, then installs the deck, but if this isn't the case, and the tank was installed through the access opening, then logic says there must be a way!
I've already been eyeing the Rigid multi-tool as a solution. 1/4 the price of the Fein which I know is the best but overkill cause I'm not a tradesman or have limited budget.
I'll post final solution when done
Steve
 

Got Grady?

Well-Known Member
Joined
Feb 25, 2010
Messages
98
Reaction score
2
Points
0
Location
By the sea by the sea by the beaut.......
I had to cut that lip to get my tank out too. The lip at the aft end was 2 inchs wide so I cut off 1.5 inchs. I also trimmed 1/8 of an inch of each side so when I put the tank back in it wouldnt be so tight as to scrape the coating off the tank, when putting the tank back in I even put tape around the lip on all sides to keep from scratching any coating off. I coated my tank with coal tar epoxy and when I put it in I took 5200 and attached neoprene strips to the pads in the bottom. I considered attaching them to the tank but the pads are rough and was afraid it would tear the strips off the tank along with the epoxy. With the neoprene on the pads themselves the tank can move a bit without affecting the strips(the neoprene is slippery on that coal tar epoxy). While the tank was out I took it and had 1.5 inch angle aluminum tabs welded to the top of the tank. I marked the spots for the tabs before removing the 2x4 cross members so that when the tank went back in the tabs lined up perfectly with them without having to make new holes in the stringers for the screws. I set the tank in and got it right where it was then put the 2x4's in place right against the tabs. Everything lined up perfectly and I screwed the 2x4's back in across the top of the tank and drilled 2 holes in each tab and screwed 2 inch panhead screws(stainless of course)through the tabs into the 2x4's. Oh I also placed neoprene strips between the 2x4's and the tank. I didnt use any adhesive because when I screwed the 2x's back to the stringers it pulled them down tight to the top of the tank squeezing the neoprene strips down tight. I cut the hatch cover support boards to fit between the tabs and screwed them back to the 2x4's. Now the tank can breathe good and is super sturdy. Also the strips under the tank raised it up enough so the corners of the tank no longer rub on the bottom of the hull. I will try and post pictures in the next day or so but it sure worked out just like planned. No more wedges no foam and lots of room for the tank to breathe. Hopefully it will last for many years to come. And of course the fuel fill fuel lines were all replaced.
 

fatire

Member
Joined
Sep 13, 2010
Messages
11
Reaction score
0
Points
0
Thanks alot Got Grady,
That's excellent info.
So I didn't have angle brackets welded onto my new tank, I suppose I could get some welded on as an after-thought but that would be a pain since the tank is epoxy coated.
The other option is to use foam at the corners.
Either way I will not use those dastardly wedges.
My tank corroded under the rubber strips underneath the 2x4s but it wasn't coated and I figure if I get another 20 years well that's more then I need.
The fact that the tank is painted makes me more comfortable with the foam.
Anyway I'm still preoccupied with getting the old one OUT.
I took another posters advise and floating the tank on shockcord so I could try all manner of movement combinations.
The aft end WILL come out but immediately hits the motor well structure.
There's no way to get the front out first, if there was I'd be golden.
So I am resigned to cutting what did you use to cut the lip?
I don't think a rotorzip will fit close enough to the edge.
Thanks
Steve
 

Got Grady?

Well-Known Member
Joined
Feb 25, 2010
Messages
98
Reaction score
2
Points
0
Location
By the sea by the sea by the beaut.......
I was not concerned with a perfect cut so I just freehand cut it with my sawzall. It is not straight but it is not hurting anything. I think the foam is fine since the tank is epoxy coated. It shouldnt rub off the coating and will hold the tank in place. I would still put some neoprene strips between the tank and the 2x4's on top of the tank. Just came in from working on mine because my aft bilge is not working on auto or manual. Tested the pump and it is fine so I moved to the switch end and believe that is where the problem is. Looks like some corrosion on the ends that go to the switch. Been meaning to work on the switch area anyway. I have a couple lights that are not working on the switch panel and got a good look at one tonight. Hopefully Radio shack will have some that will work with the existing holes. If so I will replace them all and clean all terminal ends and coat with some protective coating. Everything is still working except the rear bilge and my wiring all looks good so hopefully it will work out. Boats are a real pain in the arse sometimes....ok alot of the time. Cant wait to get back on the water its been almost 3 months.
 

Got Grady?

Well-Known Member
Joined
Feb 25, 2010
Messages
98
Reaction score
2
Points
0
Location
By the sea by the sea by the beaut.......
Thanks for the tip on the switchs. Mine are all working fine its the lights under them that need replaced. The led lights from radio shack may not be marine grade but it will be an improvement over the old ones. http://www.radioshack.com/product/index ... =techSpecs
Also found my problem with the aft bilge pump. Turned out to be the ground connection between the factory harness and the bilge pump wire. Cut the old butt connectors out and used shrink connectors to hook it back up. Everything working fine now and I should be on the water again by the weekend.
 

Got Grady?

Well-Known Member
Joined
Feb 25, 2010
Messages
98
Reaction score
2
Points
0
Location
By the sea by the sea by the beaut.......
Some pics of the installation. The tank and lid supports are the original wood. I have been over this whole boat in the last year and have not found one bad piece of wood or any signs of rot. An excellent example of how well a boat can hold up after 21 years and 1300+ hours if taken care of. Actually it probably is because it was kept in dry storage the whole time, ha.
0329111628.jpg

0329111627a.jpg
 

striped bass

Well-Known Member
Joined
Dec 3, 2007
Messages
469
Reaction score
0
Points
0
Location
Watch Hill, R.I.
Fatire:

Since Grady created this problem, you should call Customer Service at Grady Corporate in Greenville, NC for advice.
 

Curmudgeon

Well-Known Member
Joined
Nov 30, 2005
Messages
875
Reaction score
1
Points
0
Location
NC/GA
.. you should call Customer Service at Grady Corporate in Greenville, NC for advice.

They will tell him to trim as necessary, it's a common glitch and easily accomplished ... :wink:
 

CoastalJuan

New Member
Joined
Sep 8, 2015
Messages
1
Reaction score
0
Points
0
Parthery said:
Is the tank done yet? Can it be shortened a bit?

When the tank on my '86 190 Tournament was replaced, I had the replacement manufactured by RDS out of Perry, FL. They had the plans for the original tank, and it literally fit like a glove.

If you cut the opening, you will have to try and match the non-skid.....

Hey Parthery,

Do you know if the 22's have similar issues with the factory tanks not fitting the access? Found another '95 that I'm planning on looking at this weekend. I've become a real stickler for fuel tank histories when looking at 19's.

Thanks,
John