Transom maintenance

SkunkBoat

Well-Known Member
Joined
Oct 12, 2017
Messages
4,255
Reaction score
1,477
Points
113
Location
Manasquan Inlet NJ
Website
www.youtube.com
Model
Express 265
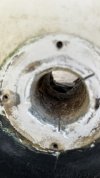
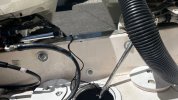
A project this spring was removing the lower motor bolts and putting some glass “eyepatches” over the inside holes, redrilling, and installing ¼” aluminum plates across inside lower bolt s.
New 316 SS ½” bolts. 5” was correct length with plates and 1/8” SS washers. Boltdepot.com is good source for 316 SS hardware

The motors were replaced in 2020. Work done by dealer. The aluminum cap was well sealed so I did not have that done. That would have delayed the season.

End of last year I noticed a rust drip inside lower bolts. Not too happy with the work I found. They left the washers from the old yamahas. They had cut into the glass a bit. I think they should have told me “hey, you should patch the holes and put on plates to spread the force out so washers won’t cut the glass”

They put bolts with new washers thru the old washers and a blob of sealant. They inserted the bottom bolts from inside-out. Nut on outside. I think the bottom bolts should go in from outside. Nuts inside. That way the thread goes in clean and the hole sealant pulls from outside/in, sealing the hole. (lower bolts are underwater)

Unlike the top bolts, where the washers are up against smooth gelcoat, the bottom washers are up against rough uneven glass. Grady is worse at that than some other boats I’ve seen. Tightening the bolt eventually pulls the washer into the glass. Seeing what I have seen, I think it would be wise to always use plates inside lower bolts.

The wood was still solid in all the bolt holes. I sanded and cleaned up with acetone. Used West epoxy, High density filler, and some glass I had leftover from other projects.
To re-drill holes with motors still in place you need a LONG 1/2" bit. I got an 18" bit at Home depot
Sealed with SikaFLex 291
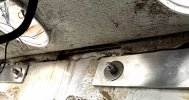
IMG_3105.jpeg

IMG_3117.jpeg

IMG_3139.jpeg
 

steveditt

Well-Known Member
Joined
Nov 11, 2012
Messages
148
Reaction score
23
Points
18
Last year needing a transom replacement it was recommended to install a plate on the top bolts and lower would be better , Transom was replaced this winter he reinstalled the plates when finished .
 

dogdoc

Well-Known Member
Joined
Apr 23, 2019
Messages
347
Reaction score
75
Points
28
Age
69
Model
Marlin
do you buy or make plate?
 

Hookup1

GreatGrady Captain
Joined
Oct 16, 2007
Messages
2,643
Reaction score
720
Points
113
Age
69
Location
Cape May, NJ
Model
Islander
Are those bedded in 3M5200? Looks like good insurance. Spread the load out. Probably do mine what I rebuild my transom.
 

seasick

Well-Known Member
Joined
Aug 19, 2008
Messages
9,149
Reaction score
1,312
Points
113
Location
NYC
If they used SS bolts and washers on aluminum plate without some sort of sealant as an insulator , there will be corrosion issues . Although the new bolts and plates looks nice and clean, I would rather see sealant ooze to insure sealant was applied.
 
  • Like
Reactions: HMBJack

SkunkBoat

Well-Known Member
Joined
Oct 12, 2017
Messages
4,255
Reaction score
1,477
Points
113
Location
Manasquan Inlet NJ
Website
www.youtube.com
Model
Express 265
I got the plates made at Atlantic Coastal Welding. $30 a piece but they did them in a day. Made them to my spec. I wanted them wide but have to fit above stringers.
3" wide. 1/4" plate. Standard 9 7/8" bottom hole spread. I looked at amazon. They have CAST aluminum 2" wide. I had a cast one crack on an older boat.

I used Sikeflex 291 sealant. First time I've used the brand. Comparable to 4200. I did not bed the length of plates.I don't think that would do anything but make it hard to remove.
I measured how much thread would come thru transom, covered bolt with sealant to that, inserted from outside-in. That makes the sealant seal the OUTSIDE hole on its way in. I worked the bolt in then back out a bit and more sealant and back in. Then a good donut of sealant were it comes thru inside. The plates squish it around the bolt.. This way the threads that are used for the nut are clean.
Remember, that water is on the OUTSIDE. Gobs of sealant inside don't do anything ....but hide fact that the washers are cutting into the glass.

As for SS against aluminum...my motors are aluminum with hundreds of SS bolts in them, and shafts and props, and steering cylinder and tie rods.....
 
Last edited:
  • Like
Reactions: Halfhitch

seasick

Well-Known Member
Joined
Aug 19, 2008
Messages
9,149
Reaction score
1,312
Points
113
Location
NYC
You must have better luck than I do, I have often broken off SS screws on motor parts, like brackets, anodes, ground lugs etc.
 

Gulffisher

Well-Known Member
Joined
Nov 29, 2012
Messages
78
Reaction score
22
Points
8
Uncoated aluminum and stainless steel in contact with one another WILL NOT play well together. But with 1/2" or larger bolts/washers in contact with 1/4" aluminum plate, it will be a long time before the aluminum corrosion results in failure.
 

SkunkBoat

Well-Known Member
Joined
Oct 12, 2017
Messages
4,255
Reaction score
1,477
Points
113
Location
Manasquan Inlet NJ
Website
www.youtube.com
Model
Express 265
So, having my head in there all that time I learned a few things.
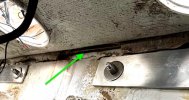
There is an aluminum bar about 1/2" thick inside the upper transom. You can see it in the pictureswhere the motorwell joins the transom. Just above the plate that I put in.

transom internal bar.jpeg
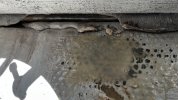
You can see the adhesive filler that oozed out when the squished the cap to the hull. It is not uniform. There are gaps and eventually pieces of blobs fall off.
That area is right where the motorwell scuppers are drilled thru. They drill thru the 1/2" aluminum and the filler and the empty space.

IMG_3132.jpeg
It is easy for the old compromised brass tubes to drip into the bilge.
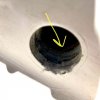
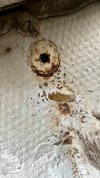
I noticed that the three brass scupper tubes are at different heights. the starboard one being right down in the corner. In my case it was mounted so low that it eventually made a hairline crack in the motorwell bottom corner and there was a very tiny drip into the bilge.

IMG_3122.jpeg

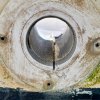
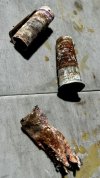
I used a sawsall with metal blade to cut a line in the brass tubes and then bent them in and pulled them out. Wood inside was solid. Made me feel good to know that.
If you have old brass tubes, get them out and look in there. Do it.

IMG_3125.jpeg
IMG_3127.jpeg

I fixed up the holes with epoxy and replaced the brass with plastic tubes (SeaChoice 1 1/4"). https://www.amazon.com/dp/B0006ZCG10?psc=1&ref=ppx_yo2ov_dt_b_product_details
Sealed with Sikaflex 291.
Covered outside with new 2 7/8" rubber flaps https://www.amazon.com/dp/B0019M5JPY?psc=1&ref=ppx_yo2ov_dt_b_product_details


IMG_3156.jpeg
IMG_3155.jpeg
In the past I replaced the POP-out Beckson pie holes with screw type Beckson pieholes. You don't need old 6" pieholes popping out in your motorwell.....
 
Last edited:

Sardinia306Bimini

Well-Known Member
Joined
Oct 11, 2023
Messages
202
Reaction score
41
Points
28
Age
59
Location
Island of Sardinia
Model
Bimini
In the past I replaced the POP-out Beckson pie holes with screw type Beckson pieholes. You don't need old 6" pieholes popping out in your motorwell.....

Thanks for your detailed how-to, very good information.

One annotation, I had the screw in pie holes on my Panga and they were a PITA to unscrew after some time.
I tried greasing the treads what led to even more tight seat and more power needed to screw them open.

Finally I welded a special handle to wrench open the cover.

Chris