Voyager 248 Transom Cap Replacement

gradywhite248

Well-Known Member
Joined
May 6, 2014
Messages
181
Reaction score
0
Points
16
Hey guys,
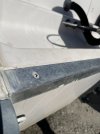
I have a questions on an issue I need to address in the upcoming down season. I have a 1999 Voyager 248 that has been stored indoors since new. I have keep the transom cap sealed but this week found one of the screws broken. I have checked and pretty sure the transom is dry, are there any transom covers or angles available through the retail market that I can buy and replace on my own. I know Ill have to raise the motor.
any help would be greatly apprechated.
SH
 

Attachments

  • 248 Voyager trasom cap.jpg
    248 Voyager trasom cap.jpg
    71.3 KB · Views: 46
  • IxDv0vn7TlWzeo2ZSW0uxg.jpg
    IxDv0vn7TlWzeo2ZSW0uxg.jpg
    131.1 KB · Views: 41

trapper

GreatGrady Captain
Joined
Jan 7, 2010
Messages
794
Reaction score
197
Points
43
248. I replaced mine with a stainless steel angle I purchased from a local machine shop and cut it to length. Lifted my F200 with a chain hoist,. re- bedded the transom cap with Sikaflex 291. You can get a plastic or is it fibreglass from Grady white. The stainless cap will out out last the boat and no doubt me to, just make sure it is well sealed in the bedding process.
 

DennisG01

GreatGrady Captain
Joined
Sep 1, 2013
Messages
6,825
Reaction score
1,210
Points
113
Location
Allentown, PA & Friendship, ME
Model
Offshore
Good eye on finding that screw! That's exactly how the galvanic corrosion starts - the two dissimilar metals (SS screw and aluminum plate) chemically interact with each other in the presence of moisture and corrode away. The hole gets bigger and the screw starts to fail.

The newer Grady cap is vinyl - which is nice as there is no interaction between dissimilar metals. But if you want to go with metal, it's just a plain 'ol piece of L-channel - you can source that locally or thru an online place like Mcmaster Carr. Get STAINLESS - then you virtually eliminate galvanic corrosion. All this thing does is cover up the gap that Grady left at the transom. In theory, you could use tape and replace as needed :)

Clean it up real well (underneath) and apply 3M5200 generously to help seal things. Let that dry and then use a regular sealant to seal the plate (easier to remove down the road). If you felt you needed some adhesive, use LifeCaulk or 3M4200.
 

family affair

Well-Known Member
Joined
Jul 31, 2010
Messages
1,303
Reaction score
292
Points
83
Location
Ohio
Model
Islander
Be aware that on the 99 248, there is a metal tube or angle about a ½" below the cap. Make sure the screws you use aren't too long or you will need to source different screws. Ask me how I know! Ideally, use the same length and diameter screws.
 

gradywhite248

Well-Known Member
Joined
May 6, 2014
Messages
181
Reaction score
0
Points
16
Be aware that on the 99 248, there is a metal tube or angle about a ½" below the cap. Make sure the screws you use aren't too long or you will need to source different screws. Ask me how I know! Ideally, use the same length and diameter screws.
Thanks for the information
 

DennisG01

GreatGrady Captain
Joined
Sep 1, 2013
Messages
6,825
Reaction score
1,210
Points
113
Location
Allentown, PA & Friendship, ME
Model
Offshore
Be aware that on the 99 248, there is a metal tube or angle about a ½" below the cap. Make sure the screws you use aren't too long or you will need to source different screws. Ask me how I know! Ideally, use the same length and diameter screws.
I believe that actually applies to quite a few (all?) models - but good reminder!
 

family affair

Well-Known Member
Joined
Jul 31, 2010
Messages
1,303
Reaction score
292
Points
83
Location
Ohio
Model
Islander
I believe that actually applies to quite a few (all?) models - but good reminder!
Most are likely the same, but I don't have experience to know. I can tell you when I was all ready to put everything back together with new hardware (on the weekend) that I was mighty pissed when the slightly longer screws wouldn't work and there was no place for me to source something different. Had to wait another entire week just because screws were an ⅛" too long!
 

DennisG01

GreatGrady Captain
Joined
Sep 1, 2013
Messages
6,825
Reaction score
1,210
Points
113
Location
Allentown, PA & Friendship, ME
Model
Offshore
Most are likely the same, but I don't have experience to know. I can tell you when I was all ready to put everything back together with new hardware (on the weekend) that I was mighty pissed when the slightly longer screws wouldn't work and there was no place for me to source something different. Had to wait another entire week just because screws were an ⅛" too long!
I hear 'ya on the frustrating part - been there! Where I vacation in Maine, if I need a screw it's about a 2 hour trip. I now have multiple tackleboxes (the kind you can divide into lot's of sections) filled and neatly labelled with SS hardware, electrical connectors, etc. A little pricey to get it stocked - but it should last me many, many years.

Now... to play arm chair quarterback with hindsight... but maybe will help in the future :) Once you found they were hitting a wall, just grind or snip off some of the tip. The hole for the screw is already created so you don't need something with a tip on it.
 

family affair

Well-Known Member
Joined
Jul 31, 2010
Messages
1,303
Reaction score
292
Points
83
Location
Ohio
Model
Islander
Now... to play arm chair quarterback with hindsight... but maybe will help in the future :) Once you found they were hitting a wall, just grind or snip off some of the tip. The hole for the screw is already created so you don't need something with a tip on it.
If only it were that easy! The screws I had were slightly smaller diameter too. I had hoped to run them a little deeper in the same holes. I hate when that SOB Murphy shows up on a simple project!:)
 
  • Like
Reactions: gradywhite248

DennisG01

GreatGrady Captain
Joined
Sep 1, 2013
Messages
6,825
Reaction score
1,210
Points
113
Location
Allentown, PA & Friendship, ME
Model
Offshore
If only it were that easy! The screws I had were slightly smaller diameter too. I had hoped to run them a little deeper in the same holes. I hate when that SOB Murphy shows up on a simple project!:)
I've run into that guy so many times over the years... I can't belive he ain't dead, yet ;)
 

SteveM

Member
Joined
Apr 20, 2023
Messages
8
Reaction score
0
Points
1
Age
61
Model
Voyager
I had mine replaced a couple months ago.
A local fabricator made one
over sized and heavier guage.
Sealed the bejeepers out of it and it is rock solid.