I replaced the pump that was there with the same model. I keep this. Oat on a trailer so didn’t feel the need to upgrade the size. However upon trying to zip tie the wire out of the way the piece of wood that they’re mounted on lifted as you can see in the photos. I’m unable to get access or I’d chisel out the old caulking or whatever the factory used and glass in a new piece. However after removing the old livewell there’s no way to reach in there that far. What would you guys recommend. I was wondering if either 5200 or marine Tex would do the trick. This is on a 1989 seafarer 228.

You are using an out of date browser. It may not display this or other websites correctly.
You should upgrade or use an alternative browser.
You should upgrade or use an alternative browser.
How to repair this??
- Thread starter Sriso100
- Start date

I had the same thing happen on my 1887 228.
You could use 5200, I wouldn't use marine tex for that application, but another option would be 2 part epoxy that mixes itself from a caulking gun. That would give you another 12" of reach down there, and set time is about 40 minutes. I used 5200 because I already had a cartridge. I like to apply it in random pattern of dime sized circles if that makes sense.
I suppose what is easiest for you to get, or maybe you already have some on hand.
Easy fix!
SkunkBoat
GreatGrady Captain
- Joined
- Oct 12, 2017
- Messages
- 4,947
- Reaction score
- 1,775
- Points
- 113
- Location
- Manasquan Inlet NJ
- Website
- www.youtube.com
- Model
- Express 265
Bloodweiser
Well-Known Member
- Joined
- Feb 10, 2020
- Messages
- 650
- Reaction score
- 169
- Points
- 43
- Age
- 53
- Location
- Northern Cal
- Model
- Seafarer
Unfortunately the only access is to remove the livewell and you need to have crazy long arms. I do have a caulking tube of 5200. I’m letting everything dry really good. I will update everyone when finished. Thanks everyone
DennisG01
GreatGrady Captain
- Joined
- Sep 1, 2013
- Messages
- 8,092
- Reaction score
- 1,605
- Points
- 113
- Location
- Allentown, PA & Friendship, ME
- Model
- Offshore
Are you sure there isn't a floor panel that can be removed with a few screws? Most of the boats have that - the first picture I pulled up of a Seafarer via google showed it.
Post a pic of your cockpit floor.
How are you going to protect the wood? It won't take long for it to rot away and become dislodged, otherwise.
But, to answer your question, installing is easy - reassemble the wood/pump/float... put the 5200 on the wood and lower it into place (as simple as two pieces of string taped to the top of the wood, which you would pull off after it dries)... push the assembly down tight to the bilge floor with a stick.
But... just know that using 5200 will be, in the future, at least as hard to remove as whatever Grady used.
Summertop511
Well-Known Member
Same thing happened to me on my 87 206g. Got an automatic rule pump that required no float. Let bilge dry with the plug out. Then caulked down the blue base. Let it cure then clicked in pump. All done
HookUp
Well-Known Member
- Joined
- Sep 27, 2007
- Messages
- 236
- Reaction score
- 61
- Points
- 28
- Model
- Adventure
maybe one of those grabby things short people use in the kitchen to get stuff out of the top shelf of the cupboard
Amazon.com: RMS 26" Handi Grip Reacher (Red): Health & Personal Care
Buy RMS 26" Handi Grip Reacher (Red) on Amazon.com ✓ FREE SHIPPING on qualified orders
www.amazon.com
The only access to the bilge on Sirso 110's bilge is by removing the livewell. The rear floor hatch that was designed for an aux fuel tank and is closed off from the bilge if you remove it. Been there and done that.
He's got it covered I would say. For the remaining water in the bilge I just threw down some large bath towels and problem solved-water magically disappeared like this...
He's got it covered I would say. For the remaining water in the bilge I just threw down some large bath towels and problem solved-water magically disappeared like this...
. I’m very seen this video before and it’s great!! Yes you explained my boat perfectly. My brother in law is 6’5 and his reach is 86 which is ridiculous. That’s better than Jon Jones for anyone who follows UFC. Mind you he can barely reach down there. He’s the one who fastened everything in. I feel like Grady should’ve came up with a better method for accessing this area lol. Once again thanks everyone.

SkunkBoat
GreatGrady Captain
- Joined
- Oct 12, 2017
- Messages
- 4,947
- Reaction score
- 1,775
- Points
- 113
- Location
- Manasquan Inlet NJ
- Website
- www.youtube.com
- Model
- Express 265
I actually thought about that. Seems like a great idea. Would it interfere with the structural integrity of the hull?If it was me I would put in a Tempress hatch in that vertical bulkhead.
Sparkdog118
Well-Known Member
- Joined
- Apr 8, 2020
- Messages
- 638
- Reaction score
- 135
- Points
- 43
- Age
- 55
- Location
- Ft Myers, fl
- Model
- Offshore
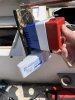
 Get a stainless strip long enough so you can make a long transom mount instead of the 2 inch mount in this pic. This is the one out of my little boat. My 24 offshore has a 2 ft transom mount so I can wire the pump and hook up the hose while not even in the hole. Mounts to transom where you can easily screw n unscrew it to change the pump and float easily. I also used a caged float since trash was alwaysgetting under it and making it stay on, burning out the pump or killing the battery. The plate also keeps the pump n float at the same level like your old plate. It is just easily removable.
Sparkdog118
Well-Known Member
- Joined
- Apr 8, 2020
- Messages
- 638
- Reaction score
- 135
- Points
- 43
- Age
- 55
- Location
- Ft Myers, fl
- Model
- Offshore
I have made them out of aluminum flat bar, but over the years, corrosion was a small issue. Also aluminum has to be heated to get it to bend without cracking. Stainless will bend in a vise and you can tap the plate to use 10-32 bolts. Or can use nut n bolt.
SkunkBoat
GreatGrady Captain
- Joined
- Oct 12, 2017
- Messages
- 4,947
- Reaction score
- 1,775
- Points
- 113
- Location
- Manasquan Inlet NJ
- Website
- www.youtube.com
- Model
- Express 265
noI actually thought about that. Seems like a great idea. Would it interfere with the structural integrity of the hull?
Lt.Mike
Well-Known Member
- Joined
- Oct 18, 2013
- Messages
- 884
- Reaction score
- 165
- Points
- 43
- Age
- 65
- Location
- Farmingdale NJ
- Model
- Overnighter
I guess we all run into this issue. This was my solution. The bracket is aluminum that was clear coated with a thick spray used to coat tool handles.
The bracket was bent to allow a clear path for debris and water to flow out of the drain plug, also for cleaning the bilge.
Bending it 45 degrees instead of 90 makes it less likely to crack and no heat is needed. The Screws and washers are stainless.
You'll notice its a little off center too. (maybe like me") )
)
Its been in 4 years now and stills looks like it did when first mounted in this photo.
I designed it to bolt it higher on the transom for easier reach for both installation and i f I need to remove it. It is sealed with 3M5200.
Screwing into the transom isn't a worry as there is a 2" thick wood core to hold it but there is a worry about introducing an entry point for water to get to the wood, hence the use of 3M5200 to seal it. 3M5200 Is the WD40 / duct tape of the boating world.")
I used the pump I had after cleaning it up but may upgrade it to a better pump or mount a second higher volume pump as a backup.
***One last important note, you'll notice how I've routed the pumps wiring straight up. all connections are covered with shrink tube that has marine sealant.
DO NOT ALLOW YOUR WIRES TO LAY IN THE BILGE. They are waterproof but only to a point. Constantly soaking the jacketing in that small amount of water that lays in the bilge will eventually do its damage. A pump is safety equipment, don't take it for granted and don't take short cuts.

The bracket was bent to allow a clear path for debris and water to flow out of the drain plug, also for cleaning the bilge.
Bending it 45 degrees instead of 90 makes it less likely to crack and no heat is needed. The Screws and washers are stainless.
You'll notice its a little off center too. (maybe like me
)Its been in 4 years now and stills looks like it did when first mounted in this photo.
I designed it to bolt it higher on the transom for easier reach for both installation and i f I need to remove it. It is sealed with 3M5200.
Screwing into the transom isn't a worry as there is a 2" thick wood core to hold it but there is a worry about introducing an entry point for water to get to the wood, hence the use of 3M5200 to seal it. 3M5200 Is the WD40 / duct tape of the boating world.
I used the pump I had after cleaning it up but may upgrade it to a better pump or mount a second higher volume pump as a backup.
***One last important note, you'll notice how I've routed the pumps wiring straight up. all connections are covered with shrink tube that has marine sealant.
DO NOT ALLOW YOUR WIRES TO LAY IN THE BILGE. They are waterproof but only to a point. Constantly soaking the jacketing in that small amount of water that lays in the bilge will eventually do its damage. A pump is safety equipment, don't take it for granted and don't take short cuts.
Last edited:
Sparkdog118
Well-Known Member
- Joined
- Apr 8, 2020
- Messages
- 638
- Reaction score
- 135
- Points
- 43
- Age
- 55
- Location
- Ft Myers, fl
- Model
- Offshore
Lt.Mike
Well-Known Member
- Joined
- Oct 18, 2013
- Messages
- 884
- Reaction score
- 165
- Points
- 43
- Age
- 65
- Location
- Farmingdale NJ
- Model
- Overnighter
I Have a serious debate going on in my head right now whether to show this to my wife or not.The only access to the bilge on Sirso 110's bilge is by removing the livewell. The rear floor hatch that was designed for an aux fuel tank and is closed off from the bilge if you remove it. Been there and done that.
He's got it covered I would say. For the remaining water in the bilge I just threw down some large bath towels and problem solved-water magically disappeared like this...

Lt.Mike
Well-Known Member
- Joined
- Oct 18, 2013
- Messages
- 884
- Reaction score
- 165
- Points
- 43
- Age
- 65
- Location
- Farmingdale NJ
- Model
- Overnighter
There probably is but is most likely as small as the one my Overnighter has. It’s big enough to see the problem but not enough to deal with it.There isn't a deck lid that could be removed to get you some access?

Theres no getting around it doing jobs like this will leave you hurting.
Mounting my bilge pump, livewell pumps and plumbing along with dealing with electrical issues has left me with some serious looking bruises and scrapes.
I guess it’s the nature of the beast.
If you don't do laundry or dishes, I suggest you delete the clip to avoid doing something you will regret!I Have a serious debate going on in my head right now whether to show this to my wife or not.