1987 228 Seafarer Aluminum tank and Fuel lines replacement

leeccoll

GreatGrady Captain
Joined
May 18, 2019
Messages
1,052
Reaction score
416
Points
83
Age
60
Location
Reno NV
Model
Seafarer
Hi all,

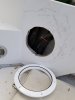
I have an '87 228 Seafarer that I bought used 4 years ago. Competed some major overdue maintenance items, and latest issue to come up is fuel sender (original) has been erratic and now doesn't work so I went ahead and ordered a wema.
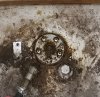
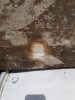
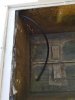
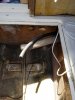
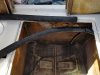
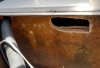
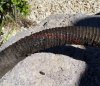
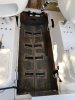
Because of the hull age, I believe the stainless mounting screws on the sender have completely welded themselves to the gas tank. I have been soaking them in PB Blaster and Liquid Wrench for a week. No dice on any movement of the screw heads.

I also took an exacto knife and awl to pick away the gasket between the sender and tank until I reached the screws and sprayed multiple times with penetrating oil in there. Plenty of corrosion powder was coming out as I used the awl to excavate the gasket head.

Still no luck on any of the screws, it gets a bit depressing, but hey I know about setbacks from boat projects ;)

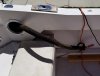
Any tips or ideas on where to move forward. I was thinking I will up the ante by tring an impact drill (already tried hand impact drill with without any luck) and if the heads strip, so be it. Drill them out and go from there.

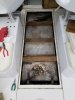
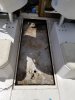
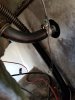
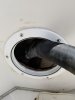
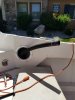
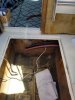
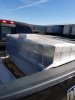
Finally, the gas tank and fill, vent and outboard lines are all original, so now my mind wanders to just taking out and replacing the tank. I know...I am on borrowed time and not cheap, the original manufacturer quoted me $1,581 plus 350 shipping for a new tank because I live in Nevada. Whole other story how I got this boat from Delaware to Reno lol.

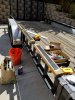
And of course there is 2" difference between the existing tank and floor, so I can't just cut the lip of the access hatch, and cutting floor I really want to avoid. Means moving a lot of things before I can cut so I would just empty then fill tank with water and cut the darn thing out with a sabre saw or something like that.

If anybody has sage advice on either getting the sender out or just going for a new tank and lines, I am grateful for your time and input!

Lee
 

Attachments

  • 20190519_131846.jpg
    20190519_131846.jpg
    260.7 KB · Views: 141
  • 20190513_164535.jpg
    20190513_164535.jpg
    1.7 MB · Views: 145
Last edited:

Doc Stressor

Well-Known Member
Joined
Nov 13, 2009
Messages
1,177
Reaction score
288
Points
83
Location
Homosassa, FL
Model
Seafarer
You really need to replace that tank if it is the original. I usually waited 15 years before I check my tanks over the years. But by then they all had leaks. You have a lot of crevice corrosion on the top, so I'd worry about what the bottom looks like.
 

leeccoll

GreatGrady Captain
Joined
May 18, 2019
Messages
1,052
Reaction score
416
Points
83
Age
60
Location
Reno NV
Model
Seafarer
Yes its the original.
I think that is the best decision too. I never saw or smelled gas in the bilge so I have been keeping my fingers crossed. Now seems like a good time to bite the bullet.
Thanks for your thoughts. :cool:
 
Last edited:

Ky Grady

GreatGrady Captain
Staff member
Joined
Mar 1, 2006
Messages
2,918
Reaction score
1,272
Points
113
Location
Berea, KY/Cross, SC
Model
Seafarer
Have to go with Doc on this. My auxiliary tank was corroded around the fuel sending unit creating my leak. At this time, I only replaced the auxiliary tank, but I did replace all hoses for both tanks. In your case, I would at least pull your tank to get a look at the bottom, topside looks rough, can only imagine the bottom. I went with Florida Marine Tank as they were the original fabricator for my tanks.
 

UCPA111

Well-Known Member
Joined
Jul 24, 2017
Messages
325
Reaction score
103
Points
43
Location
Erie, PA
I went with Patriot Marine Fabricating in New Jersey. He makes them a little narrower so they fit better, but otherwise the stock GW design and he's a certified fuel tank manufacturer. I think it was around $750 for the tank and a couple hundred in shipping. Beautiful tank. Paul Spisak is his name. 609-693-5542 This includes the sender in the tank. Not much $$ for the piece of mind. Replaced all hoses when I did it as well. PM me if you have questions.
 
  • Like
Reactions: leeccoll

leeccoll

GreatGrady Captain
Joined
May 18, 2019
Messages
1,052
Reaction score
416
Points
83
Age
60
Location
Reno NV
Model
Seafarer
Have to go with Doc on this. My auxiliary tank was corroded around the fuel sending unit creating my leak. At this time, I only replaced the auxiliary tank, but I did replace all hoses for both tanks. In your case, I would at least pull your tank to get a look at the bottom, topside looks rough, can only imagine the bottom. I went with Florida Marine Tank as they were the original fabricator for my tanks.

Agreed. Peace of mind is worth it at the end of the day for me. Thanks for the input!
 
  • Like
Reactions: Ky Grady

leeccoll

GreatGrady Captain
Joined
May 18, 2019
Messages
1,052
Reaction score
416
Points
83
Age
60
Location
Reno NV
Model
Seafarer
I went with Patriot Marine Fabricating in New Jersey. He makes them a little narrower so they fit better, but otherwise the stock GW design and he's a certified fuel tank manufacturer. I think it was around $750 for the tank and a couple hundred in shipping. Beautiful tank. Paul Spisak is his name. 609-693-5542 This includes the sender in the tank. Not much $$ for the piece of mind. Replaced all hoses when I did it as well. PM me if you have questions.

Wow, that's a great price! Got a quote from another vendor for $1,145+ shipping earlier today, but yours is a huge savings, and since I have an old hull, I have to be judicious on what I sink $$$ into.

I'll contact him tomorrow. I'm sure I will be asking you a question or two when I get to the hoses...:eek:

Grateful for your help~
 

leeccoll

GreatGrady Captain
Joined
May 18, 2019
Messages
1,052
Reaction score
416
Points
83
Age
60
Location
Reno NV
Model
Seafarer
I went with Patriot Marine Fabricating in New Jersey. He makes them a little narrower so they fit better, but otherwise the stock GW design and he's a certified fuel tank manufacturer. I think it was around $750 for the tank and a couple hundred in shipping. Beautiful tank. Paul Spisak is his name. 609-693-5542 This includes the sender in the tank. Not much $$ for the piece of mind. Replaced all hoses when I did it as well. PM me if you have questions.

Ordered new tank through Patriot Marine Fabricating. Cost just under $800 + Shipping. Paul was great to work with!
Substantial savings... I owe you a biggie UCPA111

Thanks again for your help!
 
  • Like
Reactions: dstarok

UCPA111

Well-Known Member
Joined
Jul 24, 2017
Messages
325
Reaction score
103
Points
43
Location
Erie, PA
Ordered new tank through Patriot Marine Fabricating. Cost just under $800 + Shipping. Paul was great to work with!
Substantial savings... I owe you a biggie UCPA111

Thanks again for your help!

No worries. Glad it worked out. Paul was great to work with and I told him I'd pass his name along anywhere I could. I was impressed with the tank and how it was shipped. I hope it all works out for you.
- Shawn
 
  • Like
Reactions: leeccoll

leeccoll

GreatGrady Captain
Joined
May 18, 2019
Messages
1,052
Reaction score
416
Points
83
Age
60
Location
Reno NV
Model
Seafarer
Tank and lines replacement project is in full swing now. Found a company here in Reno that could pump out the remaining gas. Got tank out by cutting the sides of the deck a bit. Will be unnoticeable once the hatch goes back on. Was super lucky I didn't have make any cuts on the fiberglass near the cuddy cabin door.

Pulled out tank, yep lot's o crevice corrosion underneath.
 

Attachments

  • 20190617_140158 (2).jpg
    20190617_140158 (2).jpg
    1.2 MB · Views: 135
  • 20190617_141812.jpg
    20190617_141812.jpg
    1.4 MB · Views: 133
  • 20190617_143618.jpg
    20190617_143618.jpg
    1.4 MB · Views: 134
  • 20190617_143656.jpg
    20190617_143656.jpg
    2.1 MB · Views: 137
  • 20190617_143728.jpg
    20190617_143728.jpg
    2.2 MB · Views: 133
Last edited:

leeccoll

GreatGrady Captain
Joined
May 18, 2019
Messages
1,052
Reaction score
416
Points
83
Age
60
Location
Reno NV
Model
Seafarer
Cut an access hole to get at my fuel and vent hookups. Carolyn that works at Grady White customer service is the most helpful person for these older boat projects. She always goes above and beyond!

Interestingly enough, Grady plumbed in a second set back in the day in case the owner wanted to add an auxiliary tank down the road.

Got my new fuel line that goes to the water separator in the bilge and vent line installed. Ordered a new fill line from West Marine, should be arriving tomorrow. Tank should be arriving next week.

Plenty of cuts and scrapes on my hands and arms. ;)
 

Attachments

  • 20190617_191638.jpg
    20190617_191638.jpg
    1.1 MB · Views: 99
  • 20190619_115016.jpg
    20190619_115016.jpg
    1.5 MB · Views: 98
  • 20190619_114936.jpg
    20190619_114936.jpg
    1.2 MB · Views: 99
  • 20190619_114918.jpg
    20190619_114918.jpg
    1.5 MB · Views: 98
Last edited:

Ky Grady

GreatGrady Captain
Staff member
Joined
Mar 1, 2006
Messages
2,918
Reaction score
1,272
Points
113
Location
Berea, KY/Cross, SC
Model
Seafarer
Thanks for the updates. I enjoy working on my boat. Let's me know more about it and where things are. satisfying to know things are done to your liking.
 
  • Like
Reactions: leeccoll

leeccoll

GreatGrady Captain
Joined
May 18, 2019
Messages
1,052
Reaction score
416
Points
83
Age
60
Location
Reno NV
Model
Seafarer
Thank you Ky,

This project is well worth the effort. And your advice on how to snake the new hoses in was a great help to me!

Grady built these boats substantially, I don't mind putting in the time like you to make sure the job is well done.

PS-Guy that pumped out my gas used a forklift to move the boat 6" sideways. He said to me "I wasn't expecting it to be so heavy". :)
 

leeccoll

GreatGrady Captain
Joined
May 18, 2019
Messages
1,052
Reaction score
416
Points
83
Age
60
Location
Reno NV
Model
Seafarer
Well fill hose showed up and things became frustrating and went downhill from there :mad:

The first thing I did is replace the 4" screw out inspection plate under the driver's seat with a 6" version. There's no way I could work in there without more room.
At first I spliced the hoses together near the gas fill. I used a PVC coupler and screwed them together then duct taped for added strength.
After pulling and not an inch of budging I decided to splice the hoses together down in the coffin and pull from the top. Of course the coupling fell down the old pipe a bit and after a while I gave up on getting it out. I used Gorilla duct tape, and though it would hold for the tough journey ahead (rookie mistake).

So then I drilled through the old hose end where I would pull and attached a long screwdriver to get some leverage. That was a good idea.

The 1986 fill line was stiff and severely contorted (I know, right?), but with the help of my son and a neighbor we got it to move a bit, then it bound up somewhere. I was pushing with a wooden dowel in the area under the captain's chair while someone held the top secure. I was able to get the hose moving a few inches at a time. Then another halt on progress. I cut a 2" round hole in the side of the coffin where I knew the hose would be. The hose was getting caught on a turn and looked like it needed to get pulled out toward the coffin interior wall. Not enough space to work with so I pulled out the sawzall and cut a larger access. Bingo! was able to grab the hose and things started to move slowly again.

Forward to getting the new hose around a turn toward the mid section and the hoses came apart. I was lucky, the new hose was where I could grab it from the new access plate under the captain's chair and feed it up through the top hole by hand. If it was even 3" lower than where I could grab, I'd be up sh*t creek. The old hose exterior was in bad shape, and it was catching on the foam in the compartment to make matters tougher. Alligator skin.

All is well now, leaving the extra hose length as is until my new tank goes in the coffin. Fixed the holes I made in the coffin with epoxy and fiberglass mat.

The big takeaway for me was to not quit under adversity and think of alternatives when I hit a wall and to make sure there is a coupler or dowel splicing the 2 hoses together :)

This fill line took 1.5 days and 2-3 people. DONE! :cool:
 

Attachments

  • 1.jpg
    1.jpg
    983.3 KB · Views: 95
  • 2.jpg
    2.jpg
    1.1 MB · Views: 97
  • 3.jpg
    3.jpg
    1.2 MB · Views: 97
  • 4.jpg
    4.jpg
    1.1 MB · Views: 95
  • 5.jpg
    5.jpg
    1 MB · Views: 93
  • 6.jpg
    6.jpg
    827.9 KB · Views: 94
  • 7.jpg
    7.jpg
    1.3 MB · Views: 95
  • 8.jpg
    8.jpg
    1.7 MB · Views: 97
  • 9.jpg
    9.jpg
    1.3 MB · Views: 94
  • 10.jpg
    10.jpg
    1.3 MB · Views: 94
Last edited:

leeccoll

GreatGrady Captain
Joined
May 18, 2019
Messages
1,052
Reaction score
416
Points
83
Age
60
Location
Reno NV
Model
Seafarer
Received new tank yesterday. Thanking Shawn (UCPA111) -I think that stands for U See Pennsylvania...I grew up outside Pittsburgh. And Paul Spisak from Patriot Marine Fabricating in NJ for making such a nice looking tank that was tested to USCG standards, and packaged superbly for transit across the country. He also welded an extra plate where my fuel sending unit goes-I appreciate that.

I used my friend's house to do the work that doesn't have an aggressive HOA (I got a letter in 2 days from having my boat in front of my house :mad:)

Dry fit the new tank in the coffin. Figured out how thick the side and end spacers should be, then cut a PVC board for spacers, clamped and glued so the would be easier to install. Marked where I wanted the spacers to go for the side lag bolts.

Used 5200 to attach the closed cell neoprene to the wood supports that go on top of the tank. Then glued the strips to the bottom of the coffin. Opposite of what David Pascoe suggests for an install, but in my case the fiberglass pads that the tank sits on were a bit uneven and I want the tank to sit solidly on the bottom, so I could adjust the strips to the contours of the existing pads.

Tomorrow will install the new tank into coffin :eek:
 

Attachments

  • 20190625_090837.jpg
    20190625_090837.jpg
    1.8 MB · Views: 90
  • 20190625_121916.jpg
    20190625_121916.jpg
    2 MB · Views: 98
  • 20190625_132722.jpg
    20190625_132722.jpg
    1.1 MB · Views: 99
  • 20190625_145801.jpg
    20190625_145801.jpg
    2.2 MB · Views: 98
  • 20190625_145858.jpg
    20190625_145858.jpg
    2.1 MB · Views: 94
  • 20190625_172710.jpg
    20190625_172710.jpg
    1.3 MB · Views: 102
Last edited:

leeccoll

GreatGrady Captain
Joined
May 18, 2019
Messages
1,052
Reaction score
416
Points
83
Age
60
Location
Reno NV
Model
Seafarer
This job is complete :D.
Spacers on both ends inserted and lag bolts on the sides were done after I snapped this picture.

20190627_163638.jpg
 
Last edited:
  • Like
Reactions: Uncle Joe

Ky Grady

GreatGrady Captain
Staff member
Joined
Mar 1, 2006
Messages
2,918
Reaction score
1,272
Points
113
Location
Berea, KY/Cross, SC
Model
Seafarer
Looks good.

Is the tank bare aluminum or is it coated on the outside?
 

RussGW270

GreatGrady Captain
Joined
Mar 5, 2019
Messages
1,761
Reaction score
253
Points
63
Age
57
Model
Islander
Aw hell... now you all are going to make me want to cut the access ports open and check my tanks too! lol

okay.. that can wait at least a year :p

R

p.s. the new tank looks awesome btw!
 
  • Like
Reactions: leeccoll

leeccoll

GreatGrady Captain
Joined
May 18, 2019
Messages
1,052
Reaction score
416
Points
83
Age
60
Location
Reno NV
Model
Seafarer
Looks good.

Is the tank bare aluminum or is it coated on the outside?

Hi Ky,

It's bare aluminum. Fabricator recommend this to me. I know there are many different opinions about bulletproofing a tank, but I usually defer to someone that does this kind work for a living.
Since the original tank was mostly in saltwater, and the deck plates leaked due to age and lack of maintenance, the fact that the original tank lasted 32 years without a leak leads me to believe this will be the last tank in the boat. I took out the 2 deck plates a few years ago and totally re did the marine grade plywood and fiberglass as Grady recommended to me. When I pulled up both plates for this job, they were bone dry underneath.

I think it will be the right choice for me, but who knows...

Glad its done now. Took her out today for a couple hours to test run, feels solid!

This all came to be because of a bad fuel sender. Happy to know how much gas is in the tank now.

Side note-I was struggling whether or not to add an anti-siphon valve to the gas line. I finally called Grady to get their stance and they said it goes on all their boats, I had ordered it on mine prior to the call, but made me feel a bit better about the decision.
 
Last edited:

leeccoll

GreatGrady Captain
Joined
May 18, 2019
Messages
1,052
Reaction score
416
Points
83
Age
60
Location
Reno NV
Model
Seafarer
Aw hell... now you all are going to make me want to cut the access ports open and check my tanks too! lol

okay.. that can wait at least a year :p

R

p.s. the new tank looks awesome btw!

LOL, you have to pick your battles with these things. I was actually avoiding even thinking about replacing the tank and fuel lines since I purchased the boat. Now I feel like I never have to deal with it again .

Thanks,

Lee