1999 Bimini 306 - replacing fuel tanks.

blindmullet

Well-Known Member
Joined
Oct 19, 2015
Messages
449
Reaction score
106
Points
43
Location
Florida
Model
Explorer
@blindmullet thanks for your response 1/2 the price. And Colin was great to talk to.
Colin has more experience and you will get a better tank than the big tank company in the state. It's just him and on other guy that's been there for 15+ years. His wife takes care of the paperwork and phones. I need to get in there and have him do my Grady tank before he retires.
 

Hookup1

GreatGrady Captain
Joined
Oct 16, 2007
Messages
2,601
Reaction score
714
Points
113
Age
69
Location
Cape May, NJ
Model
Islander
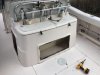
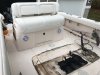
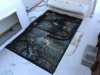
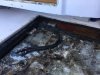
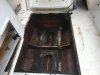
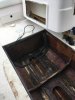
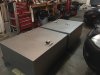
Lesson learned. The fuel tanks need to be rinsed regularly, and the deck plate o-ring seals are prone to leaking. I have had this boat since 2005. About 5 years ago, I pulled the deck plate to have a look underneath. I saw A LOT of white jelly. Sadly - I thought that jelly was a protective lubricant on the fittings. So I left it in place, and forgot to / but meant to call GW about it to confirm. This past week I was replacing the o-rings because the plates were popping up while driving, and discovered how stupid I was, that it was just a bunch of salt build up. Probably a combination of salt water, bacteria. I cleared away the salt build up by the hand full, and threw it overboard. In the process I began to smell gas. What i discovered after cleaning thing up a bit more was a 1/2 inch by 3/4 inch hole at the line feeding the engines. Of course the reat tank (the one w/ the hole) was full. I ahve not yet tried to clean the front tank for fear of putting another hold in that tank also.

A few questions....

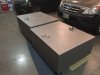
  1. How much money should I expect to spend to have both 150 Gallon tanks replaced.
  2. What do you do with 200 Gallons of fuel?
  3. Do you re-use the fuel? If so do you pump it mechanically back into the new tanks?
  4. I have seen some other posts about where to get tanks including from the original manufacturer (RDS).
  5. I expect to need to remove the seat/leaning post to get access to the access panels. I don't know how that is secured to the deck. Any pointers would be helpful.
I am very disappointed with my self because I take such good care of this boat, but the tank rinsing is something that never occurred to me. I now see that in the manual that it needs to be done at least 2x per year.

I keep the boat on a mooring, so there is some pretty good rocking as boats go by. Today I tried patching it with J&DWeld. I managed to get the hole covered, but gas is continuing to weep through the patch. I have not yet turned the batteries on since the discover/hole formed. I am hoping to be a able to run the boat on a calm day at high RPMs to get the fuel way down below the top of the aluminum.

Any pointers on this process are welcome. See pictures

Also - any recommendations on a marine shop that can do this work in the sea coast New Hampshire area. I have a feeling this may be a bigger job than I am capable of.

Ed


View attachment 15865View attachment 15866View attachment 15867

I have been watching my fuel tanks for a few years and just finished a inspection project last week.


I have a 1997 268 Islander. Couple of things I can tell you to help.

I regularly bring my boat back from a winter trip to FL and pump some ethanol free fuel out for my lawn equipment. I use a automotive fuel pump with a long power cord that plugs into my truck (keep sparks away). Hose is hooked up to fuel bulb, prime it and start pump. Fuel goes into 5 gallon fuel cans.

IMG_1144.jpeg

Underneath the deck ports I use a 18" x 18" sheet of polly to cover the business end of the fuel tank. If ports leak at least it is deflected away from the fittings.

That "goo" that you see may be the adhesive from the plywood inside your deck hatch covering the fuel tank. Mine was compromised leaking a coffee colored liquid on my deck when removed it. Tanks had sticky glue like mix on top of them.

Fuel compartment doesn't drain into bilge. There is a glassed in hose running from the front of the boat to the back. The idea is to keep leaked fuel in the fuel compartment. At the start of the project I had pumped the liquid out of the compartment (plastic hand pump) to check for fuel (there was none). After I cleaned my tanks I pumped all the water out and vacuumed out what was left.

If I were going to wash my tanks I would pull the deck hatch, clean them up and pump all the water out so the tanks are not sitting in water that has no way to drain (only evaporate).

Deck repair is documented in the above link.

Both tanks were emptied as above. I smoke tested and pressure tested both tanks to make sure I had no tank leaks or more importantly hose leaks (spray bottle soapie water). There were none.

Water gets into fuel compartment via deck hatch condensation, deck hatch caulking, deck hatch screw holes and deck hatch access ports (biggest contributor).

New access ports installed with 3M 4000. Deck edges and screw holes caulked with 3M 4000. Access ports are not opened frequently so I plan to 3M clear silicone caulk them shut.
 
Last edited:

IFish4Tuna

Well-Known Member
Joined
Apr 12, 2005
Messages
108
Reaction score
27
Points
28
Location
York Harbor, ME
Great tip on the tank locations holding water. Would have never known / thought of that.


My boat is being hauled on Nov 4th, then the winterizing fun begins and will tear up the deck. I did get an even better price quote from a local aluminum shop.
 

IFish4Tuna

Well-Known Member
Joined
Apr 12, 2005
Messages
108
Reaction score
27
Points
28
Location
York Harbor, ME
I decided to document the process along the way. Here are a few pictures of prepping to pull the leaning post & getting the deck up. I'll upload a video to youtube once done also.
An observation. There is not much of anything to grab onto to lift them out. I may have to device a pully hanging off the t-top and hook it to the hose fittings. Also the leaning post is definitely in the way. I could get the deck up with it moved over to the side on blocks, but the rear tank will be blocked on a virtical pull. The tank needs to come up vertically I believe. Maybe it can come out on the starboard side...I hope so.
 

Attachments

  • IMG_5800.JPG
    IMG_5800.JPG
    2 MB · Views: 14
  • IMG_5804.JPG
    IMG_5804.JPG
    1.7 MB · Views: 13
  • IMG_5806.JPG
    IMG_5806.JPG
    2.2 MB · Views: 15
  • IMG_5807.JPG
    IMG_5807.JPG
    2.2 MB · Views: 14
  • IMG_5854.JPG
    IMG_5854.JPG
    2.1 MB · Views: 15
  • IMG_5857.JPG
    IMG_5857.JPG
    2.4 MB · Views: 15
Last edited:

Fishtales

Well-Known Member
Joined
Jan 31, 2005
Messages
7,558
Reaction score
1,177
Points
113
I'm gonna say that it's a 1999 model so it saw water in 98 or 99. I would suspect no matter how well you rinsed them, you would be replacing around this timeframe.
 

IFish4Tuna

Well-Known Member
Joined
Apr 12, 2005
Messages
108
Reaction score
27
Points
28
Location
York Harbor, ME
Tanks up & out
 

Attachments

  • IMG_5871.JPG
    IMG_5871.JPG
    2.2 MB · Views: 15
  • IMG_5872.JPG
    IMG_5872.JPG
    1.6 MB · Views: 15
  • IMG_5868.JPG
    IMG_5868.JPG
    2.1 MB · Views: 15

IFish4Tuna

Well-Known Member
Joined
Apr 12, 2005
Messages
108
Reaction score
27
Points
28
Location
York Harbor, ME
Sorry @Buckee - I'm not sure why I didn't get notified of your post. I'll have to check into that. As for how to get out. Used rope trapped around the fittings on top, and lifted from port and starboard. Not real heavy maybe 50lbs at most, but awkward as F. Not a 1 person job to lift out. As seen in the photo, I did have to sawsall the baffling to get the front tank out.
 

IFish4Tuna

Well-Known Member
Joined
Apr 12, 2005
Messages
108
Reaction score
27
Points
28
Location
York Harbor, ME
New Tanks - Very pretty !!

They did not come coaltar painted. That was done by the guy helping me with removal/install
Got both of these from Kentfab in Massachusetts. This was significantly better in pricing than I found with others. Plus local pickup instead of shipping.

$2441 total price for both tanks.
 

Attachments

  • IMG_5993.JPG
    IMG_5993.JPG
    905.1 KB · Views: 5
  • IMG_5994.JPG
    IMG_5994.JPG
    966.7 KB · Views: 3

efx

Well-Known Member
Joined
Jun 19, 2018
Messages
263
Reaction score
87
Points
28
Location
Los Angeles
Model
Islander
Make sure you have an air space under this new tanks. I have used heavy rubber strips similar to what Grady used. Air flow around the tank is key to keeping them in good shape.
 

blindmullet

Well-Known Member
Joined
Oct 19, 2015
Messages
449
Reaction score
106
Points
43
Location
Florida
Model
Explorer
Make sure you have an air space under this new tanks. I have used heavy rubber strips similar to what Grady used. Air flow around the tank is key to keeping them in good shape.

You really don't want to use rubber on the bottom of the tank. Most manufacturers moved away from that practice. Rubber is a conductor as it usually contains carbon. The tank manufacturer in my area lays RTV and let's it dry. Then covers it in 5200/4200 and adds the tank.

I'm actually doing a tank right now on my little Mako but it's getting CTE, foam and glass.
 

efx

Well-Known Member
Joined
Jun 19, 2018
Messages
263
Reaction score
87
Points
28
Location
Los Angeles
Model
Islander
Thanks for the heads up on the rubber strips.