2000 GW 208 repower

rockfishon

Member
Joined
Apr 21, 2015
Messages
22
Reaction score
2
Points
3
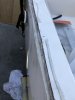
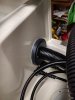
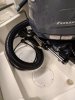
I have decided to repower my 2000 GW 208 Adventure with a newly purchased Yamaha i4 200hp. I just sold my old running 150 HPDI and have an empty transom currently. My plan is to install new hydraulic steering, new binnacle, replace the transom trim ring and aluminum angle, and clean up the stern before mounting the new engine. I will post updates as the project evolves.
 

trapper

GreatGrady Captain
Joined
Jan 7, 2010
Messages
794
Reaction score
195
Points
43
rockfish, you will love the new motor! I have had mine for five years running a Reliance 15p prop. with T8 kicker, Great combo,. Get 58 -5900 WOT Enjoy!! trapper
 

Sdfish

Well-Known Member
Joined
Sep 15, 2013
Messages
460
Reaction score
151
Points
43
Location
San Diego, California
Model
Adventure
Hi Trapper, what year is your 208 and when you installed the new 4 stroke did the stern of you boat sit lower and submerge the wash deck thruhulls? I am in process of installing a 150 Yamaha 4 stroke, so interested in how it will sit with another 70 + lbs of motor.

Rockfish - I am replacing the bang plate on my 208 as I re-power, I'm going with 316 SS. My transom is solid, but there was a bulge where the outboard was mounted, I called Grady and they said that is normal and they would not have concerns. Interested to know if you have a similar issue.
 

Attachments

  • IMG_3632.JPG
    IMG_3632.JPG
    1.1 MB · Views: 54

seasick

Well-Known Member
Joined
Aug 19, 2008
Messages
9,071
Reaction score
1,292
Points
113
Location
NYC
Interesting replay about the bulge. A bulge would be a concern to me but in your case, it looks from your photo that instead of a bulge in the middle, there may be a depression on each side of the middle when the motor mounting has compressed the transom. I don't recall seeing that on my transom but I haven't really looked that closely.
Have you ever had to retighten the engine mounting bolts?
 

rockfishon

Member
Joined
Apr 21, 2015
Messages
22
Reaction score
2
Points
3
I did not notice any bulge in my transom. I will take a closer look next week when I get some more time to work on it. I have ordered the plastic trim for the sides, but still trying to source the AL or stainless bottom.
 

seasick

Well-Known Member
Joined
Aug 19, 2008
Messages
9,071
Reaction score
1,292
Points
113
Location
NYC
Sorry, my reply was meant for Sdfish who posted a photo.
 

rockfishon

Member
Joined
Apr 21, 2015
Messages
22
Reaction score
2
Points
3
@trapper, do you have bottom paint on your boat? Just wondering so I get the correct prop put on engine.
 

rockfishon

Member
Joined
Apr 21, 2015
Messages
22
Reaction score
2
Points
3
Grady got back to me and said that no longer sell the AL bottom. I has been replaced with vinyl purchased by the foot. I think I will get some SS off of ebay.
 

trapper

GreatGrady Captain
Joined
Jan 7, 2010
Messages
794
Reaction score
195
Points
43
No bottom paint. 2006 208. I also have a 100 lb. kicker on the stern. I plug the starboard drain (kicker motor side) when fishing working the down rigger. It lets a little water onto the deck when on a list. Could use new flaps in the deck drains (scuppers) No issues with any water on deck when running or anchored. With no kicker you may be able to use the Reliance 17p. Do not go to the Yam "Salt water series" prop with that motor, as advised in my search for the correct prop for that motor. I think a stainless bang plate is the way to go. I just got a piece of stainless angle and cut it to length. Good luck, trapper
 

Sdfish

Well-Known Member
Joined
Sep 15, 2013
Messages
460
Reaction score
151
Points
43
Location
San Diego, California
Model
Adventure
Seasick - the boat is a "new to me" 1999. I am re powering, so I never touched the original bolts. I agree, the depression is more pronounced around the bolts. The transom is solid though, I do not see any indication of water in it. All engine bolts were dry as were old fish finder bolts lower in the transom. The shop that is doing the work says they have a bigger Grady with same bulge..... I have not seen that boat though.
When I called Grady they said that it should no issue, given the transom is dry.
 

rockfishon

Member
Joined
Apr 21, 2015
Messages
22
Reaction score
2
Points
3
I just got the stainless for the bang plate installed. It was a piece of 16 gauge 304 2b mill finish bent at a 90 deg angle. I buffed it out before mounting. I paid $36 for the stainless and bending.IMG_20181211_200459 - Copy.jpg
 

rockfishon

Member
Joined
Apr 21, 2015
Messages
22
Reaction score
2
Points
3
I plan to utilize a rigging tube for my new motor. Does anyone know how to interface the smaller boat end rigging grommet to the splash well to cover the older larger rigging hole?
 

Greyduk

Well-Known Member
Joined
Dec 5, 2017
Messages
242
Reaction score
56
Points
28
Age
78
Location
Alabama
rockfishon, Your angle replacement looks great. If I might ask a question. Are the white vertical pieces on either side of the SS angle original to the boat or are they replacements? Thanks.
 

suzukidave

Well-Known Member
Joined
Sep 24, 2013
Messages
383
Reaction score
9
Points
18
rockfishon, Your angle replacement looks great. If I might ask a question. Are the white vertical pieces on either side of the SS angle original to the boat or are they replacements? Thanks.

they are standard on a 208. i just finished inquiring with grady and they are the only pieces grady makes like that.

unfortunately they are available but not long enough to fit your 223 (or my 223!).
 

suzukidave

Well-Known Member
Joined
Sep 24, 2013
Messages
383
Reaction score
9
Points
18
I just got the stainless for the bang plate installed. It was a piece of 16 gauge 304 2b mill finish bent at a 90 deg angle. I buffed it out before mounting. I paid $36 for the stainless and bending.View attachment 6112


rockfish, can i ask you a favour to confirm how wide (inside depth) those pvc trim bits are. also, for bonus points, what is the notch angle? for a 223 the notch angle is 100 degrees.

i am determined to redo my transom without the mitred aluminum corners.
 

rockfishon

Member
Joined
Apr 21, 2015
Messages
22
Reaction score
2
Points
3
So I went out and got a square piece of 3/4 Starboard and drilled a hole in the center. Mounted this square in my grinder and turned it on. I then took a belt sander to the spinning Starboard and shaved it down til it was 5.5" in diameter. I then smoothed the outside edge by holding a 120 grit sandpaper on the spinning edge. I screwed this from the inside to cover the old rigging hole. It looks great.


I plan to utilize a rigging tube for my new motor. Does anyone know how to interface the smaller boat end rigging grommet to the splash well to cover the older larger rigging hole?
 

rockfishon

Member
Joined
Apr 21, 2015
Messages
22
Reaction score
2
Points
3
I dropped my boat off at the dealer to finally get the new motor mounted. I can't wait to see it with the new motor on!
 
  • Like
Reactions: Ky Grady

rockfishon

Member
Joined
Apr 21, 2015
Messages
22
Reaction score
2
Points
3
The dealer tested the boat with the engine mounted on the 3rd hole with the 17P prop and got 45 mph at 5800rpm. Others seem to like the 15P but the dealer is not recommending this one for me. I will post some pictures once I pick it up.
 
Last edited:

rockfishon

Member
Joined
Apr 21, 2015
Messages
22
Reaction score
2
Points
3
Some of the pictures of the new engine mounted.
 

Attachments

  • IMG_20181220_175026 - Copy.jpg
    IMG_20181220_175026 - Copy.jpg
    752 KB · Views: 41
  • IMG_20181220_175006 - Copy.jpg
    IMG_20181220_175006 - Copy.jpg
    1.6 MB · Views: 40
  • Like
Reactions: Ky Grady