228G Seafarer Advice on inside cushions along gunwales

Don Davis

Well-Known Member
Joined
Mar 2, 2020
Messages
354
Reaction score
116
Points
43
Age
59
Location
Courtenay, British Columbia
Model
Seafarer
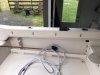
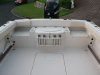
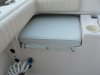
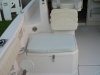
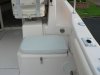
Hello, I recently bought a project 1999 228G Seafarer from an auction in Vancouver BC and it was missing a lot of parts and pieces. I need to make the gunwale pads for both the port and starboard sides that also act as back rests for the stern seats at the transom. The clips are still on the boat but I'm not sure how the cushions would attach to those clips on the gunwale. My plan was to cut the backing out of marine grade plywood and then take those pieces to get upholstered at a shop. I was hoping to get any advice on exactly how to attach to those existing clips. Thanks for any help.
 

Holokai

GreatGrady Captain
Joined
Aug 14, 2019
Messages
317
Reaction score
136
Points
43
Location
Hawaii
Model
Adventure
The coaming pads have a solid backing board with circular holes that line up the the clips. They are they covered with foam and vinyl in front. I replaced mine with SeaDek but we’ll see how it holds up. I’ll snap a picture of the old ones in a minute
 

Holokai

GreatGrady Captain
Joined
Aug 14, 2019
Messages
317
Reaction score
136
Points
43
Location
Hawaii
Model
Adventure
The bottom edge of the coaming pad is a mesh with grommets. The grommets line up with the screws used to secure the pad to the gunwale. Hope this helps.

C915A7A3-FF60-4CF1-B1A9-A9104DBE14E1.jpeg536BA4F5-04C3-471C-B18D-4FA256358BC2.jpegCE5C8248-30FB-4A7C-8D03-9FAD7178D968.jpeg
 
  • Like
Reactions: PNW_Drifter

Don Davis

Well-Known Member
Joined
Mar 2, 2020
Messages
354
Reaction score
116
Points
43
Age
59
Location
Courtenay, British Columbia
Model
Seafarer
Hmmm interesting, these are the clips that are on my gunwales ... would those holes in the back of your combing pads fit into those clips in the photo? Thanks
 

Attachments

  • 341C2EAD-A1AE-422A-8E5F-2FBBAC79A3A6.jpeg
    341C2EAD-A1AE-422A-8E5F-2FBBAC79A3A6.jpeg
    81.1 KB · Views: 39
  • Like
Reactions: DoctorOctopus

wrxhoon

Well-Known Member
Joined
Apr 4, 2012
Messages
958
Reaction score
291
Points
63
Location
Sydney Australia
Hmmm interesting, these are the clips that are on my gunwales ... would those holes in the back of your combing pads fit into those clips in the photo? Thanks

Yes they will. You actually hand the pads on the brackets and then you screw them on as well guiding the screws in the grommets. If you close you may even find the small screw holes on your gunwale.
 

Ky Grady

GreatGrady Captain
Staff member
Joined
Mar 1, 2006
Messages
2,918
Reaction score
1,272
Points
113
Location
Berea, KY/Cross, SC
Model
Seafarer
Hmmm interesting, these are the clips that are on my gunwales ... would those holes in the back of your combing pads fit into those clips in the photo? Thanks


Those look to be the factory clips for the coaming pads.

The holes on back of pads match clip locations. Align the holes and push down on the pad. Mine fit tight enough that I don't have screws in mine. The marine grade plywood will be to thick I think. The backing is around 1/4". You can see a couple of my factory clips in this pic.

20170807_165534-600x800.jpg
 

Don Davis

Well-Known Member
Joined
Mar 2, 2020
Messages
354
Reaction score
116
Points
43
Age
59
Location
Courtenay, British Columbia
Model
Seafarer
Great thank you for the information, I will have to experiment to see what thickness of backing will work. I think I should be able to measure the bend in the clip to get the exact backing thickness. Did you mention that you bought your replacement combing pads?
 

seasick

Well-Known Member
Joined
Aug 19, 2008
Messages
9,144
Reaction score
1,311
Points
113
Location
NYC
Great thank you for the information, I will have to experiment to see what thickness of backing will work. I think I should be able to measure the bend in the clip to get the exact backing thickness. Did you mention that you bought your replacement combing pads?
Don't use the width of the gap at the top. That is not the spot that holds the bolster. The tapered gap at the bottom is where the top edge of the hole wedges into. If I remember correctly, the backing is about 5/16 inch and was some sort of plastic. To test the fit take a scrap piece of 1/4 material like luan plywood. Drill a hole in it about 1 1/2 in diameter and slid the piece over a clip and push it down. The hole has to be big enough to allow the backing board to slip over it without having to need to twist the bolster Note that the vinyl and any piping will make the edges of the bolster assembly thicker and the backing board will not sit flush to the gunnel.
 

wrxhoon

Well-Known Member
Joined
Apr 4, 2012
Messages
958
Reaction score
291
Points
63
Location
Sydney Australia
The backing on my 2013 model 228G is some plastic looking and as Seasick stated 5/16" thick. I wouldn't use any timber material, it will rort.
 

Don Davis

Well-Known Member
Joined
Mar 2, 2020
Messages
354
Reaction score
116
Points
43
Age
59
Location
Courtenay, British Columbia
Model
Seafarer
Awesome information thank you much appreciated, I will try to get a couple pieces of starboard 5/16 thick for the backing. Would you say that the backing is about 4 inches wide? Would you have length measurements for the 4 pieces as well? I guess 2 of the longer side pieces and then the 2 shorter back rests along the transom, so I guess I just need the 2 measurements if they are similar length pieces on both sides.
 

Holokai

GreatGrady Captain
Joined
Aug 14, 2019
Messages
317
Reaction score
136
Points
43
Location
Hawaii
Model
Adventure
You can save yourself some cash by not buying Starboard as the backing since it won’t be exposed to sunlight. Something a little more cost effective like HDPE, ABS, etc. should be fine.
 

wrxhoon

Well-Known Member
Joined
Apr 4, 2012
Messages
958
Reaction score
291
Points
63
Location
Sydney Australia
Don , your 1999 seafarer 228 has only 2 coaming pads and they go around at the seat to create a seat backing , they are the same height where you seat. The later models post 2004 maybe 2005? are different the coaming pad finishes at the rearmost of the gunnel and the seatback is separate and high back.
I don't have my old boat to measure for you but I have photos, I hope that helps.
 

Attachments

  • Grady White sale 047.JPG
    Grady White sale 047.JPG
    1.6 MB · Views: 41
  • Grady White sale 098.JPG
    Grady White sale 098.JPG
    653.5 KB · Views: 39
  • Grady White sale 105.JPG
    Grady White sale 105.JPG
    710.1 KB · Views: 36
  • Grady White sale 106.JPG
    Grady White sale 106.JPG
    728 KB · Views: 34

Viking88rd

Well-Known Member
Joined
Sep 22, 2019
Messages
73
Reaction score
41
Points
18
Age
63
Model
Express 330
Thought I'd add a thought too, as I've replaced bolsters on my old Gulfstream and am currently doing them on our Marlin. Regarding the grommets/stainless steel screws along lower edge of bolsters....I stopped using them altogether. The upper circular hole clips fit very snug so the lower screws really are not needed in my opinion. Unlike regular seat cushions which many people stow away when not in use ....the bolsters are most often never removed hense the common issue of having to get them replaced/reupholstered. With now screws to mess with, unclipping the bolsters is easy and part of my usual "putting the boat away" after use. Sure, it sits on my mooring "naked", but no more weathered rotten bolsters. Voila!
 

seasick

Well-Known Member
Joined
Aug 19, 2008
Messages
9,144
Reaction score
1,311
Points
113
Location
NYC
The bolsters are taller than 4 inches. I had some photos of mine when I recovered them. Let me see if I can find those pictures.
 

seasick

Well-Known Member
Joined
Aug 19, 2008
Messages
9,144
Reaction score
1,311
Points
113
Location
NYC
Here a few pics I took when I redid the bolsters. The pic with he ruler gives an idea to the thickness of the backing plastic. It looks more like 3/8 in. The last pic shows the various pieces needed to make up the end caps and inside corner where the bolster wrapped around the gunnel. Honestly, it was a major job especially since I am not an upholsterer. If you don't need bolsters with the wrap around corners, it is easier to but pre made bolsters. Thaey come in various lengths.IMG_4724.JPGIMG_4724.JPGIMG_4717.JPGIMG_4771.JPGIMG_4719.JPG
 

Don Davis

Well-Known Member
Joined
Mar 2, 2020
Messages
354
Reaction score
116
Points
43
Age
59
Location
Courtenay, British Columbia
Model
Seafarer
Sorry to keep asking so many questions but I'd like to build these coaming pads as close to original size as I can. Would someone have the total length and height of the coaming pad backing material? I estimated the total length at 8 feet each pad by putting a tape measure from the starting edge and then through the corner and ending at the stern using your pictures as best I could.
I estimated the height of the backing at 5 inches but I was using the color difference in the gel coat as best I could to judge the height measurement, thanks! I'm getting some HDPE cut for the backing and was also wondering if I should get the edges routed?
 

seasick

Well-Known Member
Joined
Aug 19, 2008
Messages
9,144
Reaction score
1,311
Points
113
Location
NYC
I may have the small pieces still somewhere in my basement. If I do, I will try to estimate the width. The plastic does not have to be radiused. The foam does though. The corner where the bend is has two layers of foam and is thicker as a result.
I do not have the long pieces so I can't tell you the total length. Even if I did, my hull is a 208. I would assume your bolsters are longer ( Of course that may not be true either:))
Let me see what I can did up.
 

seasick

Well-Known Member
Joined
Aug 19, 2008
Messages
9,144
Reaction score
1,311
Points
113
Location
NYC
As shown in one of the posts, the bottom of the bolster has a strip about an inch wide or so of mesh material. That is there primarily to allow the foam to drain should it get wet. In addition the grommets are installed in that mesh

For the mesh the product to use is here:

The grommets are there solely to allow a screw to be installed to hold the bolster in place. Some folks say the screws aren't needed but I rather not find that to be not true while leaning over reeling in a fish. I only installed 2 screws per side.
For the foam I used Dryfast foam from the Foam Factory. The stuff is expensive but water will absolutely not get absorbed. It is so porous that I had issues applying the contact cement to glue up the foam pieces. The glue would drain right through. A spray adhesive would be better. The original foam was wrapped in thin plastic to keep it dry. With Dryfast, that isn't necessary.
The corners and ends are complex areas to make. One option could be to not use the pleated material at all and just use plain flat vinyl. The ends and corners would be easier to sew.