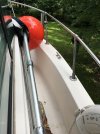
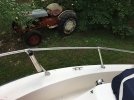
Adding new cleats

Lt.Mike

Well-Known Member
Joined
Oct 18, 2013
Messages
879
Reaction score
165
Points
43
Age
63
Location
Farmingdale NJ
Model
Overnighter
I'd touched base on this earlier and have decided to follow thru.
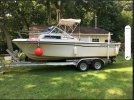
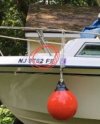
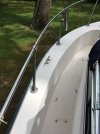
When tied up at the ramp waiting for me to park my truck or dunk the trailer after a day on the water the boat has a way of pivoting in with the bow rubbing on the dock marring the gelcoat. This happens even If I ask someone to watch it :roll: so I've been using the orange ball up in where the bow flares and it does the job protecting the bow. I don't really like hanging it off the rail though and figured I'd add a cleat on both sides just over the registration decal.
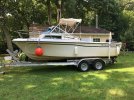
IMG_9670b.jpg

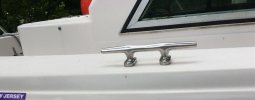
These are the cleats I picked up. They are identical to the factory cleats but about 3/4 in size.
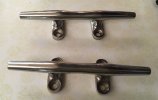
IMG_0092c.jpg

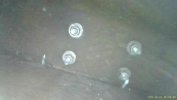
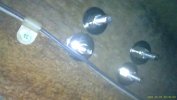
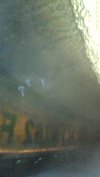
I was planning on using large screws to secure the cleats as I thought that that area was inaccessible from underneath but today I went to put something in the cabin and noticed there is a gap. Its small but I can just about fit my arm thru so I broke out the inspection camera to have a look.
this is what I saw...
You can see where the railing support is thru bolted and even the reg numbers glowing thru.
IMG_0092 b.jpg

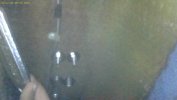
There's not a lot of room there for my arms but with the help of the inspection camera to guide me I can reach a socket on an extension. Maybe get my neighbors kid with his little arms to reach up there to start a washer and stop nut on the bolt. :)

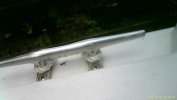
I had a look at the rear cleat to see how the factory bolted it up and its not all that fancy. Doesnt use a backing plate or even fender washers so I guess what I'm planning will be more than strong enough. ;) (you can see the cleat is the same exact style I'm installing)
IMG_0097b.jpg

IMG_0096b.jpg

I've got to go shop for hardware now. How thick do you suppose that portion of the rail deck is?
It looks to have a core glassed in so I'm guessing 1" maybe 1-1/4" ?
I plan of involving 3M5200 to seal it up as well. ;)
 
Last edited:

wspitler

GreatGrady Captain
Joined
May 16, 2011
Messages
1,319
Reaction score
295
Points
83
Location
Inglis, FL
Model
Express 330
You could remove one of the existing bolts to determine thickness and reseal. I'd use stainless elastic stop nuts and stainless steel fender washers if you can get them in there as backing. I wouldn't use 5200 as it is permanent and if you develop a problem down the line, forget about removing the cleat. I'd use 4200 or 4000UV for bedding compound.
 
  • Like
Reactions: GypsyRover

PointedRose

Well-Known Member
Joined
Feb 11, 2021
Messages
646
Reaction score
196
Points
43
Location
San Francisco
Model
Overnighter
I’d agree w 3M 4000UV because it allows a little flex and uv protection.
Can countersink the drill holes. Also pre drill with smaller drill bits. Use a drill bit guide if you can to get the drill holes perfectly vertical. Use painters tape to contain the gooey mess. Use throw away gloves. Allow the goo 24 hours to cure before really cinching the bolts down and it’ll seal well without squeezing it all out wet. Trim excess at the edge with a utility knife once dry. Get the small $10-15 squeeze tube of 3M rather than a full cartridge that’s like $35
 
  • Like
Reactions: Holokai and Lt.Mike

DennisG01

GreatGrady Captain
Joined
Sep 1, 2013
Messages
6,839
Reaction score
1,214
Points
113
Location
Allentown, PA & Friendship, ME
Model
Offshore
Mike, although you've probably thought of this, I'll mention it "just in case" as maybe you just change how you tie up and not need to add the cleat at all... What if you could keep the boat tied up such that the bow CAN NOT rub against the dock? One way is to keep the stern line as short as possible. If you can't keep the stern line short, be sure to pull the midship cleat's line forward and taught. If the stern and midship lines extend out from the boat at opposite angles, the bow will not hit. Lastly, you could move that ball fender to the midship cleat to give you a little extra margin of error since it will push the bow further from the dock than the stern. Again... just a thought that could help if you didn't already think of it.

Oh... depending on your docks... if you haven't already seen these... google for "portable dock ring" or "cleat". They might help, too.

And, yeah, forget about the 5200 - it's not going to make "sealing" the holes any better than LifeSeal or 4000. If you want the best, though... for this application it would be butyl rubber tape. And if you really, REALLY want to do it the "best" way... drill your hole out at 5/16" or 3/8" (depending on cleat base size)... fill with poly or epoxy resin and let cure... re-drill at 1/4" for your 1/4-20 fasteners... seal. BUT, if it should ever leak, the gunwale core is completely preserved by the plastic.
 
Last edited:

Lt.Mike

Well-Known Member
Joined
Oct 18, 2013
Messages
879
Reaction score
165
Points
43
Age
63
Location
Farmingdale NJ
Model
Overnighter
Mike, although you've probably thought of this, I'll mention it "just in case" as maybe you just change how you tie up and not need to add the cleat at all... What if you could keep the boat tied up such that the bow CAN NOT rub against the dock? One way is to keep the stern line as short as possible. If you can't keep the stern line short, be sure to pull the midship cleat's line forward and taught. If the stern and midship lines extend out from the boat at opposite angles, the bow will not hit. Lastly, you could move that ball fender to the midship cleat to give you a little extra margin of error since it will push the bow further from the dock than the stern. Again... just a thought that could help if you didn't already think of it.

Oh... depending on your docks... if you haven't already seen these... google for "portable dock ring" or "cleat". They might help, too.

And, yeah, forget about the 5200 - it's not going to make "sealing" the holes any better than LifeSeal or 4000. If you want the best, though... for this application it would be butyl rubber tape. And if you really, REALLY want to do it the "best" way... drill your hole out at 5/16" or 3/8" (depending on cleat base size)... fill with poly or epoxy resin and let cure... re-drill at 1/4" for your 1/4-20 fasteners... seal. BUT, if it should ever leak, the gunwale core is completely preserved by the plastic.
I get what your saying about protecting the core. When I recored the hatch above the tank I made a 1” gap filled with epoxy between the new core and the edge so the screw holes can’t transfer moisture to the core.
Don’t know if I’m that motivated on this one though. 99% Of water intrusion thru screw holes especially in the transom comes from rainwater. Mines stored under a carport so I’m going to use that as an excuse to not go the whole nine yards on it.
I’ve tried the tie up tight in the stern thing but have come back to my boat to find that “fixed” by my “crew”. :rolleyes:
I’ve found the quickest and most trouble free thing at the ramp is one rope on the midship cleat and the 3 fenders as seen in the pic.
I picked up the hardware I need and will get after it in a few. Damned heat index says feels like 103, another great day for an outdoor project ;)
 

DennisG01

GreatGrady Captain
Joined
Sep 1, 2013
Messages
6,839
Reaction score
1,214
Points
113
Location
Allentown, PA & Friendship, ME
Model
Offshore
I hear 'ya about the heat - I was outside, basically just walking around slowly doing a small chore - maybe 30 minutes, tops. I'm soaked.

"Motivated" - sure, understood. What I mentioned isn't really "needed" - it's just one of those "best practice" things. But other methods will be MORE than adequate, as well.

Maybe the "crew" needs some motivation! :) "If the bow touches the dock, you're on wash duty"
 
  • Like
Reactions: Lt.Mike

Lt.Mike

Well-Known Member
Joined
Oct 18, 2013
Messages
879
Reaction score
165
Points
43
Age
63
Location
Farmingdale NJ
Model
Overnighter
I hear 'ya about the heat - I was outside, basically just walking around slowly doing a small chore - maybe 30 minutes, tops. I'm soaked.

"Motivated" - sure, understood. What I mentioned isn't really "needed" - it's just one of those "best practice" things. But other methods will be MORE than adequate, as well.

Maybe the "crew" needs some motivation! :) "If the bow touches the dock, you're on wash duty"
The “crew“ is easily distracted by a crab on a piling, that kinda thing. Can’t lose your mind when something happens either you just do your best to prevent it.
I Laid down blue tape, strung a line between the railing posts and marked center. Then positioned the cleats off center to the sides with the onboard side of the bolts under the string. That postioned it perfect with just the right angle to follow the curve of the bow.
Holes drilled, chamfered and bolts hanging in to mock it up and they look great. I got that much done as a T-storm was rolling in. I put a strip of gorilla tape over the holes to keep them dry. (Boats parked in front of my shop at the moment)
The storm rolled thru and I’ll get back at it tomorrow morning to finish it up.
Oh a part I ordered on eBay came today, a wire mount that holds a ring bouy so I got that mounted too.
 
  • Like
Reactions: PointedRose

DennisG01

GreatGrady Captain
Joined
Sep 1, 2013
Messages
6,839
Reaction score
1,214
Points
113
Location
Allentown, PA & Friendship, ME
Model
Offshore
Ah! It's THAT kind of crew! Understood. I bet they're cute, though!

OK, just "throwing out" another suggestion about the life ring. The problem with those, I've always thought, is that you really need a rope on it for it to be useful. Otherwise, you make a bad throw and what do you do? Tell the person to swim to it? Heck, if they could swim to it, they could swim to the boat! And, if you have a rope attached... you just KNOW it's not going to pay out nicely. A MUCH better solution is a Life Line Throw Bag (google it). They throw perfectly straight every time AND... if it happens to land on someone's head when you throw it, it doesn't knock them out like a ring buoy would... which kinda defeats the purpose of what you're trying to do! :)
 
Last edited:
  • Like
Reactions: Lt.Mike

Lt.Mike

Well-Known Member
Joined
Oct 18, 2013
Messages
879
Reaction score
165
Points
43
Age
63
Location
Farmingdale NJ
Model
Overnighter
Ah! It's THAT kind of crew! Understood. I bet they're cute, though!

OK, just "throwing out" another suggestion about the life ring. The problem with those, I've always thought, is that you really need a rope on it for it to be useful. Otherwise, you make a bad throw and what do you do? Tell the person to swim to it? Heck, if they could swim to it, they could swim to the boat! And, if you have a rope attached... you just KNOW it's not going to pay out nicely. A MUCH better solution is a Life Line Throw Bag (google it). They throw perfectly straight every time AND... if it happens to land on someone's head when you throw it, it doesn't knock them out like a ring buoy would... which kinda defeats the purpose of what you're trying to do! :)
I’ll look into it. Thanks.
 

Lt.Mike

Well-Known Member
Joined
Oct 18, 2013
Messages
879
Reaction score
165
Points
43
Age
63
Location
Farmingdale NJ
Model
Overnighter
I'm a little delayed in posting pics but this is the finished cleat project.
There were two things that kept this project from taking 10x longer than it did and without endless pain and frustration, thats this inspection camera and my neighbors 12 year old son. His arms could reach in the tight space between the walkway and the hull where mine would have no chance. It was also helpful that he has a Dad who encourages hands on learning about tools and mechanical repairs. This kid is handier with tools than a lot of adults I know. :)

Just starting the threads in this pic, thought I could reach it with an extension on the socket wrench but that proved clumsy.
IMG_0006.JPG

I gave up my pride and went top side to hold the screwdriver while Little Glenn wrenched it on.
The camera was helpful to let us see and make sure the nav lights wire did not get pinched
IMG_0008.JPG

Final image of it all tightened up. If you compare this to the image above of the factory installation you'll see GW actually used smaller washers to back up a larger cleat.
These photos btw were taken with the inspection camera.
IMG_0010.JPG

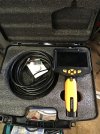
Bought it on Amazon. I got the one with the 10' cable as I've got a project coming up that will require it but so far a 3' cable would have worked fine for what i've used it for.
if you don't have one of these you might consider it because its come in handy quite a lot.
IMG_0168.jpg

Top side images...
IMG_0132.jpg

IMG_0134.jpg

IMG_0133.jpg

IMG_0136.jpg

If you didn't know I installed these would you know it didn't come like this from the factory ? ;)
 
Last edited:

wspitler

GreatGrady Captain
Joined
May 16, 2011
Messages
1,319
Reaction score
295
Points
83
Location
Inglis, FL
Model
Express 330
Very nice pictures! Do you have a link for the brand and model of your borescope? Really nice! Nice job!
 
  • Like
Reactions: Lt.Mike

Lt.Mike

Well-Known Member
Joined
Oct 18, 2013
Messages
879
Reaction score
165
Points
43
Age
63
Location
Farmingdale NJ
Model
Overnighter

wspitler

GreatGrady Captain
Joined
May 16, 2011
Messages
1,319
Reaction score
295
Points
83
Location
Inglis, FL
Model
Express 330
Here you go, I got the 10’ model but 3’ will probably handle most of what you want.
If your curious you can also pull your spark plugs to see the condition of your engines cylinders.

If have an old one, (3-5 years old) but not near the clarity of yours. Thanks!
 

Lt.Mike

Well-Known Member
Joined
Oct 18, 2013
Messages
879
Reaction score
165
Points
43
Age
63
Location
Farmingdale NJ
Model
Overnighter
Nice work on the cleats. Clean install.
Thank you. It’s always my goal in whatever I do to make it look like the factory could have done it.
It’s going to prove useful.
One thing I want to do now is learn how to cut and lace an end loop in a dock line to hang the fender at the desired height.
 
  • Like
Reactions: acg123

PointedRose

Well-Known Member
Joined
Feb 11, 2021
Messages
646
Reaction score
196
Points
43
Location
San Francisco
Model
Overnighter
Thank you. It’s always my goal in whatever I do to make it look like the factory could have done it.
It’s going to prove useful.
One thing I want to do now is learn how to cut and lace an end loop in a dock line to hang the fender at the desired height.
Three strand is pretty easy to splice. Double braided rope is a little trickier but you can get the hang of it.
 
  • Like
Reactions: Lt.Mike

Lt.Mike

Well-Known Member
Joined
Oct 18, 2013
Messages
879
Reaction score
165
Points
43
Age
63
Location
Farmingdale NJ
Model
Overnighter
I guess everybody over 50 needs a good borescope!
:D Yup !
I really don’t think this is much different from what they use. Lol.
I have used mine to check out a busted tooth crown though.
for my tractors I’ve checked the piston walls and condition of the valves.