Calling anyone who has successfully applied hull striping.

SeanC

Well-Known Member
Joined
Jun 16, 2015
Messages
338
Reaction score
202
Points
43
Location
Brisbane, Australia
Model
Seafarer
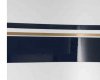
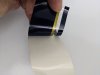
So today I had a professional apply all the decals to my 2006 228. All fine until it came to applying the hull striping. It would not go around the bow without creasing. It didn’t come close. I think it may be due to the fairly thick paper backing which has no stretch causing it to crease. The hull striping is made up of three individual stripes. See image. If you have successfully hull striped your boat what sort of backing was on the striping. The guy applying the decals said some has a plastic backing which will stretch instead of creasing. Any tips or tricks. Disappointing, as the plan was to apply the ceramic coat this weekend then ready to fish.
 

Attachments

  • D2A4662C-D579-4B2A-8642-54F179920E89.jpeg
    D2A4662C-D579-4B2A-8642-54F179920E89.jpeg
    81.1 KB · Views: 6

DennisG01

GreatGrady Captain
Joined
Sep 1, 2013
Messages
6,836
Reaction score
1,211
Points
113
Location
Allentown, PA & Friendship, ME
Model
Offshore
There shouldn't be any "backing"... just the piece of paper that you peel off. Gotta peel more of the paper off so it allows the vinyl to stretch/conform. The more you peel off at a time, the better the end result. Warmer temps help, too.
 

Fishtales

Well-Known Member
Joined
Jan 31, 2005
Messages
7,635
Reaction score
1,188
Points
113
My 2 pennies....
The factory actually cuts the stripe on two spots. The first is at the bow and the second is where the boat starts to flare on the starboard and port side.
Start at the rear of the boat and apply the stripe under the hull lip till you reach the flare. First cut should be long. Then overlap the next portion that follows the same lip, but the lip is slightly angled for the flare. Then cut both pieces. When I did it, I had the bow piece overlap the side piece about 1/4". Chose the bow piece to be on top as I figured the water would mostly run bow to stern under power. The other way, it could get worked off. At the bow do the same thing and slightly overlap.
 

SeanC

Well-Known Member
Joined
Jun 16, 2015
Messages
338
Reaction score
202
Points
43
Location
Brisbane, Australia
Model
Seafarer
There shouldn't be any "backing"... just the piece of paper that you peel off. Gotta peel more of the paper off so it allows the vinyl to stretch/conform. The more you peel off at a time, the better the end result. Warmer temps help, too.
The backing is over the top of the stripes. It keeps the 3 stripes spaced correctly so it needs to be in place until the stripes have been attached to the boat. See photo.I think the paper backing doesn’t have any stretch. I’m interested in knowing what type of backing the ones from Grady have.FB376E2E-55F8-4F2E-A528-0A437283AD15.jpeg
 
Last edited:

SeanC

Well-Known Member
Joined
Jun 16, 2015
Messages
338
Reaction score
202
Points
43
Location
Brisbane, Australia
Model
Seafarer
My 2 pennies....
The factory actually cuts the stripe on two spots. The first is at the bow and the second is where the boat starts to flare on the starboard and port side.
Start at the rear of the boat and apply the stripe under the hull lip till you reach the flare. First cut should be long. Then overlap the next portion that follows the same lip, but the lip is slightly angled for the flare. Then cut both pieces. When I did it, I had the bow piece overlap the side piece about 1/4". Chose the bow piece to be on top as I figured the water would mostly run bow to stern under power. The other way, it could get worked off. At the bow do the same thing and slightly overlap.
Yes, we cut the stripe at the kink in the lip coming forward from the transom. Then got to about 3 feet from the bow but couldn’t get any further without really bad creasing. Pretty sure the problem is the lack of stretch in paper backing that holds the 3 stripes in place. See photo above.
 

Fishtales

Well-Known Member
Joined
Jan 31, 2005
Messages
7,635
Reaction score
1,188
Points
113
Sorry, I didn't have that issue as I recall. It's been 15 + years since I did it.
 

handinpalm

Active Member
Joined
Mar 29, 2016
Messages
34
Reaction score
5
Points
8
Location
Tampa Bay FL
I restriped my 228 a few years ago. I bought the striping from the local GW dealer. Your striping looks a lot different than the OEM striping. My striping has the paper backing on the back side, and is sticky with some type of adhesive. Very easy to bend/stretch around the bow. There should not be any backing on the stripe while applying. I was a bit intimidated on applying it at first, but used a few drops of dishwashing soap (Dawn) in a spray bottle filled with water. This lets you move the striping around a bit. The trick is to pull about 3'+ of tape off and pull the stripe tight to get straight line. If need be you can pull back off a section and reapply with the soapy water. After it is on, go back with small hand squeegee and remove any air pockets. Sometimes have to poke air bubble with xacto knife to get rid of it. It was a lot easier than I was thinking!

When I was ordering it, I thought the color was black (color blind). They stated they only have dark blue color, so ordered any way. It was the correct color.

BTW, looks better w/ stripes, it pronounces the step up along the cockpit freeboard.
 

Attachments

  • GW Stripe.jpg
    GW Stripe.jpg
    1.7 MB · Views: 3
Last edited:

SeanC

Well-Known Member
Joined
Jun 16, 2015
Messages
338
Reaction score
202
Points
43
Location
Brisbane, Australia
Model
Seafarer
I restriped my 228 a few years ago. I bought the striping from the local GW dealer. Your striping looks a lot different than the OEM striping. My striping has the paper backing on the back side, and is sticky with some type of adhesive. Very easy to bend/stretch around the bow. There should not be any backing on the stripe while applying. I was a bit intimidated on applying it at first, but used a few drops of dishwashing soap (Dawn) in a spray bottle filled with water. This lets you move the striping around a bit. The trick is to pull about 3'+ of tape off and pull the stripe tight to get straight line. If need be you can pull back off a section and reapply with the soapy water. After it is on, go back with small hand squeegee and remove any air pockets. Sometimes have to poke air bubble with xacto knife to get rid of it. It was a lot easier than I was thinking!

When I was ordering it, I thought the color was black (color blind). They stated they only have dark blue color, so ordered any way. It was the correct color.

BTW, looks better w/ stripes, it pronounces the step up along the cockpit freeboard.
Is that one piece of clear striping with the stripes printed on it? Or does the clear section come off after the stripe has been attached to the hull? The stripe I took off the boat was made up of three separate stripes which the same as the new one I have.
 

georgemjr

Well-Known Member
Joined
Jan 2, 2009
Messages
439
Reaction score
37
Points
28
Location
Bay Shore, Long Island NY
2X using the soapy water and removing a couple feet worth at a time. I would have thought the professional would have come across this in the past. Call Grady customer service if you advice on their application process.
 
  • Like
Reactions: Pat Hurley

Pat Hurley

Well-Known Member
Joined
Apr 22, 2020
Messages
244
Reaction score
113
Points
43
Age
66
Location
OCMD
Model
Marlin
... x 3 on that soapy water spray. We lease some space to a sign shop and I observe them using it when applying decals and lettering to commercial vehicles. It allows them to correct mistakes as you describe
 

handinpalm

Active Member
Joined
Mar 29, 2016
Messages
34
Reaction score
5
Points
8
Location
Tampa Bay FL
The OEM striping came off as 1 piece from the roll, with the clear space being a piece of the vinyl, so do not have to worry about separate pieces. That is what made it so easy to apply. This also allows you to unroll 3'+ sections at a time to keep things straight. I could see if the striping came of in separate pieces, like yours, it could be a nightmare. I guess people would probably want to stick to the OEM product on this one. Good luck on your install. If all else fails, reorder OEM.
 

SeanC

Well-Known Member
Joined
Jun 16, 2015
Messages
338
Reaction score
202
Points
43
Location
Brisbane, Australia
Model
Seafarer
The OEM striping came off as 1 piece from the roll, with the clear space being a piece of the vinyl, so do not have to worry about separate pieces. That is what made it so easy to apply. This also allows you to unroll 3'+ sections at a time to keep things straight. I could see if the striping came of in separate pieces, like yours, it could be a nightmare. I guess people would probably want to stick to the OEM product on this one. Good luck on your install. If all else fails, reorder OEM.
Interesting. The striping I removed was 3 separate stripes. Looks like the OEM might have changed since 2006. Getting a quote on OEM through the local Grady dealer but they warned me that the cost of postage out of the US at the moment is “horrendous.” I’m pretty sure that is how they described it.
 

SeanC

Well-Known Member
Joined
Jun 16, 2015
Messages
338
Reaction score
202
Points
43
Location
Brisbane, Australia
Model
Seafarer
... x 3 on that soapy water spray. We lease some space to a sign shop and I observe them using it when applying decals and lettering to commercial vehicles. It allows them to correct mistakes as you describe
Unfortunately soapy water didn’t help.
 

Fishtales

Well-Known Member
Joined
Jan 31, 2005
Messages
7,635
Reaction score
1,188
Points
113
... x 3 on that soapy water spray. We lease some space to a sign shop and I observe them using it when applying decals and lettering to commercial vehicles. It allows them to correct mistakes as you describe

Agree that this is needed for large pieces of vinyl and won't hurt striping either. It will help you position the stripe for sure, prob won't do much for the stretching.
 

Wally World

Well-Known Member
Joined
Apr 18, 2013
Messages
76
Reaction score
1
Points
8
I used www.hullstripes.com as per recommendation of someone on this site, It was the best recommendation. If you go to their website they offer a solution in a spray bottle that is worth every penny. Apply it generously. Start from the Transom and head to the bow, You must do it in two pieces as the flare area at midship is impossible if you do not. If you follow the crease in the fiberglass or allot of times you can follow the previous oxidized stipe in the hull you should be ok. If you are not getting the bend you need and it creases, put a small cut in the stipe with a razor blade and bend the stripe as needed, then push out all bubbles and poke with a pin to remove any others. It takes time but the stripe on a Grady is something that sets it apart.
 

handinpalm

Active Member
Joined
Mar 29, 2016
Messages
34
Reaction score
5
Points
8
Location
Tampa Bay FL
Interesting. The striping I removed was 3 separate stripes. Looks like the OEM might have changed since 2006. Getting a quote on OEM through the local Grady dealer but they warned me that the cost of postage out of the US at the moment is “horrendous.” I’m pretty sure that is how they described it.
I forgot about the clear portion of the tape that is removed after you apply to hull, so you end up with 3 separate stripes. You want to remove this clear portion of tape after the soapy water has dried (next day). See pic.

I cannot believe that shipping for some lightweight tape would be that much.

GW Stripe with clear tape removed.jpg
 

SeanC

Well-Known Member
Joined
Jun 16, 2015
Messages
338
Reaction score
202
Points
43
Location
Brisbane, Australia
Model
Seafarer
I forgot about the clear portion of the tape that is removed after you apply to hull, so you end up with 3 separate stripes. You want to remove this clear portion of tape after the soapy water has dried (next day). See pic.

I cannot believe that shipping for some lightweight tape would be that much.

View attachment 18697
As I suspected. The OEM has the plastic layer which will stretch and conform to the curve. The paper layer on the Hullstripes stripe doesn’t. If you need to nick the stripe to fit the curve then it’s not really fit for purpose. Waiting on a quote from Grady. I’ll send an email to Bill at Hullstripes to see if he has any tips.
 

Miller's High Life

New Member
Joined
Aug 4, 2020
Messages
1
Reaction score
0
Points
1
Age
51
Model
Tournament 223
I just had mine done by a company called Wrapabull. They did a fantastic job and said they had no problem.