GemLux Deluxe Outrigger Bases

Hookup1

GreatGrady Captain
Joined
Oct 16, 2007
Messages
2,635
Reaction score
718
Points
113
Age
69
Location
Cape May, NJ
Model
Islander
Anyone using these GemLux Deluxe outrigger bases?


Hookup1

GreatGrady Captain
Joined
Oct 16, 2007
Messages
2,635
Reaction score
718
Points
113
Age
69
Location
Cape May, NJ
Model
Islander
I committed to a pair of these rigger bases. All stainless construction. Pricey but looks like they will hold up.

GW hardtop at least on my model looks to have a soft core. The old outriggers flexed and damages the aft edge of the hardtop. Both sides. My plan is to remove the hardtop (it needs to be painted anyway) and weld-in an aluminum plate in the corner.
Pad locations.jpeg
The problem now is the spreader lights. Its not clear how they run them. Starboard side has a group of wires coming up from the helm. They exit the tube and turn to the bow of the boat - probably headed for the electronics box. Spreader lights are controlled from the courtesy light at the helm. Maybe they ran them back in which case I can re-run them. Was also curious if GW opened up sections of the tubing to help running wires and making turns.
Rigging tubing.jpeg
Comments from anyone who has been in there would be helpful.

I looked real hard at reinforcing with fiberglass and Coosa board but can't convince myself it will be strong enough.
 

SkunkBoat

Well-Known Member
Joined
Oct 12, 2017
Messages
4,242
Reaction score
1,468
Points
113
Location
Manasquan Inlet NJ
Website
www.youtube.com
Model
Express 265
I have my top off.
The cable harness runs up the rear starboard leg comes out at the top and goes back in the starboard top tube running fwd to the E-box. The spreader blue & black come backwards from the E-box. It goes out the stbd rear corner and back in to go across to the port side. A loop is left out of the stbd hole to get spliced to pigtails to the stbd light. The loop & splice is stuffed back in the hole.

The rear cross bar and the hardtop are curved on mine. Looks like yours too. That may take some thought when welding a flat plate.


Get help if you are taking it off. 2 guys were not enough but we managed to work it back over the motors. It is REALLY heavy. Mine is 8'x11' yours might be a foot narrower?
You have to take the Ebox off to get it over the rear cross tube. Otherwise you cannot tilt it enough. We learned that the hard way and had to push the top back and take off the e-box.
 
  • Wow
Reactions: Hookup1

SkunkBoat

Well-Known Member
Joined
Oct 12, 2017
Messages
4,242
Reaction score
1,468
Points
113
Location
Manasquan Inlet NJ
Website
www.youtube.com
Model
Express 265
Thinking out of the box...

you could glass in coosa/plywood on TOP and be able to bolt that thru the frame on two sides with longer 1/4-20 screws.

Get 1/4" core and you can curve it to the existing arc
 

Hookup1

GreatGrady Captain
Joined
Oct 16, 2007
Messages
2,635
Reaction score
718
Points
113
Age
69
Location
Cape May, NJ
Model
Islander
I have my top off.
The cable harness runs up the rear starboard leg comes out at the top and goes back in the starboard top tube running fwd to the E-box. The spreader blue & black come backwards from the E-box. It goes out the stbd rear corner and back in to go across to the port side. A loop is left out of the stbd hole to get spliced to pigtails to the stbd light. The loop & splice is stuffed back in the hole.

The rear cross bar and the hardtop are curved on mine. Looks like yours too. That may take some thought when welding a flat plate.


Get help if you are taking it off. 2 guys were not enough but we managed to work it back over the motors. It is REALLY heavy. Mine is 8'x11' yours might be a foot narrower?
You have to take the Ebox off to get it over the rear cross tube. Otherwise you cannot tilt it enough. We learned that the hard way and had to push the top back and take off the e-box.
Thanks for the reply. You answered most of my questions. If I can pull the spreader light wire out I'll weld the plate in. If not I'll do some glass work and reinforce the top out to the three bolts for the tubing. The top does have a curve. My welding guy has a overhead system in his shop I could use to pull the top off.

Today I'll pull the electronics and drop the overhead box. Remove spreader lights. Investigate spreader light wiring.

Rigger bases delayed by FedEx screwup from Monday to Wednesday. They are being mounted using 2 of the same holes as the old ones. I'll drill the rest out and investigate the core material. If coring is soft I take a 4"x6" section out down to the underside skin and glass Coosa board spacers in. I need an 11 degree wedge to level the bases and the top side is being refinished anyway.
 
  • Like
Reactions: SkunkBoat

Hookup1

GreatGrady Captain
Joined
Oct 16, 2007
Messages
2,635
Reaction score
718
Points
113
Age
69
Location
Cape May, NJ
Model
Islander
Thinking out of the box...

you could glass in coosa/plywood on TOP and be able to bolt that thru the frame on two sides with longer 1/4-20 screws.

Get 1/4" core and you can curve it to the existing arc
A variation of your suggestion would be to remove the topside skin out to the three bolts, glass in strips of coring and repair the topside with built-in wedge. The coring would sit on top of the frame on the side and aft ends.

I still have 1/4 sheet of 1/2" Coosa board leftover. It's pretty stiff so it would have to be strips.

I should probably do this regardless of plate installation.
 
  • Like
Reactions: SkunkBoat

Hookup1

GreatGrady Captain
Joined
Oct 16, 2007
Messages
2,635
Reaction score
718
Points
113
Age
69
Location
Cape May, NJ
Model
Islander
Progress today. Got the blue and black pair loosened up at the overhead box. Able to pull the wire back and forth to the spreader lights. No other wires nearby. This clears the way for welding in two plate about 6" x 8" in each corner. Not much curvature so flat plates will work fine.

Spoke to my welder today. No problem to do the work but won't be until next month.

I'll get the hardtop "loose" this week and see if I can get it down this weekend.
 
Last edited:

Hookup1

GreatGrady Captain
Joined
Oct 16, 2007
Messages
2,635
Reaction score
718
Points
113
Age
69
Location
Cape May, NJ
Model
Islander
Hardtop "loose". Ready to lift off. Welder ready to go to install plates. Glass guys nowhere to be found. Deal with that next week.

The hardtop is cored. Have to figure out hardtop reinforcement for the rigger bases in addition to the plates. Belt and suspenders.
 

SkunkBoat

Well-Known Member
Joined
Oct 12, 2017
Messages
4,242
Reaction score
1,468
Points
113
Location
Manasquan Inlet NJ
Website
www.youtube.com
Model
Express 265
sucks not having the welding done before measuring and inserting the coosa. Is the welder trying to get the plate flush to existing underside?
Again, it curves. Maybe he could go low and you increase the underside with coosa?

The top is thicker. IMO keep the top glass intact for strength.and add a wedge to it to flatten out the top for your rigger.

idk...I have wishbone riggers
 

Hookup1

GreatGrady Captain
Joined
Oct 16, 2007
Messages
2,635
Reaction score
718
Points
113
Age
69
Location
Cape May, NJ
Model
Islander
I have looked at doing it both ways - flush to the hardtop by leveling with both side and cross pipe - or - straight across both side pipes and angling the plates.

I like your suggestion to reinforce the top from the bottom and eliminate the coring.That being the case the plates would be welded in flush with the hardtop. Oversize the bolt holes in the aluminum and sleeve with plastic. I'll make wedges out of Starboard for both top and bottom. Install stainless backing plate. The rigger base bolts can be cranked down without crushing the hardtop.

Plates will be 6" wide and 8" long. Rigger backing plate is 4" x 6" and match the rigger bases. Leaves a 1" border all around.
 

SkunkBoat

Well-Known Member
Joined
Oct 12, 2017
Messages
4,242
Reaction score
1,468
Points
113
Location
Manasquan Inlet NJ
Website
www.youtube.com
Model
Express 265
idk. If you use coosa to beef up(replace) the core, you can crank it down without crushing the hardtop. Why not just bolt tight to aluminum plate?
Maybe thats what you are saying and I read it wrong.
 

Hookup1

GreatGrady Captain
Joined
Oct 16, 2007
Messages
2,635
Reaction score
718
Points
113
Age
69
Location
Cape May, NJ
Model
Islander
Because the rigger bases sit on top of the hardtop. The hardtop core is soft. It flexed before and cracked the gelcoat. I have seen GW post about this as well. Remember you have sandwich of rigger base, angle wedge, hardtop with soft core, aluminum plate, angle wedge, backing plat and nuts & bolts.
 

SkunkBoat

Well-Known Member
Joined
Oct 12, 2017
Messages
4,242
Reaction score
1,468
Points
113
Location
Manasquan Inlet NJ
Website
www.youtube.com
Model
Express 265
If you figure out a way to make the anodized aluminum frame look better, please share. Nothing I tried looked any better after it dried.
 

Hookup1

GreatGrady Captain
Joined
Oct 16, 2007
Messages
2,635
Reaction score
718
Points
113
Age
69
Location
Cape May, NJ
Model
Islander
The upper parts of mine look like crap. All around the hardtop. I'm not going there.
 

SkunkBoat

Well-Known Member
Joined
Oct 12, 2017
Messages
4,242
Reaction score
1,468
Points
113
Location
Manasquan Inlet NJ
Website
www.youtube.com
Model
Express 265
Because the rigger bases sit on top of the hardtop. The hardtop core is soft. It flexed before and cracked the gelcoat. I have seen GW post about this as well. Remember you have sandwich of rigger base, angle wedge, hardtop with soft core, aluminum plate, angle wedge, backing plat and nuts & bolts.
ya but you are removing the soft core and replacing with coosa, wider than the bases and the plates, right? So you want it tight so no flex?

Problem I see might be getting the hardtop to "sit" on the aluminum plate. Any gap could be shimmed but that invites movement.

I would be shooting for rigger base, hardtop reinforced with glass & coosa and shaped flat on bottom to mate with aluminum plate, washers(backing plate) nuts & bolts

I'm also not convinced that you need to worry about wedging the base to be "horizontal". The riggers are fully adjustable. The little angle of the hardtop should not matter.

Have you seen this video from Gemlux? Gemlux delux install
 

Hookup1

GreatGrady Captain
Joined
Oct 16, 2007
Messages
2,635
Reaction score
718
Points
113
Age
69
Location
Cape May, NJ
Model
Islander
I have seen the GemLux install videos. One of them shows a finger like aluminum backing plate on a boat with a flat or nearly flat top. This plate can flex a little and make up for small differences. Also no rocket launchers off the back of the hardtop.

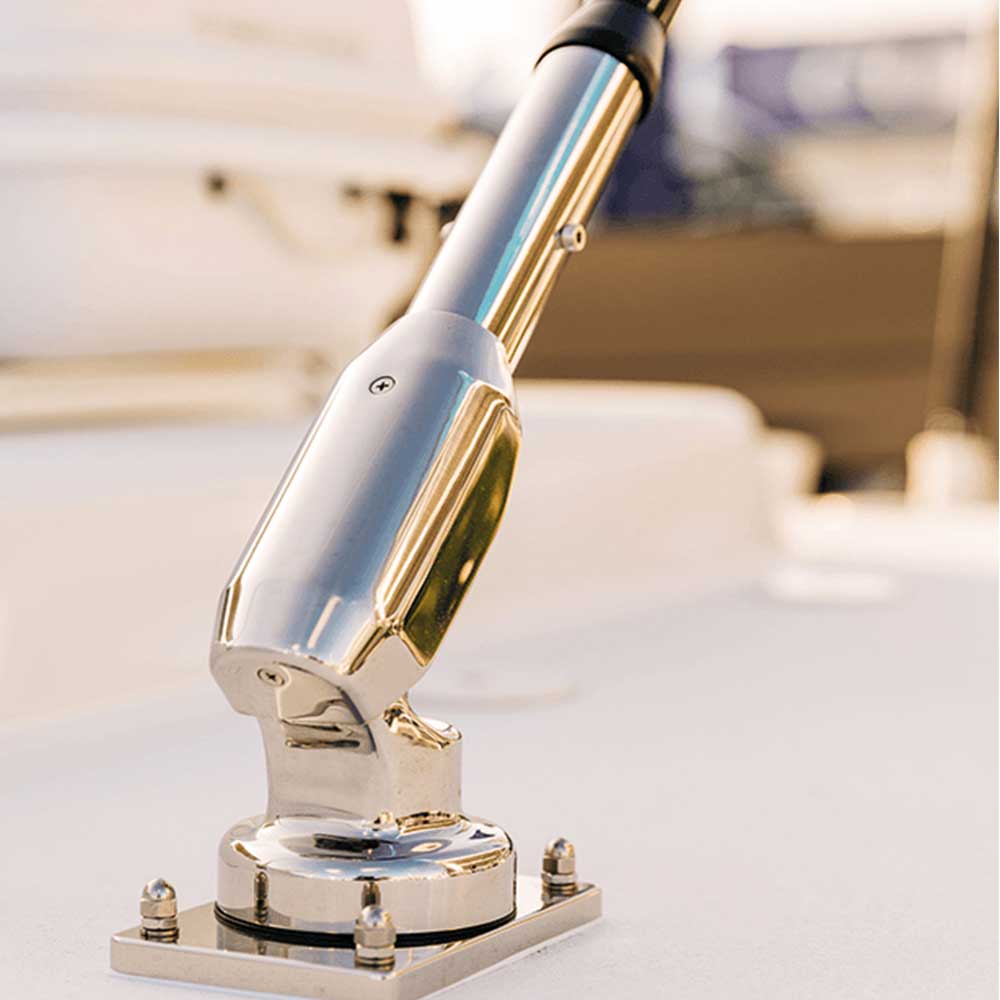
My boat has 5 rocket launchers off the back. The old rigger bases had a 12" tall base. When you looked at the boat from behind I want the riggers parallel to the rocket launcher. Purely an aesthetic issue. The GemLux Deluxe bases are low profile so its not as noticeable. GemLux sells 7.5 degree wedges. The ones I took out with my Rupp's were about 11 degrees. I'm going to make them parallel the rocket launcher and "level" them. Besides it helps satisfy my OCD!

Hardtop Rod Holders.jpeg Rigger Lines Stowed.jpeg Rigger shims.jpeg

Now the question is how to "level" them. I'm comfortable doing them either way (level across or level to tube tops in corner).

Probably get the best "fit" by putting a straight edge across when welding and doing the same when reconstructing the corners of the hardtop. The hardtop extends beyond the tubes so the lines are easy to recreate and you know where the tubes will sit.

Still have to deal with wedges. Could glass in or build them.

Rigger Mount 2.jpeg Rigger Mount 1.jpeg

The new plates are 1" wider than the new rigger base footprint.
 

Hookup1

GreatGrady Captain
Joined
Oct 16, 2007
Messages
2,635
Reaction score
718
Points
113
Age
69
Location
Cape May, NJ
Model
Islander
Hardtop disassembled and lifted up. Held in by 5 bolts for transport.

Spoke to the welder today. He said he will follow the roof line. Straight edge across curved rail and side rail and weld plate in. Use wedge to level rigger base top and bottom.

Reinforce inside hardtop. He suggested working from the top but I'll do it from the underside.

My son got me a deal today on a 30 gallon 5.4 SCFM compressor. I'll do all the glass work and get it ready for paint. My brother will paint in his auto body shop in North Jersey.
 
  • Like
Reactions: SkunkBoat

southernstyle995

Well-Known Member
Joined
Mar 1, 2018
Messages
176
Reaction score
27
Points
28
This is how I did mine. I made a custom backing plate took a piece of pipe and cut it in half long ways and welded it to plate. Did this so I didn't have to weld anything. Had plate powder coated. Has work out great so far and I also use carbon fiber outrigger poles to help with keeping as much stress off the top.Resizer_16525174520301.jpgResizer_16525174520300.jpg
 

Hookup1

GreatGrady Captain
Joined
Oct 16, 2007
Messages
2,635
Reaction score
718
Points
113
Age
69
Location
Cape May, NJ
Model
Islander
This is how I did mine. I made a custom backing plate took a piece of pipe and cut it in half long ways and welded it to plate. Did this so I didn't have to weld anything. Had plate powder coated. Has work out great so far and I also use carbon fiber outrigger poles to help with keeping as much stress off the top.
Nice job! Great way to do a no-weld support and not have to lift the hardtop.