GW 265 Express Electronics Upgrade

Fowl Hooked

Well-Known Member
Joined
Jun 4, 2007
Messages
203
Reaction score
53
Points
28
Location
Southern Maryland
Model
Express 265
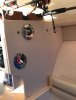
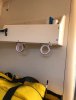
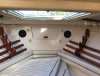
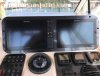
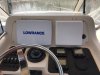
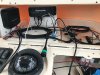
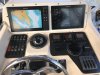
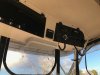
Pulled the trigger this off-season on the electronics overhaul I'd been planning for a while. Gutted the outdated and disparate systems (1st pic), displays, wiring, pretty much everything and replaced with a complete Raymarine setup including a pair of 12" Axiom displays (one Pro model that has the tactile control panel), digital doppler radar, autopilot, a real vision 3D transducer and a 1kW dual band CHIRP transducer along with the associated networking gear. Lot of time spent on the parts you don't generally see but it did my OCD good and was a nice change from the unmarked bird's nest that I started with. While I had everything torn apart I redid both dash panels, replacing all the old mismatched and worn switches with etched and red led backlit ones, added an external VHF speaker so I can hear it while running without the curtains, and a switch panel for the new electronics. The panels themselves were done with 3/16" carbon fiber ABS plastic. Replaced the dome light with a box speaker from Fusion for better sound at the helm, I've got a separate overhead LED light bar that's more than enough for that area. The overhead panel had been done previously but there's now a networked VHF radio as well as the standalone. Couple little things let to get, like the chart card for the MFDs, but it's pretty much done and ready for the spring season.
 

Attachments

  • IMG_0312.jpeg
    IMG_0312.jpeg
    282.4 KB · Views: 163
  • A069FF8B-3A56-4401-970F-5C236A17BADF.jpeg
    A069FF8B-3A56-4401-970F-5C236A17BADF.jpeg
    299.3 KB · Views: 186
  • IMG_3451 (1).jpeg
    IMG_3451 (1).jpeg
    300.9 KB · Views: 185
  • AB78D3F1-55F5-438E-9BA0-1AE197BD31C5.jpeg
    AB78D3F1-55F5-438E-9BA0-1AE197BD31C5.jpeg
    212.6 KB · Views: 185

RussGW270

GreatGrady Captain
Joined
Mar 5, 2019
Messages
1,761
Reaction score
253
Points
63
Age
57
Model
Islander
Hrm, never thought about putting things through the doors of the electronics boxes.. nice look and congrats on a nice setup.

R
 

SkunkBoat

Well-Known Member
Joined
Oct 12, 2017
Messages
4,249
Reaction score
1,468
Points
113
Location
Manasquan Inlet NJ
Website
www.youtube.com
Model
Express 265
Awesome! New etched switches on my list too. Did you do the panel yourself or did you use NewWire.com? I was on that site and tried using their panel designer and I could not get 5 switches across that width.
I like the carbon fiber look over black Starboard. When they put my motors on they will replace the Gauge panel and Key with Starboard. Not sure if I should get a piece of that ABS for them and use the remainder to do the left side switch panel myself. Or I was thinking let them do Starboard and later just get all panels cut at once by NewWire so they match....maybe even break down and do the closed up flat panel helm. What do you do with all the crap you used to put in there?
 

bac0701

Well-Known Member
Joined
Aug 8, 2017
Messages
79
Reaction score
15
Points
8
Thanks for posting I asked about the overhead mounting the other week. Looks awesome. Should be night and day for you
 

Fowl Hooked

Well-Known Member
Joined
Jun 4, 2007
Messages
203
Reaction score
53
Points
28
Location
Southern Maryland
Model
Express 265
Awesome! New etched switches on my list too. Did you do the panel yourself or did you use NewWire.com? I was on that site and tried using their panel designer and I could not get 5 switches across that width.
I like the carbon fiber look over black Starboard. When they put my motors on they will replace the Gauge panel and Key with Starboard. Not sure if I should get a piece of that ABS for them and use the remainder to do the left side switch panel myself. Or I was thinking let them do Starboard and later just get all panels cut at once by NewWire so they match....maybe even break down and do the closed up flat panel helm. What do you do with all the crap you used to put in there?
I did the panels myself using the originals as a template / guide I rough cut the pieces then trimmed them down on my router table. Cutting out the interior holes was a bit more effort and not as clean as you'd probably get from NewWire but it wasn't that hard and with the switches installed you can't see any of the rough edges anyway. If you're asking about all the space in the 'electronics console' I never had the opportunity to find out just what I could store there and then get used to having it, the PO had already closed it up (see first pic), probably best as it's a huge space and I'm sure I would have figured out all sorts of uses for it.
 
  • Like
Reactions: SkunkBoat

Fowl Hooked

Well-Known Member
Joined
Jun 4, 2007
Messages
203
Reaction score
53
Points
28
Location
Southern Maryland
Model
Express 265
Thanks for posting I asked about the overhead mounting the other week. Looks awesome. Should be night and day for you
Thanks. That was one of the first 'big' projects I took on and I've been very happy with it. The trim work on that piece of starboard isn't the best (didn't finish it on the router like I should have) and I'd probably use 1/2" vice 1/4" if I did it again but it was the first time I'd really used starboard and I didn't realize how much it would flex. With the anchoring screws at the bottom it works fine and sits flush like the original but I wouldn't mind it being a little stiffer.
 

SkunkBoat

Well-Known Member
Joined
Oct 12, 2017
Messages
4,249
Reaction score
1,468
Points
113
Location
Manasquan Inlet NJ
Website
www.youtube.com
Model
Express 265
I did the panels myself using the originals as a template / guide I rough cut the pieces then trimmed them down on my router table. Cutting out the interior holes was a bit more effort and not as clean as you'd probably get from NewWire but it wasn't that hard and with the switches installed you can't see any of the rough edges anyway. If you're asking about all the space in the 'electronics console' I never had the opportunity to find out just what I could store there and then get used to having it, the PO had already closed it up (see first pic), probably best as it's a huge space and I'm sure I would have figured out all sorts of uses for it.
Where did you buy the etched switches?
 

Fowl Hooked

Well-Known Member
Joined
Jun 4, 2007
Messages
203
Reaction score
53
Points
28
Location
Southern Maryland
Model
Express 265
Where did you buy the etched switches?
The switches came from New Wire, they had the red LED switches and etched actuators that I needed. I've used Rocker Switch Pros for custom etched switches like what I put on the macerator for the head but everything for the switch panel ended up being stock.
 

Fishtales

Well-Known Member
Joined
Jan 31, 2005
Messages
7,635
Reaction score
1,188
Points
113
Nice job. Those dual Axioms look bad a$$ and fit perfectly.
 
  • Like
Reactions: Fowl Hooked

Fowl Hooked

Well-Known Member
Joined
Jun 4, 2007
Messages
203
Reaction score
53
Points
28
Location
Southern Maryland
Model
Express 265
Had some extra carbon fiber ABS from a different project and decided to upgrade the dash to match the other panels, added black oxide bolts to blend in and am much happier with the look. Had seen another thread that added rod grommets in the forward cabin bulkhead and followed suit, four forward grommets with two cut down zero degree rod holders on the port side and two Taco rod butt hangers on the starboard side let me store the 7' and over rods without bending.
 

Attachments

  • 7043D7CA-685A-46BF-A08F-54C7CB6F7ADC.jpeg
    7043D7CA-685A-46BF-A08F-54C7CB6F7ADC.jpeg
    208 KB · Views: 77
  • A2F1924D-3E7D-49B3-80AD-E4835EECC7DA.jpeg
    A2F1924D-3E7D-49B3-80AD-E4835EECC7DA.jpeg
    172.2 KB · Views: 75
  • A5915D41-DCE0-4869-BF17-1264C258A576.jpeg
    A5915D41-DCE0-4869-BF17-1264C258A576.jpeg
    237.2 KB · Views: 76
  • E5685374-9BCA-478E-819A-3F7572ACDED0.jpeg
    E5685374-9BCA-478E-819A-3F7572ACDED0.jpeg
    338 KB · Views: 80
  • Like
Reactions: vocz

southernstyle995

Well-Known Member
Joined
Mar 1, 2018
Messages
176
Reaction score
27
Points
28
like what you did in the cabin when you get a chance can you take a pic of a rod in the wooden holders on each side of the cabin. the second pic
 

Hookup1

GreatGrady Captain
Joined
Oct 16, 2007
Messages
2,636
Reaction score
718
Points
113
Age
69
Location
Cape May, NJ
Model
Islander
Nice job! I like the fuse mount on overhead doors although I would probably have done it with a screw down panel. The New Wire panels look great. Carbon fiber a nice touch.
 

Hookup1

GreatGrady Captain
Joined
Oct 16, 2007
Messages
2,636
Reaction score
718
Points
113
Age
69
Location
Cape May, NJ
Model
Islander
Had some extra carbon fiber ABS from a different project and decided to upgrade the dash to match the other panels, added black oxide bolts to blend in and am much happier with the look. Had seen another thread that added rod grommets in the forward cabin bulkhead and followed suit, four forward grommets with two cut down zero degree rod holders on the port side and two Taco rod butt hangers on the starboard side let me store the 7' and over rods without bending.
Foul Hooked - Tell me a little bit about the carbon fiber material you used. Supplier, how thick is it,
 

Fowl Hooked

Well-Known Member
Joined
Jun 4, 2007
Messages
203
Reaction score
53
Points
28
Location
Southern Maryland
Model
Express 265
Foul Hooked - Tell me a little bit about the carbon fiber material you used. Supplier, how thick is it,
Hookup, the ABS carbon fiber with the Axiom displays is 1/8" thick and is only for appearance, it's backed by 1/2" starboard that provides the real strength and rigidity for mounting the displays. The instrument panel and switch panel are both from a 3/16" thick piece of ABS. Got both from Decorative Plastics, https://shop.decorativeplasticsheets.com/Carbon-Fiber-ABS-for-Boat-Instrument-Panels-CF101.htm
 

SkunkBoat

Well-Known Member
Joined
Oct 12, 2017
Messages
4,249
Reaction score
1,468
Points
113
Location
Manasquan Inlet NJ
Website
www.youtube.com
Model
Express 265
Hookup, the ABS carbon fiber with the Axiom displays is 1/8" thick and is only for appearance, it's backed by 1/2" starboard that provides the real strength and rigidity for mounting the displays. The instrument panel and switch panel are both from a 3/16" thick piece of ABS. Got both from Decorative Plastics, https://shop.decorativeplasticsheets.com/Carbon-Fiber-ABS-for-Boat-Instrument-Panels-CF101.htm
Thats the stuff I'm using for the gauge area. From same company but ordered on amazon.
I'm sticking with the black 1/2" starboard for the bubble dash...I think...

BTW...you can heat the abs with a heat gun and bend it.
Trying to make a drop-in tray for the (formerly)gauge area


Edit: I ended up not using the bent plastic tray, Bought a clear plastic tray that fit perfectly
abs tray_2.jpg
abs tray_1.jpg

abs tray_3.jpg
 
Last edited:

Hookup1

GreatGrady Captain
Joined
Oct 16, 2007
Messages
2,636
Reaction score
718
Points
113
Age
69
Location
Cape May, NJ
Model
Islander
I want to update the "plastic wood" but I'm undecided about what I want.
 

weatherguage

Active Member
Joined
Oct 5, 2020
Messages
26
Reaction score
3
Points
3
Model
Express 265
Wow I love that helm! I have a 12" Axiom+ I'm about to install but the 12" Axiom Pro is making my wallet ache. How much fiberglass did you have to cut to make that fit?