Livewell install on 1996 grady adventure.

imjus4u2nv

Well-Known Member
Joined
Jul 1, 2018
Messages
264
Reaction score
33
Points
28
Location
New York
Model
Adventure
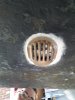
My boat did not come with the factory livewell and I am in the process of installing. I was able to run 3/4 hose from the bilge to the port side icebox (now livewell) using the port PVC tube under the deck (all my wires use the starboard side so this one was empty). This pipe come out under the port passenger seat, after removing the storage trays under the seat, I was able to access the hose and snake it to the round port cover located on the front of the ice box for easy access to add intake. I will be adding another drain as required (will be my last step as I am hoping to try the current drain and a stand pipe - anyone know what size stand pipe or if one with rubber seal). I also have a livewell switch that cycles the pump on an off.

Since I have no seacock on my boat, I was thinking of somehow pulling water woth some plumbing over the transom but with priming issues not so easy. Other option is to install pump on the transom, or put an l bracket off back of boat with the scoop and a pump on top of it so can pump or fill while under way, it this looks ugly.

Anyone install a brass groco scoop on bottom of boat with a shutoff valve? Assuming just need to drill accurately and use some 5200? I really didnt want to drill a hole in the boat but may be best option.
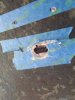
 

Ky Grady

GreatGrady Captain
Staff member
Joined
Mar 1, 2006
Messages
2,914
Reaction score
1,271
Points
113
Location
Berea, KY/Cross, SC
Model
Seafarer
High speed pickup will probably be your best option. I replaced mine last year after my Florida trip. I crushed mine on the boat lift. Doesn't look overly hard to do after replacing mine. One large hole for pickup and 4 small holes for mounting bolts around flange. Just make sure to place it inboard from your bunks or rollers.

20180722_131731.jpg
20180722_135010.jpg
 

imjus4u2nv

Well-Known Member
Joined
Jul 1, 2018
Messages
264
Reaction score
33
Points
28
Location
New York
Model
Adventure
High speed pickup will probably be your best option. I replaced mine last year after my Florida trip. I crushed mine on the boat lift. Doesn't look overly hard to do after replacing mine. One large hole for pickup and 4 small holes for mounting bolts around flange. Just make sure to place it inboard from your bunks or rollers.

View attachment 8349
View attachment 8350
Seems to be the best option, do you recall how thick your hull was? Grocos come in different lengths.
Anything special with the shutoff valve? Do you use teflon tape (i tend to stay away from tephlon).
Many thanks and good point on the rollers/bunks when positioning. I will also place on opposite side of the transducer to avoid interference.
 

seasick

Well-Known Member
Joined
Aug 19, 2008
Messages
9,073
Reaction score
1,293
Points
113
Location
NYC
Seems to be the best option, do you recall how thick your hull was? Grocos come in different lengths.
Anything special with the shutoff valve? Do you use teflon tape (i tend to stay away from tephlon).
Many thanks and good point on the rollers/bunks when positioning. I will also place on opposite side of the transducer to avoid interference.

I don't use teflon tape on fittings connected to the outside below waterline world, You should use an appropriate pipe thread sealant.
 
  • Like
Reactions: imjus4u2nv

Ky Grady

GreatGrady Captain
Staff member
Joined
Mar 1, 2006
Messages
2,914
Reaction score
1,271
Points
113
Location
Berea, KY/Cross, SC
Model
Seafarer
The thru hull pickup is the 1" ones. The threaded part are all the same length. The ball valves are Apollo's and I used pipe dope, no Teflon tape. Since I've replaced these once due to bad positioning on the boat lift, I installed with 4200 incase of repeat damage.
IMG_1992.JPG
 
  • Like
Reactions: imjus4u2nv

imjus4u2nv

Well-Known Member
Joined
Jul 1, 2018
Messages
264
Reaction score
33
Points
28
Location
New York
Model
Adventure
I took the plunge and drilled a hole in the bottom of my boat and installed the scoop, was scary but all went well.
I used two magnets to help line up inside and outside location, I used expoxy resin to seal the edges of the holes prior to install (maybe overkill). I ground down a bevel edge around all the holes for better adhesion (I went with 5200 and will see if/when I regret it but feel more confident for underwater with 5200).
Was tough to get the bolts tightened by myself@ but was able to get socket on the inside to push up against transom while i screwed from outside. I also made sure to sand away bottom paint where the 5200 would touch.
Only suggestions for others is to limit the amount of sealant on the scoop to avoid excess on inside of scoop/bottom of boat inside the steainer - I went a little heavy in one spot and was usig a qtipo get some out from inside the strainer.
I used loctite 592 for the brass scoop tot je brass ball valve. From there livewell pump screws in, hose run to a check valve (can anyone suggest a good low restriction checkvalve the brass one I have seems to restrict flow a good bit), the to an inline PVC valve which located in a more more ccessible spot then the main shutoff valve at bottom of bilge, that way if I don't want to fill while driving I can easily shut the intake off.
Thanks for the help guys!
 

Attachments

  • 20190820_160529.jpg
    20190820_160529.jpg
    707.8 KB · Views: 29
  • 20190820_160449.jpg
    20190820_160449.jpg
    487.5 KB · Views: 31
  • 20190820_115453.jpg
    20190820_115453.jpg
    636.3 KB · Views: 29
  • Like
Reactions: Paul_A

imjus4u2nv

Well-Known Member
Joined
Jul 1, 2018
Messages
264
Reaction score
33
Points
28
Location
New York
Model
Adventure
Thanks for the suggestions, will see if she holds water in a few more days.
 

Ky Grady

GreatGrady Captain
Staff member
Joined
Mar 1, 2006
Messages
2,914
Reaction score
1,271
Points
113
Location
Berea, KY/Cross, SC
Model
Seafarer
Good deal. Looks like it should work great for you. Better than the hose over the transom option.
 
  • Like
Reactions: imjus4u2nv

imjus4u2nv

Well-Known Member
Joined
Jul 1, 2018
Messages
264
Reaction score
33
Points
28
Location
New York
Model
Adventure
Just for anyone looking to do do similar project, this is the plumbing setup I am going to try (be nice please lol). One side goe to the seacock/livewell pump and the other to the livewell fill.
Needed a check valve because my tank fills from the bottom (probably should have just had fill from top, but also drains from top so was afraid of poor water circulation if had inlet on top of livewell), and when switch is off livewell would drain. I have a timer switch (on for 30 seconds or so every 1 2 3 5 etc minutes).
First brass check valve (spring loaded) was too restrictive and cut flow down by more then half, decided to try the white pvc swing check valve in the upper left of the picture. Shutoff valve on other end is to shut off water rfrom the cooper rather then turning seacock (which is difficult to get to), other valve allows me to drain excess water in system above the check valve to winterize and when not in use.
Installed today, will see how it works next time out.
 

Attachments

  • 20190828_174544(0).jpg
    20190828_174544(0).jpg
    1.4 MB · Views: 26

imjus4u2nv

Well-Known Member
Joined
Jul 1, 2018
Messages
264
Reaction score
33
Points
28
Location
New York
Model
Adventure
Just for anyone looking to do do similar project, this is the plumbing setup I am going to try (be nice please lol). One side goe to the seacock/livewell pump and the other to the livewell fill.
Needed a check valve because my tank fills from the bottom (probably should have just had fill from top, but also drains from top so was afraid of poor water circulation if had inlet on top of livewell), and when switch is off livewell would drain. I have a timer switch (on for 30 seconds or so every 1 2 3 5 etc minutes).
First brass check valve (spring loaded) was too restrictive and cut flow down by more then half, decided to try the white pvc swing check valve in the upper left of the picture. Shutoff valve on other end is to shut off water rfrom the cooper rather then turning seacock (which is difficult to get to), other valve allows me to drain excess water in system above the check valve to winterize and when not in use.
Installed today, will see how it works next time out.

It worked great, some restriction with check valve but otherwise works great! Just in time for striped bass run.
 

Lt.Mike

Well-Known Member
Joined
Oct 18, 2013
Messages
879
Reaction score
165
Points
43
Age
63
Location
Farmingdale NJ
Model
Overnighter
I did this already to my Overnighter. I turned the right side fishbox into a livewell and it works fantastic. I found though that if you use the 3/4” drain it’s not going to keep up with the incoming water flow and it will overflow onto the deck. If you have a screen on the stand pipe it will clog with scales and with no screen then the pipe under the deck will clog.
I also found that with the high speed pickup if I was running fast the force of the water in the pickup would blow thru the pump and again overflow the tank whether the pump was running or not. I ended up installing an elbowed 1-1/2” drain on the side of well at the desired height, ran about a foot of connecting hose down across from the access hatch on the side just above the deck and out an elbowed thru-hull out the side.
The elbow drain in the well has a twist on screen that prevents small baits from going through but can be easily removed to allow large fish scales to flush out. I’ve had large stripers in that well that actually revived from the fight.
Fluke, blues, large bunker can be a pain to get back out of the well as they rest up and are full of fight.
With the larger drain there is no overflow problem.
I also have a diverter valve (from wakemakers) that controls the flow from the 800gph rule bait pump, connected to a bronze high speed pickup, and feeds the rear baitwell, front livewell or both.
The diverter valve is “V” shaped and is mounted into the motor well with just its “V” handle showing making a very easy, clean, and trick looking install.
There is also an air pump with stones in both wells to provide aeration while on the trailer headed home.
Both wells are fed by a made by me sprayer bar (but it looks factory) ;). On these I found you need to install removable end caps in case you get gravel or debris in the tube that had made it passed the pump.
Also the front well being made as an ice chest from the factory you have to get in there with 3m5200 to seal the seams or sloshing water will get thru into your bilge.
I also added blue LED lights inside each well that I wired to the nav/ anchor lights. You’ll have to wire in a one way diode so that the power feeding the LEDs doesn’t feedback into the other circuits.
I also picked up and inboard motor flush tool, the one that looks like a toilet plunger with a hose fitting to test the system while it’s on the trailer.
Aside from the bait wells I taped into the through hull by using the livewell pumps fitting to plumb a washdown pump, a West Marine unit. If you don’t have one of those get it. It’s a god send.
Good luck with it.
Mike
PS - not sure where you are but your welcome to come inspect my layout first hand or I can send you pictures with my cell number for questions.
 
Last edited:

imjus4u2nv

Well-Known Member
Joined
Jul 1, 2018
Messages
264
Reaction score
33
Points
28
Location
New York
Model
Adventure
I did this already to my Overnighter. I turned the right side fishbox into a livewell and it works fantastic. I found though that if you use the 3/4” drain it’s not going to keep up with the incoming water flow and it will overflow onto the deck. If you have a screen on the stand pipe it will clog with scales and with no screen then the pipe under the deck will clog.
I also found that with the high speed pickup if I was running fast the force of the water in the pickup would blow thru the pump and again overflow the tank whether the pump was running or not. I ended up installing an elbowed 1-1/2” drain on the side of well at the desired height, ran about a foot of connecting hose down across from the access hatch on the side just above the deck and out an elbowed thru-hull out the side.
The elbow drain in the well has a twist on screen that prevents small baits from going through but can be easily removed to allow large fish scales to flush out. I’ve had large stripers in that well that actually revived from the fight.
Fluke, blues, large bunker can be a pain to get back out of the well as they rest up and are full of fight.
With the larger drain there is no overflow problem.
I also have a diverter valve (from wakemakers) that controls the flow from the 800gph rule bait pump, connected to a bronze high speed pickup, and feeds the rear baitwell, front livewell or both.
The diverter valve is “V” shaped and is mounted into the motor well with just its “V” handle showing making a very easy, clean, and trick looking install.
There is also an air pump with stones in both wells to provide aeration while on the trailer headed home.
Both wells are fed by a made by me sprayer bar (but it looks factory) ;). On these I found you need to install removable end caps in case you get gravel or debris in the tube that had made it passed the pump.
Also the front well being made as an ice chest from the factory you have to get in there with 3m5200 to seal the seams or sloshing water will get thru into your bilge.
I also added blue LED lights inside each well that I wired to the nav/ anchor lights. You’ll have to wire in a one way diode so that the power feeding the LEDs doesn’t feedback into the other circuits.
I also picked up and inboard motor flush tool, the one that looks like a toilet plunger with a hose fitting to test the system while it’s on the trailer.
Aside from the bait wells I taped into the through hull by using the livewell pumps fitting to plumb a washdown pump, a West Marine unit. If you don’t have one of those get it. It’s a god send.
Good luck with it.
Mike
PS - not sure where you are but your welcome to come inspect my layout first hand or I can send you pictures with my cell number for questions.
Many thanks, mike.
I am actually all done at this point but appreciate the offer. I didn't go as elaborate as you but good to know this info in case I want to expand.
I used the port side to better distribute weight (I fish solo a lot), also was the best shape of the two on the adventure (port was oval, starboard side was off shape).
Good point on sealing, I got my head in the livewell and siliconed the heck out of the seam between top of livewell and rest of boat already but forgot to mention.
I agree I will likely need another drain, but all depends on how much water I need, I have a variable timer pump so can easily set it so it don't overflow, question will be if this setting is enough wate to keep bait alive.
When on plain, I also have a shutoff valve (see pictures above) which can control in-flow and/or shut off the scoop if dont want to fill (also have the ability to screw in a cap in the livewell to stop water from coming in).
At this point I am trying to figure out the springs/hydrics to keep lids open.