Transom mod/repower update

jbrinch88

Well-Known Member
Joined
Feb 28, 2014
Messages
351
Reaction score
17
Points
18
Location
Long Island, NY
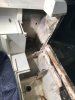
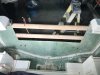
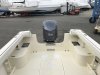
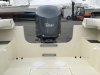
Went ahead and rebuilt the transom on my 1988 24 offshore. I cut the floor out as most do to get easier access to the wooden core and rear stringers which were also replaced.

I used 3 layers of 3/4” mirante and west systems epoxy. The rear stringers I doubled up on 3/4” mirante making them 1 1/2”s thick. I closed in the transom sides 8”s port and starboard and raised the overall height 5”s. Tied everything together, glassed the floor back in and repainted the boat with awlgrip.

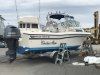
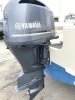
Ended up selling my 225 etec end of last year and repowered with a new Yamaha 300. Still have some wet sanding to do, touch ups, and rigging.
 

Attachments

  • A4E30F8D-52AA-4F38-8545-CBAC4DF1BFCB.jpeg
    A4E30F8D-52AA-4F38-8545-CBAC4DF1BFCB.jpeg
    2.1 MB · Views: 73
  • 99123C42-68A0-4268-8232-372C7116A89F.jpeg
    99123C42-68A0-4268-8232-372C7116A89F.jpeg
    1.9 MB · Views: 75
  • 09653C7B-D06C-4229-9B5A-DF481BE874BD.jpeg
    09653C7B-D06C-4229-9B5A-DF481BE874BD.jpeg
    2 MB · Views: 76
  • A98B0A2D-07CC-41C1-9792-3F9793DF8FD5.jpeg
    A98B0A2D-07CC-41C1-9792-3F9793DF8FD5.jpeg
    2 MB · Views: 77
  • 13B9C8F3-C90F-4532-842F-14A0802F33B0.jpeg
    13B9C8F3-C90F-4532-842F-14A0802F33B0.jpeg
    1.5 MB · Views: 73
  • C1C5B667-896A-4383-9394-E28BEA3A02CD.jpeg
    C1C5B667-896A-4383-9394-E28BEA3A02CD.jpeg
    1.3 MB · Views: 75
  • E15F73FC-5B6F-4D59-94FD-3F76120FE9FA.jpeg
    E15F73FC-5B6F-4D59-94FD-3F76120FE9FA.jpeg
    2 MB · Views: 77
  • 0FFE491D-E60A-4E07-ABA0-779876E36DE6.jpeg
    0FFE491D-E60A-4E07-ABA0-779876E36DE6.jpeg
    1.5 MB · Views: 74

SirGrady226

Well-Known Member
Joined
Nov 7, 2017
Messages
229
Reaction score
95
Points
28
Great job! That's going to be one very nice boat and should be good for many years of enjoyment.
 

CJ7Rob

Well-Known Member
Joined
May 13, 2018
Messages
157
Reaction score
23
Points
18
Very clean job you did, boat looks great for an '88.
 

DennisG01

GreatGrady Captain
Joined
Sep 1, 2013
Messages
6,744
Reaction score
1,188
Points
113
Location
Allentown, PA & Friendship, ME
Model
Offshore
That looks really nice, Jason. Edges look good - nice radius. How'd you like working with the Awlgrip? I've shied away from that in the past... but that's primarily because of the price! :) I do know it's a fantastic product, but have never used it.
 

jbrinch88

Well-Known Member
Joined
Feb 28, 2014
Messages
351
Reaction score
17
Points
18
Location
Long Island, NY
That looks really nice, Jason. Edges look good - nice radius. How'd you like working with the Awlgrip? I've shied away from that in the past... but that's primarily because of the price! :) I do know it's a fantastic product, but have never used it.

That’s mostly what we use where I work. Awlcraft 2000. I like it a lot because you can walk away from it the way it comes right out of the gun. It will come out even better by sanding with 1500, 2000 and then a 2 step polish but it’s not always necessary ( if you’re spraying a cockpit, floor, etc) if you we’re doing hull sides then I would say to sand and polish to get that extra shine.

Touch ups are very simple because the colors come right out of a can (although they can rarely still be off) rather then trying to match gel coat. The awlcraft does not fade at least from what I’ve seen.

I think gel coat is more forgiving as far as fairing goes. It’s thicker and will fill more blemishes and pin holes where paint you see every little pin hole and blemish that you miss. The gelcoat is also more durable as far as scuffing and scratching etc.

Out of the 2 I prefer paint just because once it’s done the one time it’s less upkeep. You don’t need to polish every season like you do gelcoat. Just a good wash and once in awhile some wax.
 

jbrinch88

Well-Known Member
Joined
Feb 28, 2014
Messages
351
Reaction score
17
Points
18
Location
Long Island, NY
Here’s a few pics from the first few days I started :
 

Attachments

  • D1253A85-EDFC-4CFF-A8C1-6FAA8350CBF7.jpeg
    D1253A85-EDFC-4CFF-A8C1-6FAA8350CBF7.jpeg
    1.1 MB · Views: 53
  • 63BB73E6-DD62-486B-AFA2-C1CA2980B443.jpeg
    63BB73E6-DD62-486B-AFA2-C1CA2980B443.jpeg
    1.5 MB · Views: 53
  • 689ABF75-CC31-41FB-A431-F7D96495321A.jpeg
    689ABF75-CC31-41FB-A431-F7D96495321A.jpeg
    2.2 MB · Views: 53

jbrinch88

Well-Known Member
Joined
Feb 28, 2014
Messages
351
Reaction score
17
Points
18
Location
Long Island, NY
Rigging pics. Just about ready for the season!
 

Attachments

  • CA7A9564-E4E1-4945-9D07-A084D8634171.jpeg
    CA7A9564-E4E1-4945-9D07-A084D8634171.jpeg
    2.2 MB · Views: 48
  • 3659DF88-232C-4B47-B459-D578A9237C70.jpeg
    3659DF88-232C-4B47-B459-D578A9237C70.jpeg
    1.8 MB · Views: 48
  • DAF17610-657A-4808-8B3B-03608B2BC0EE.jpeg
    DAF17610-657A-4808-8B3B-03608B2BC0EE.jpeg
    1.9 MB · Views: 42
  • Like
Reactions: SkunkBoat

Paul_A

Well-Known Member
Joined
Feb 25, 2019
Messages
144
Reaction score
43
Points
28
Model
Adventure
Looks fantastic!

I gotta ask, in post 6, how many hours to get from the first picture to the third?
 

jbrinch88

Well-Known Member
Joined
Feb 28, 2014
Messages
351
Reaction score
17
Points
18
Location
Long Island, NY
Looks fantastic!

I gotta ask, in post 6, how many hours to get from the first picture to the third?

I would say I spent a solid 3 days cutting/grinding all the nasty out to get to where I could get my first core laminated in. Not fun at all but the end result was worth it.
 

Paul_A

Well-Known Member
Joined
Feb 25, 2019
Messages
144
Reaction score
43
Points
28
Model
Adventure
I agree, it is a very professional looking result. I was close to doing my transom but after pulling the motor and looking things over I have decided to wait until I repower next year.
 

mleads310

Well-Known Member
Joined
Apr 6, 2016
Messages
271
Reaction score
40
Points
28
Location
Brooklyn NY
Model
Sailfish
I knew I recognized this boat and the yard. That's at crow's-nest! I seen that boat a couple of months ago when I was having my boat worked on. They do amazing work over there that thing is going to be more structurally sound that when it was new.
 

trapper

GreatGrady Captain
Joined
Jan 7, 2010
Messages
794
Reaction score
195
Points
43
WOW beautiful work!! I see where the stern hatches( boxes) are just cit off near the transom . How do you join that back up on completion to appear like it was never removed. In other word, they appear to be just cut off rather randomly the new work is attached to make it look like they were all original. I guess there are some gifted wood and fibreglass guys out there. Looks like a new YACHT Congrats!!!! Cheers, trapper