New Suzukis

Ekea

Well-Known Member
Joined
Aug 11, 2020
Messages
409
Reaction score
126
Points
43
Age
38
Location
Mid Atlantic
Model
Chase
are the zukes as narrow as they look? they seem very skinny compared to my f250s
 

dogdoc

Well-Known Member
Joined
Apr 23, 2019
Messages
329
Reaction score
73
Points
28
Age
69
Model
Marlin
So finally got the boat back with new DF 250s. Did need the transom and that went fine. Installation could have been a little cleaner, but ok. 3 hours into break in all seems ok. My problem is the SMG4 gauges. Currently I have no fuel tank readings, I do not think the dealer calibrated the gauges/tanks. My reading says this is started with empty tanks, which mine are not. Is that the case? The gauges do display a large amount of info, but I cannot seem to arrange the displayed info in the manner I would like to see and monitor. Wondering how others set their displays while running. Any advice appreciated.
Thanks
 

family affair

Well-Known Member
Joined
Jul 31, 2010
Messages
1,283
Reaction score
283
Points
83
Location
Ohio
Model
Islander
My tanks were not empty and mine were set up fine. I'm not certain if that is a dealer requirement or not.
As for the displays, check out some of the videos on YouTube for the SMG4. Once you understand the programing logic, the set-up isn't too bad.
Check out my thread on the 2005 Islander with df200's. You can see how I have mine set up for reference. The only thing I'd like to see that I currently don't is each engine's hours, but I haven't dug far into that yet.
 
  • Like
Reactions: PT G

SkunkBoat

Well-Known Member
Joined
Oct 12, 2017
Messages
4,137
Reaction score
1,435
Points
113
Location
Manasquan Inlet NJ
Website
www.youtube.com
Model
Express 265
Did they even connect the tanks to the zuke harness?

If you still have the old dashboard fuel level Main/Aux switch you have to disconnect that and run the sender wires to the zuke harness.

The Mechanical zukes have a special wire harness to the SMG4 gauges. The gauges do not have all the functionality of those connected to Digital motors.
IDK what is different.

Its been a long time since I setup the tanks. I had to do it because I had a bad sender in one tank so the dealer could not get it setup.
I seem to remember that you needed to do something to get to the "dealer setup" menu.
There is a required setting for the US or Euro senders. There are settings for naming/numbering the tanks.

Ha! I walked outside to go in the boat to get the SMG4 manual and the boat's not there! I launched yesterday!

I know they are now shipping Generation2 SMG4s. Unless they made a change to the SMG4s, "calibration of levels" is not necessary. It will just display a linear percentage of the range of ohms for the sender (US or Euro).

When you say Have not fuel tank readings" you mean there are two tanks displaying no bars or do you mean you have no fuel tank display at all.

There are Menus for doing setup. Once you are done setup you never use "Menu" button again. In the menus you can setup the "SCREENS" to look the way you want. There are 4 SCREENS.
Some can be set to look analog or digital or OFF. Fuel SCREEN can be set ON or OFF. Initial Settings Menu lets you setup Units & formats ..

The SET button scrolls you thru SCREENS. Each screen has Sub-Info. You use the ^ v arrows to scroll thru Sub-info on each SCREEN.

Holding either arrow for a long time resets TRIP and Fuel Used . REMEMBER...Do that every time you gas up! Then you will know how much you have burned since you gassed up.

I use the All Items Display Screen for both gauges. The fuel gauge on that screen is COMBINED tanks. Then use the SET button to look at separate tank fuel levels.
Use ^ v arrows to see "Total HRs (Engine hours)", trip hours, trip burn, economy , etc
 

dogdoc

Well-Known Member
Joined
Apr 23, 2019
Messages
329
Reaction score
73
Points
28
Age
69
Model
Marlin
Getting used to the new look gauges from the old Yamaha, and like Skunk use "all item" on both. Below a link to a brief explanation of the gauges I found helpful.


My main problem at this point is the lack of fuel sender data displayed on the SMG4s. As I recall when rigging the dealer made a comment about the main/aux tank switch at the helm and that only one wire actually went to the old gauge. I thought this would be eliminated and wires from both senders would be moved to the gauges. Apparently not. I will dig into that today. Any advice appreciated as always.

Props.. Dealer installed 3 blade 16x21.5 Suzuki prop after a smaller (size unknown) prop did not perform well. To me seems like a slight bit slower on getting up on a plane with engines fully down and then trimming engines up gets me 30 mph at 3800 rpm and 17-18 gph burn rate. This is all very preliminary as I am still in the break in 10 hr time frame. Does run smoother (no vibrations as before) and obviously quieter. An added bonus seems to be slow speed handling. When returning to my lift I must make a 180 in the canal with the engines then essentially parallel park it and pull into the lift. Only done it twice but seems smoother than with the old Yamahas.

Weight I was concerned about the extra 200 lbs on the transom. Scuppers are still above water line and no water in the bilge I can see.
 

family affair

Well-Known Member
Joined
Jul 31, 2010
Messages
1,283
Reaction score
283
Points
83
Location
Ohio
Model
Islander
Skunk, to see each engine's hours, is that attained by setting the gauges to where one displays "port" and the other "starboard" in the upper left corner and then scrolling to hours?
I like keeping my engine hours even and it bugs me that Suzuki doesn't display hours in tenths. Right now both the port and starboard gauges show 8 hours. I was able to dig into my Garmin under "numbers" (apparently looking under "gauges" made too much sense) to find how to display each engine's hours. There it appears to display tenths.
 

dogdoc

Well-Known Member
Joined
Apr 23, 2019
Messages
329
Reaction score
73
Points
28
Age
69
Model
Marlin
Today tore into the switch panel to find sender wires and clean up unused junk in preparation for a new panel in the future. Punctuated by I phone falling in canal. Depth 6ft, time of immersion 3 min, adverse effects amazingly none! Have the sender wires isolated and now need to know how to connect to the SMG4 gauges. Reluctant to tear into the harness until I have a better idea what to look for. Attached are pics of switches before and after and wiring diagram for 1 station 2 motor smg4 install. Are the colors red, lavender, black? What will the connectors look like?
Thanks
 

Attachments

  • wire.png
    wire.png
    190.2 KB · Views: 9
  • switch before.jpg
    switch before.jpg
    57.1 KB · Views: 9
  • switch after.jpg
    switch after.jpg
    41.3 KB · Views: 9

dogdoc

Well-Known Member
Joined
Apr 23, 2019
Messages
329
Reaction score
73
Points
28
Age
69
Model
Marlin
Any tricks for cutting rectangular switch holes. I have some 1/4 in black starboard clone
 

dogdoc

Well-Known Member
Joined
Apr 23, 2019
Messages
329
Reaction score
73
Points
28
Age
69
Model
Marlin
Also any ideas on how to set up the new gauge panel, same material 1/4 starboard. There will be lots of room and not sure how to fill it up.
 

Attachments

  • dash.jpg
    dash.jpg
    132.3 KB · Views: 21
  • panel.jpg
    panel.jpg
    88 KB · Views: 20

SkunkBoat

Well-Known Member
Joined
Oct 12, 2017
Messages
4,137
Reaction score
1,435
Points
113
Location
Manasquan Inlet NJ
Website
www.youtube.com
Model
Express 265
Skunk, to see each engine's hours, is that attained by setting the gauges to where one displays "port" and the other "starboard" in the upper left corner and then scrolling to hours?
I like keeping my engine hours even and it bugs me that Suzuki doesn't display hours in tenths. Right now both the port and starboard gauges show 8 hours. I was able to dig into my Garmin under "numbers" (apparently looking under "gauges" made too much sense) to find how to display each engine's hours. There it appears to display tenths.
3 of the 4 "Screens" will display "sub-info". only the 4th "All Items Display" Screen does not let you scroll sub-info.
Use ^ v arrows to scroll thru sub-info (at bottom right of screen) the first H displayed is total eng hours. It does not say Eng H...just H
Port gauge/port motor, stb gauge/stbd motor. The second one says TRIP xx H


I usually run on All Items Screen (dset digital not analog) and I look at sub-info on the Fuel Info Screen

You can read up on this in the DF200AP owners manual and also in the SMG4 manual.

You probably have gen2 SMG4s so your menu/screen/sub-info maybe be slightly differnt than mine..idk.
 
  • Like
Reactions: family affair

dogdoc

Well-Known Member
Joined
Apr 23, 2019
Messages
329
Reaction score
73
Points
28
Age
69
Model
Marlin
Just left the dealer/installer and am not thrilled. Still not sure why they did not connect sender wires from tanks to the SMG4s. They just did not give me a straight answer. They did connect the main tank wire (red) which comes OUT of the main/aux switch and a black wire to the engine one harness connection on one gauge. This did nothing to provide tank readings. After much discussion they seemed to say the following.

A direct wire from pos and neg at the tank senders must be run to the gauge harness from both tank 1 and tank2. A ground or "black wire" cannot be picked up from another location.
Only one gauge needs these connections as the gauges talk to each other via the nema backbone.

I question the need to run a neg wire from the sender as I thought all neg are essentially tied together in the electrical system.
SMG4 wiring diagram shows connections from both tanks to both motors

Really looking for some help here.
Thanks
 

Halfhitch

GreatGrady Captain
Joined
Nov 11, 2017
Messages
1,347
Reaction score
421
Points
83
Location
Venice, Florida
The tank sensors talk to the gauges by measuring small changes in the ohm readings in the circuit, hence the demand for continuous wire leads. If your ground is just connected to whatever ground point that is handy, then there may be some corrosion there to compromise the integrity of the ohm readings. Then from that handy ground, the wire feeding that point may come from some other junction of ground wires and on and on. To get an accurate fuel level reading in that scenario is highly unlikely. Thats why the designers ask that you provide an uncompromised circuit to help their equipment perform as intended.
 
  • Like
Reactions: fitzman

dogdoc

Well-Known Member
Joined
Apr 23, 2019
Messages
329
Reaction score
73
Points
28
Age
69
Model
Marlin
So crisis averted. Pulled sender wires off main/aux switch. Extended them enough to reach port gauge harness and plugged into red wire/tank 1 and blue wire/tank 2 connectors. Hijacked a good ground in the helm box and ran 10ga wire to port gauge. Using 10/12 butt connector spliced the 10 with 2 16ga wires and ran one to each black lead connector in the harness. Maybe you get a more accurate reading if you run the ground to the tank, but what I have is close enough to avoid that hassle. Buttoned things up and turned on the switches. The programing was a snap. Cycle to Setup then tanks, enter capacity and US ohms and voila gauges now show levels that match the needle gauge on the senders. And yes you only need to set up one gauge, they communicate via nmea backbone.
For what I paid the dealer I should not have had to do this, he will hear that for sure.
 
  • Like
Reactions: SkunkBoat

SkunkBoat

Well-Known Member
Joined
Oct 12, 2017
Messages
4,137
Reaction score
1,435
Points
113
Location
Manasquan Inlet NJ
Website
www.youtube.com
Model
Express 265
Also any ideas on how to set up the new gauge panel, same material 1/4 starboard. There will be lots of room and not sure how to fill it up.
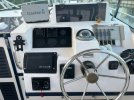
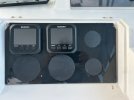
Whats behind the black door of the e-box? Maybe redesign the entire helm to look more modern. Move things. Flat panel the Garmin. Maybe where the gauges are and move the gauges up to a flat panel with a VHF. Whats the Raymarine thing?

Definitely get a new switch panel. Ditch those remaining god-awful euro-oval switches. ditch the hinged lid?

hehehe, you can't make it any worse.... ;)
 

dogdoc

Well-Known Member
Joined
Apr 23, 2019
Messages
329
Reaction score
73
Points
28
Age
69
Model
Marlin
How to cut rectangular switch holes....call New Wire Marine. Material and holes for less than 2 fish tacos and a beer.
Ray Marine is my mfd for auto pilot EV-150, best thing I ever put on the boat
 

dogdoc

Well-Known Member
Joined
Apr 23, 2019
Messages
329
Reaction score
73
Points
28
Age
69
Model
Marlin
Left side almost done, cell phone holder going in to right of gauges. Not sure what to put under gauges yet. Raymarine MFD does not look much different but it now sits in 1/4 starboard instead of 3/4 cutting board painted black. The mfd went to deep and hit the old Yamaha key switches, thus the need to use 3/4 in standoff. New Wire stuff should be here soon and on to the right side. Probably gonna get a new Ritchie as well. Sure would rather be working with wood than Starboard, man I hate that stuff.

new gauge.jpg
 

Parthery

GreatGrady Captain
Joined
Jan 31, 2005
Messages
2,587
Reaction score
220
Points
63
Location
Atlanta, GA
Ritchie will rebuild that compass and get it back to you brand new. Go to their website, find the nearest authorized repair center, and make arrangements to either drop it off or ship it. Total cost was about 35% less than a new one.
 

dogdoc

Well-Known Member
Joined
Apr 23, 2019
Messages
329
Reaction score
73
Points
28
Age
69
Model
Marlin
I use a 100 tooth plywood blade and the amount of "starboard" dust is humongous. Sticks to everything, and unlike fine saw dust doesn't just disappear outside. Inside sticks to everything (static cling?) and hard to clean up. Does not sand as well either, imo. Cannot glue, only mechanical connections. That said it is the best product for what I use it for and will keep on using and complaining.
 

Ekea

Well-Known Member
Joined
Aug 11, 2020
Messages
409
Reaction score
126
Points
43
Age
38
Location
Mid Atlantic
Model
Chase
I use a 100 tooth plywood blade and the amount of "starboard" dust is humongous. Sticks to everything, and unlike fine saw dust doesn't just disappear outside. Inside sticks to everything (static cling?) and hard to clean up. Does not sand as well either, imo. Cannot glue, only mechanical connections. That said it is the best product for what I use it for and will keep on using and complaining.
got it, thanks. i have a potential starboard project next off season. its good to know what to plan for.