Replacing 1983 Seafarer floor/gas tank

richie rich

Well-Known Member
Joined
May 20, 2009
Messages
1,183
Reaction score
1
Points
0
Location
south windsor, CT
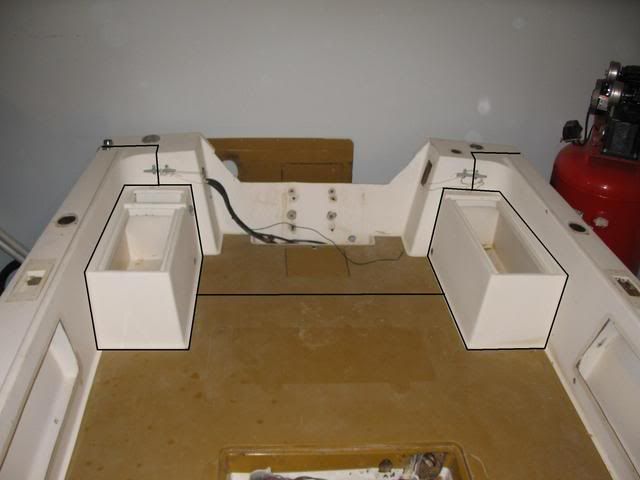
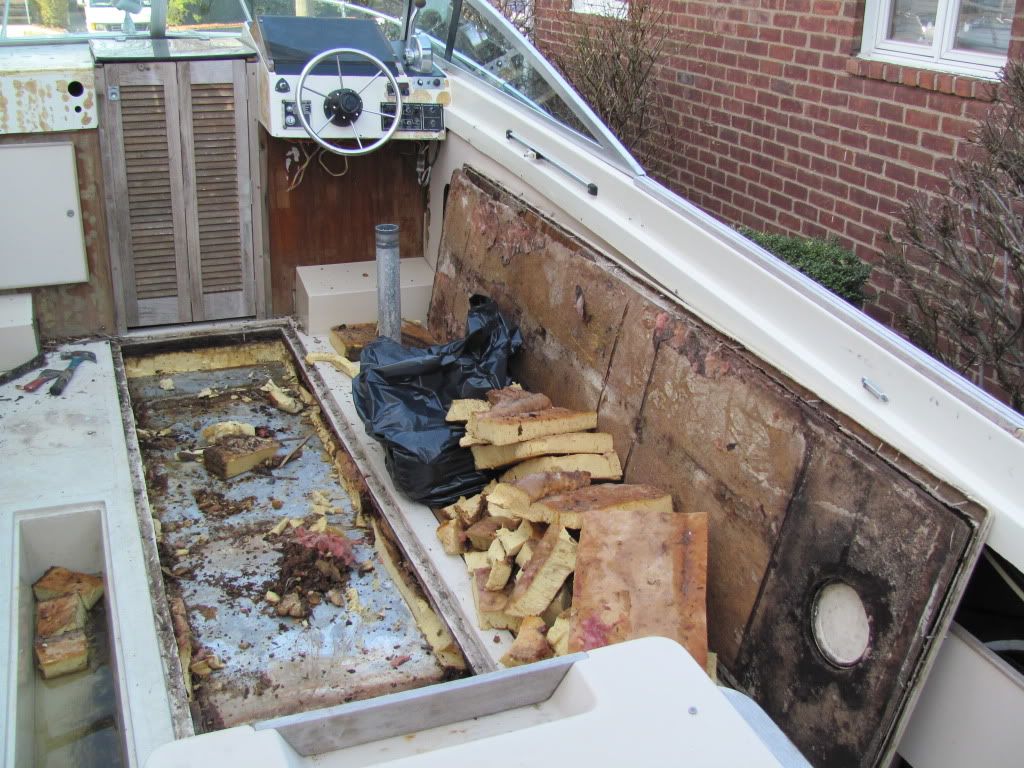
Going back on the thread, page one shows the fishbox and toe rail...there should be a seam along the fishbox so cut the caulked seam......then cut across the toerail where the trim normally is...at least on my sailfish.....on center of the trim so you can add the backing strip and cover the finished joint with the trim.....then if you look on page 2, second to the last picture you see the rear engine well area/bulkhead.....I would leave a connecting strip of the original deck right at the fuel deck lid, lip area, and cut back to the toe rail......this will leave a connection all the way across the deck and give you a place to put a backing strip under the repaired deck lid....would like to see a better picture of that rear area to see where to cut.

PS...try and ask to speak with Dan Naugle at GW...he is their structural engineer and that's who I spoke with last year.
 

mac83

Well-Known Member
Joined
Jan 24, 2010
Messages
100
Reaction score
1
Points
18
Age
40
Location
Suffolk, VA.
Model
Adventure
So...I contacted GW today about my stringers. I spoke with Danny and he said that on the older (70's - early 80's) Grady's, there were 1/2 stringers used. He recommended if I'm restoring the boat, he'd go with 3/4 inch stringers/bulkheads.
 

richie rich

Well-Known Member
Joined
May 20, 2009
Messages
1,183
Reaction score
1
Points
0
Location
south windsor, CT
OK...so what are you going with? also, did you ask him about the amount or type of glass and resin to use? I found him very helpful and informative with my project...
 

mac83

Well-Known Member
Joined
Jan 24, 2010
Messages
100
Reaction score
1
Points
18
Age
40
Location
Suffolk, VA.
Model
Adventure
I'm going with 3/4 inch and 1708. I'm not sure how many layers yet? I'm going to tab in with 12oz, also not sure what to cap the stringers with. I'm going to try something simsimilar to what grady did with attaching the floor to the stringers. What has everyone used to float the stringers off the hull, I believe they are suppose to be suspended about 1/4 inch from the hull...I was thinking about using some small pieces of 1/4 inch foam board every 1.5 ft or so. I was going to use pl adhesive to put the stringers in. How's all that sound?
 

richie rich

Well-Known Member
Joined
May 20, 2009
Messages
1,183
Reaction score
1
Points
0
Location
south windsor, CT
3/4 and 1708 is fine......3 layers of 12oz tape and 3 of 17oz will be good...you dont need to "cap" the stringers per se, just run the 17oz all the way up the sides and then resin over the top end grain......suspend the stringer with a piece of foam like you said, but before doing that, resin the crap out of stringer bottom and side end grain...thats where most of your damage came from to begin with as they were totally exposed by not being bedded in resin directly to the hull........what is pl adhesive? Use the VE or epoxy for this.
 

NOTHING ELSE MATTERS

GreatGrady Captain
Joined
Jun 26, 2006
Messages
1,993
Reaction score
5
Points
38
Age
59
Location
LONG ISLAND NEW YORK
Like Richie said, coat the bottom of the stringers with at least 3 coats of resin, the way i do it i coat them up until they get "shiny". I tabbed my stringers with 5 layers( i know, i know, ovewrkill) of 12 oz tape, then run the 1708 all the way up the stringer, then i capped them with a layer of 12 oz tape just because i walk on them during the restoration, i did all that wet on wet.
To install the stringers you have to mix "wood flower" (very fine dust) with epoxy in like peanut butter consistency and bed them in it, or (what i did) i cut 1/4" thick foam by 1" long and lay the stringer on top of that to create a 1/4" gap between the hull and the stringer(you need that in 2 or 3 places only), then make fillet at least 1/2" radius ( i did mine 3/4" to 1") with the same mix(you can add some silica so it won't run on you) and then start tabbing. It is best to do the whole thing "wet on wet", so try to have all your pieces cut before you start. For a length of 20 feet of stringer you going to need between 2-3 hours per side(depends on how many beer you have or how many cigarettes you smoke), so plan accordingly. If you need any more help you can PM or call me to talk about boat porn.
 

richie rich

Well-Known Member
Joined
May 20, 2009
Messages
1,183
Reaction score
1
Points
0
Location
south windsor, CT
NOTHING ELSE MATTERS said:
Like Richie said, coat the bottom of the stringers with at least 3 coats of resin, the way i do it i coat them up until they get "shiny". I tabbed my stringers with 5 layers( i know, i know, ovewrkill) of 12 oz tape

For a length of 20 feet of stringer you going to need between 2-3 hours per side(depends on how many beer you have or how many cigarettes you smoke), so plan accordingly. If you need any more help you can PM or call me to talk about boat porn.

NEM, not sure if the boat will float with 5 layers, but you'll be able to take on any wave coming at ya. :D

And there's another problem using PE resin...you can't smoke around the solvents...need at least a pack a day to counter act the fiberglass dust in your lungs. :shock:
 

mac83

Well-Known Member
Joined
Jan 24, 2010
Messages
100
Reaction score
1
Points
18
Age
40
Location
Suffolk, VA.
Model
Adventure
Here are a few of updated pictures...

232323232%7Ffp53993%3Evq%3D8593%3E243%3E259%3EWSNRCG%3D3398%3B7895434%3Avq0mrj


232323232%7Ffp539%3B2%3Evq%3D8593%3E243%3E259%3EWSNRCG%3D3398%3B7895534%3Avq0mrj


232323232%7Ffp539%3C4%3Evq%3D8593%3E243%3E259%3EWSNRCG%3D3398%3B7895734%3Avq0mrj


232323232%7Ffp53993%3Evq%3D8593%3E243%3E259%3EWSNRCG%3D3398%3B7895%3A34%3Avq0mrj


232323232%7Ffp733%3B2%3Enu%3D8593%3E243%3E259%3EWSNRCG%3D3398%3B7896234%3Anu0mrj

What oz.? glass is used here for the tabbing. It looks much thicker than 1708?

232323232%7Ffp539%3A8%3Enu%3D8593%3E243%3E259%3EWSNRCG%3D3398%3B7896334%3Anu0mrj


232323232%7Ffp73398%3Enu%3D8593%3E243%3E259%3EWSNRCG%3D3398%3B796%3C934%3Anu0mrj


232323232%7Ffp53995%3Enu%3D8593%3E243%3E259%3EWSNRCG%3D3398%3B7896634%3Anu0mrj


232323232%7Ffp53987%3Enu%3D8593%3E243%3E259%3EWSNRCG%3D3398%3B7896834%3Anu0mrj

Finally got the tank out and started cleaning it up. There are only a few areas that have corrosion on them. I'm going to try and salvage it.

232323232%7Ffp539%3B7%3Enu%3D8593%3E243%3E259%3EWSNRCG%3D3398%3B796%3C%3B34%3Anu0mrj


232323232%7Ffp539%3A8%3Enu%3D8593%3E243%3E259%3EWSNRCG%3D3398%3B7896%3A34%3Anu0mrj

There is no corrosion on the bottom, just this brown tar substance thats very hard to get off. Went through two steel wool brushes on it.

232323232%7Ffp53983%3Enu%3D8593%3E243%3E259%3EWSNRCG%3D3398%3B7973234%3Anu0mrj

Well, I had to be stubborn and learn for myself. Everyone told me that dont even try to use the old tabbing...Well, I finally said hell with it and cut it out. I'll be putting all new glass/tabbing on. Thanks everyone, should have just listened in the first place.

232323232%7Ffp53987%3Enu%3D8593%3E243%3E259%3EWSNRCG%3D3398%3B7897234%3Anu0mrj


I'll be getting all my wood this week so hopefully I'll be able to get the rest of the rotten stringer out this week. I've got to order all new thru hull fittings and plumbing...What size thru hulls do I need and what kind of piping/plumbing? I'm definatly going with stainless. I'm going to completely finish on the port side before I start doing anything on the starboard.

I'm still unsure of where to make my cut on the port side for the fixed floor. I have made up my mind that I'm going to cut it out to made sure I dont have any rot on the outer stringer. My problem is that my rear bulkhead is rotted so that has to be replaced. I dont want to cut up into any of the rear fishbox/well area. If I just customer up to it on the floor will I have enough access to get all of the rot out and slide in my new rear bulkhead. I know that's hard to explain but that's the best I can do. I wanted to get outside today and get pictures but we've had storms coming through all day. Thanks so much guys....I really appreciate all of the advice.
 

richie rich

Well-Known Member
Joined
May 20, 2009
Messages
1,183
Reaction score
1
Points
0
Location
south windsor, CT
Mike, can you get a fuller picture of one entire side of the deck perimeter....it will better show where to make the cut lines...need to get a clear shot of the area against the forward fishbox, the gunwale and the rear box/bulkhead.
 

mac83

Well-Known Member
Joined
Jan 24, 2010
Messages
100
Reaction score
1
Points
18
Age
40
Location
Suffolk, VA.
Model
Adventure
Yea, I'll try to get out there tomorrow afternoon and get some better pictures. Does anyone have any of the sizes of those thru-hulls?
 

richie rich

Well-Known Member
Joined
May 20, 2009
Messages
1,183
Reaction score
1
Points
0
Location
south windsor, CT
They'll be different on different models, but many drains are 1 inch....the bilge may be 3/4 for a 500 or 700 series or 1-1/8 for a 1100 or 2000....the water pick up should be 3/4 for that boat....I would wait until you disconnect them before ordering...you'll have plenty of time to order them while doing your glasswork
 

mac83

Well-Known Member
Joined
Jan 24, 2010
Messages
100
Reaction score
1
Points
18
Age
40
Location
Suffolk, VA.
Model
Adventure
232323232%7Ffp539%3B6%3Enu%3D8593%3E243%3E259%3EWSNRCG%3D33%3A2%3C7597%3A34%3Anu0mrj

Picture of the area that I'll be cutting after a good cleaning.

I dont think that the outer stringers are rotted but I dont want to do all this work and end up having to having to tear it up in a couple years. I have to cut enough because I'll be putting in a new rear bulkhead also. I just need enought space to get that in there. Has anyone ever put in a rear bulkhead in two pieces? I really dont want to cut up my fishboxes if I can help it. I'm thinking of making my cut along the sides and across the fishboxes. In the stern of the boat, I'll cut just after the little lip where the removeable splash piece is (dont know the name?). I'm going to try to cut half way down the lip that way I'll be able to get some new glasson that whole seam. I'm think I'm going to measure either an inch or two inches along the side and in front of the boxes to make my cut. Please let me know what everyone thinks.
I know someone mentioned, try to find the seam on the sides but I dont think there is a seam. If there is, I dont know how to find it. Thanks everyone.
 

richie rich

Well-Known Member
Joined
May 20, 2009
Messages
1,183
Reaction score
1
Points
0
Location
south windsor, CT
I would use a wide piece of masking tape to draw out a cut line around the perimeter of the deck and around the fishboxes. I believe this line is close to where the non-skid ends. This will leave you with a "lip" on the horizontal surface to glue in a strip of wood underneath for splicing/support when you put the deck back in. I can't see if that is a little step down or not when you go from the main deck to the back half of the fish box...that may be a good area to make and hide a cut line from the vertical edge facing the stern that no one will see. Otherwise I would cut across along the back edge of the hatch cover and leave that 2 inch wide strip connecting the fish boxes. I don't think you need to cut the boxes...try without it first, you can always cut it out later if need be, but when you remove the deck you will see everything to make the next round of decisions. The bulkhead is probably in 3 pieces already. The main span between the inner stringers as shown in the picture, then 2 short pieces going outward....entire transoms can be made using several pieces to make up lengths bigger than 8 feet....you just want to make sure when you glass it becomes one homogeneous piece.

Tape out where your cut lines will be so we can see, but I think you're on the right track.
 

gw204

Well-Known Member
Joined
Jan 31, 2005
Messages
2,481
Reaction score
22
Points
38
Location
St. Leonard, MD
I would cut the gunwales on both sides about 3" aft of the forward fish boxes and remove them entirely. Then do the same for the liner and remove it as well. That will require the least amount of glassing/fairing when it comes time to put it all back together, and will give you the most access to replace what needs to be replaced.

The black lines here show where I made the cuts on my Mako.

Option3.jpg


I wish I would have made one single cut across the width of the thing right in front of the boxes. That would have given me tons of access.
 

mac83

Well-Known Member
Joined
Jan 24, 2010
Messages
100
Reaction score
1
Points
18
Age
40
Location
Suffolk, VA.
Model
Adventure
I got off work a little early today and I was anxious to get the deck off to see what was underneath. It took me about an 1.5 hours to get it off after I measured three inches all the way around.

232323232%7Ffp539%3A%3A%3Enu%3D8593%3E243%3E259%3EWSNRCG%3D33%3A434749434%3Anu0mrj

I got the whole deck off in one piece. Thanks guys for the advice...I think this will make everything much easier to put back in once I get everything squared away.

232323232%7Ffp53997%3Enu%3D8593%3E243%3E259%3EWSNRCG%3D33%3A434749534%3Anu0mrj

Starboard side. I was so happy to find no rot on this side except for the main stringer and that portion of the rear bulkhead (which I already knew).

232323232%7Ffp539%3B6%3Enu%3D8593%3E243%3E259%3EWSNRCG%3D33%3A434749634%3Anu0mrj

Now I'll finally be able to get in there and do some work. I'm going to have to replace both of those small verticle pieces (dont know what they are called?)

232323232%7Ffp539%3C4%3Enu%3D8593%3E243%3E259%3EWSNRCG%3D33%3A434749734%3Anu0mrj

This is where I knew my trouble was. I could feel a small softspot just behind the passenger seat/fishbox. Once I got the deck out, the core of the floor on the port side was a mess...very wet. I'm so happy I decided to take the floor out. Towards the stern near the second box there is about an inch of rot. I'm just going to make sure I get it all out and probably just fill it with epoxy.

232323232%7Ffp539%3B4%3Enu%3D8593%3E243%3E259%3EWSNRCG%3D33%3A434749834%3Anu0mrj

This is a close up of the starboard side of the deck. I'm not sure if this is how Grady capped the stringers or if this was just to fill the gap to afix the floor to the stringers when they put the cap on. I got a another measurment from a good portion of the main stringer and they are only 1/2 inch. I can't believe that they only used 1/2 inch. I'm going with 3/4 inch on the mains and all of the bulkheads since those are the only onces that I have to do.

Since I've got everything open, I'm going to replace all of the thru hulls. In terms of putting the new floor back in, I'm going to use yalls idea of putting some type of wood (2X4?) on the bottom of the fixed floor and then I'll glass,resin, and screw the new floor in. I think I'm going to have to cut about six inches of foam out so I can fit some type of wood under the fixed part of the floor. Thanks so much guys and let me know your opinions.
 

gw204

Well-Known Member
Joined
Jan 31, 2005
Messages
2,481
Reaction score
22
Points
38
Location
St. Leonard, MD
D@mn son...you made quick work of that! :goodjob

Do yourself a favor and pull that foam while you've got the floor up. Any moisture that has gotten into it will have settled to the bottom. Once you have it all (or whatever you can get to) out, put a layer or two of glass over those outboard stringers to seal them up. Install your new main stringers and then refoam.

Good luck.
 

richie rich

Well-Known Member
Joined
May 20, 2009
Messages
1,183
Reaction score
1
Points
0
Location
south windsor, CT
Yeah, you're gonna need to take some foam out anyway to put you're perimeter wood support for the deck....with everything open like that, the foam should come out easy and then you'll see the entire grid top to bottom. You will need to grind the lip you left over from underneath to properly accept the resin and bond...2x4 is overkill....just use the 3/4 in ply....maybe 4 or 5 inches wide since you left 3 inches around everything...it looks pretty good though...the strips of resin/glass are just to make up the space difference and bond the deck down....those pieces at the transom are support brackets or "knees" that help stiffen the transom and tie it into the hull bottom. Overall, not bad at all at this point...see how it looks after some more cutting and prep.
 

NOTHING ELSE MATTERS

GreatGrady Captain
Joined
Jun 26, 2006
Messages
1,993
Reaction score
5
Points
38
Age
59
Location
LONG ISLAND NEW YORK
Memories, memories, memories and endless bags of foam..............
IMG_0106.jpg


You work very fast i see.
I would have to agree about the foam though. If it's wet(99 % is) you should replace it. Also by pulling it out you get to see the condition of the rest of the stringers and don't be surprised if you find more rot. Now that you start dancing you have to continue dancing and if you find your self questioning your self what the heck you are doing, take a break a few days and then start fresh again, i found that this method works really really well. Good luck and get some more pictures of the progress.
 

mac83

Well-Known Member
Joined
Jan 24, 2010
Messages
100
Reaction score
1
Points
18
Age
40
Location
Suffolk, VA.
Model
Adventure
If I use 3/4 in. for my supports for the deck, what would everyone use to secure them? epoxy,pl adhesive,screws :hmm